Distilling · Volume 3
Vol 3 — The Tier-1 Kitchen Still: Your First Distillation
Phase 2 — Distilling deep-dive series. This volume covers everything you need to buy, build, and run your first still at kitchen scale: a vendor comparison spanning four paths (mass-produced budget kits, the VEVOR mid-budget, hardware-store DIY, and US-built quality copper), a costed bill of materials for your full Tier-1 setup, a legal/safety briefing, and a step-by-step walkthrough of your first distillation run on a simple sugar wash.
3.1.1 What Tier-1 Means
The Tier-1 kitchen still is defined by:
- Scale: 2–5 US gallon wash capacity per run
- Equipment cost: $65–$1,350 for the still itself depending on quality tier (budget Chinese kits at $65–$130; US-built copper stills $199–$1,350); $100–$1,500 for the complete fermentation-to-spirit kit
- Energy source: kitchen stovetop (gas or electric) — no dedicated heating element required
- Skill level: entry; learning cuts, observing vapor behavior, and building process intuition
- Spirit output: approximately 0.5–1.5 liters of 40–65% ABV per run (single spirit run on 5 gallons at ~10% ABV)
- Equipment type: simple pot still or pot-still-with-thumper; no column/reflux packing at this tier
The Tier-1 still is a teaching tool as much as a production tool. The goal of Phase 2 is to learn the process — foreshots, heads, hearts, tails, heat management, temperature curves — before investing in a Tier-2 bench rig or Tier-3 reflux column. Do not optimize Tier-1 for volume; optimize it for learning.
Federal legal note: In the United States, distilling beverage alcohol at home without a federal Distilled Spirits Plant (DSP) permit is a federal felony under 26 U.S.C. § 5602, regardless of quantity. No personal-use exemption exists at the federal level. State laws vary; several states permit limited personal-use distillation (New Zealand and some EU countries are fully legal for home use). This book is written for educational purposes. Know your jurisdiction before operating any still. See
_shared/legal_safety.mdfor the current TTB envelope and state-by-state status.
3.1.2 The Vendor Landscape: Four Paths to Your First Still
Paths A through C are budget-tier options ($65–$120, predominantly Chinese-manufactured stainless with copper coils or DIY assemblies). Path D introduces three US-built all-copper alternatives ($199–$1,350) for buyers who want a still that will last decades rather than years. §3.2.4 explains why copper material grade and build origin matter — read that section before deciding between the budget tier and the quality tier.
3.1.2.1 Path A — Amazon / Online Marketplace Budget Kits (~$60–$80)
A cluster of Chinese OEM brands — Seeutek, HUKOER, Dibosh, WUIO, GorillaRock — produce functionally identical pot stills in the 8–12 L (2–3 gallon) range, sold at $55–$80 on Amazon. Many share the same factory origin and differ mainly in labeling and minor feature packaging.
Typical construction:
- 201 or 304 stainless steel boiler (check listing for grade; 304 is food-grade)
- Red copper or copper-clad condenser coil
- Bimetal thermometer built into the boiler lid
- Some models include a thumper keg; some include a circulating pump
Representative option — Seeutek 3-Gal / 12L with Thumper Keg:
- Amazon ASIN: B08YQTH52Y (thumper model) / B011ZXMML0 (pump + dual thermometer variant)
- Price: approximately $65–$80 (market volatile; check at time of purchase)
- Capacity: 3-gallon (12 L) boiler; usable fill 2–2.5 gallons
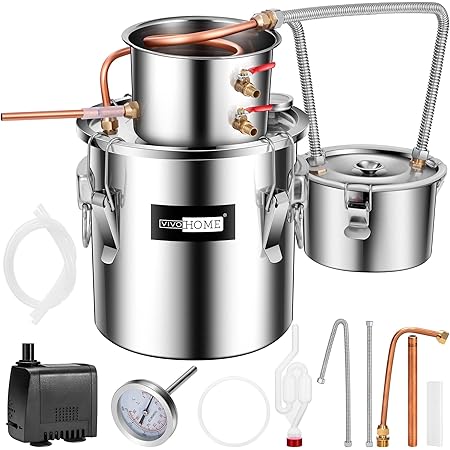
- Includes: boiler barrel, thumper keg, condenser barrel, copper coil, circulating pump, one-way exhaust valve, thermometer, silicone hose, sealing rings
- Pros: Complete out-of-box kit; no extra purchases needed; copper condenser tube improves flavor vs. all-stainless; circulating pump means no ice bath required
- Cons: Assembly instructions are sparse and confusing; thumper has no internal dip tube (vapor rides over liquid rather than bubbling through — essentially a slobber pot unless modified); condenser coil is short and may not keep up on long runs in warm rooms; lid gasket may need re-tightening on arrival; ReviewMeta flagged ~7% of reviews as potentially unnatural
Representative option — HUKOER 2-Gal / 8L:
- Amazon ASIN: B07JFH9SXD
- Price: approximately $55–$70
- Capacity: 2-gallon (8 L) boiler; usable fill ~1.5 gallons
- Includes: boiler, copper coil condenser, silicone tubing, thermometer; no pump
- Pros: Most compact at-tier; easy to store; very inexpensive trial entry
- Cons: 2-gallon capacity is quite small (one run on a typical 5-gallon ferment would require multiple loads); no thumper or pump; you will need an ice-water bucket to cool the condenser
Known category-wide issues:
- Thumper design flaw: inlet connects at top of thumper liquid, so vapor bypasses the liquid rather than bubbling through. The fix (home distilling forums): cut 3–4 inches of 3/8” copper tube and press it into the inlet connection so it extends downward into the liquid.
- Condenser coils run short; in warm rooms the output is warm to hot by the end of a run. Have a secondary ice bath or bucket of cold water ready.
- PTFE tape (plumber’s tape) all threaded connections before first run.
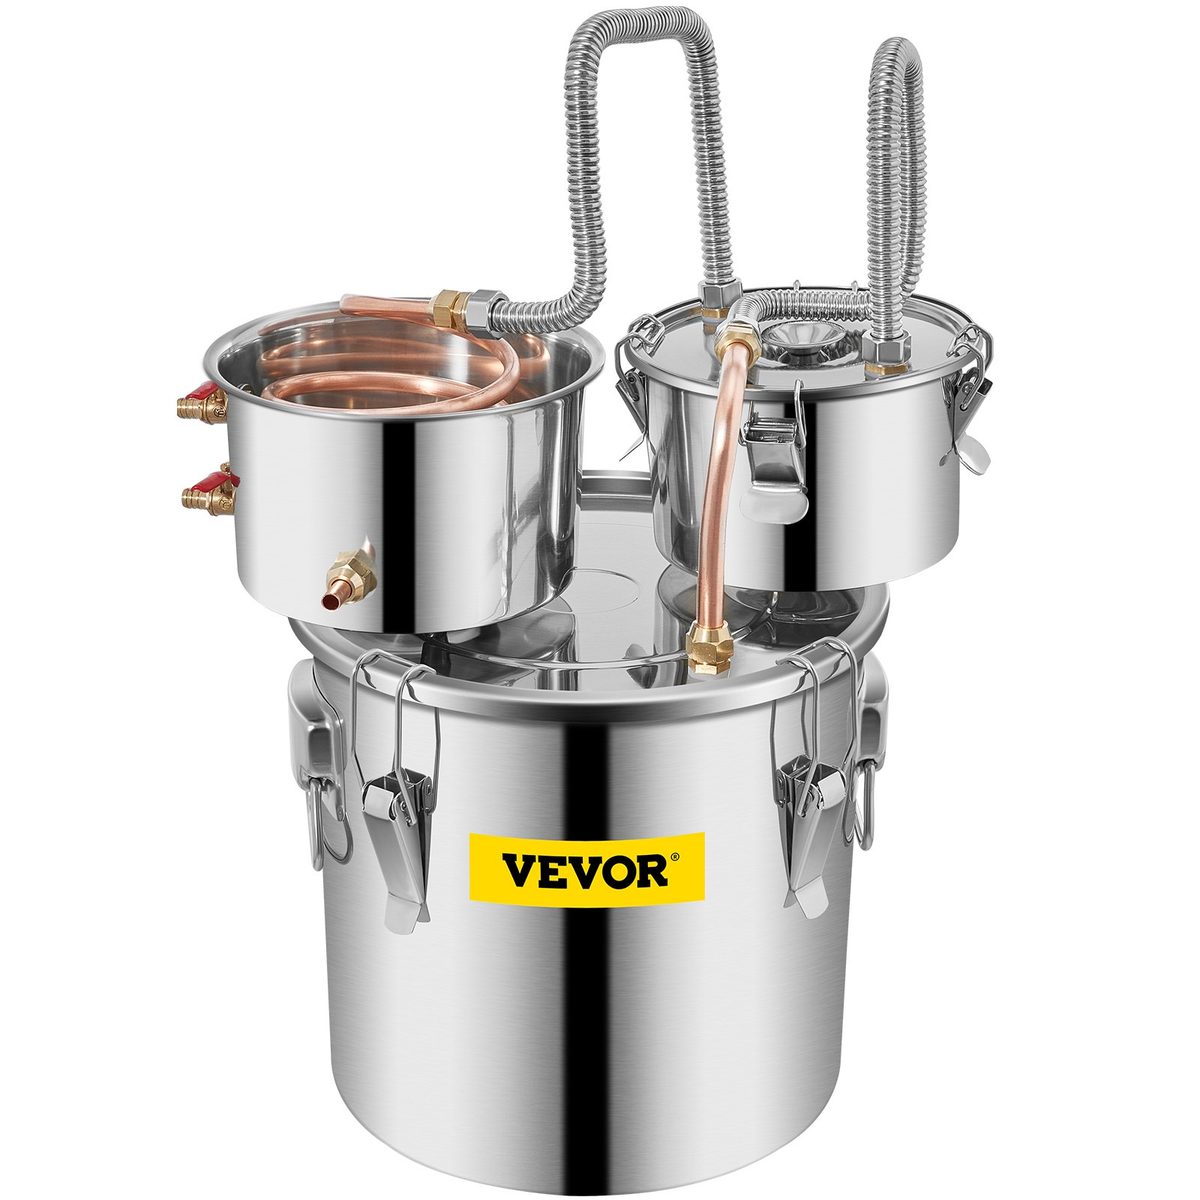
3.1.2.2 Path B — VEVOR Distillation Kit (~$80–$130)
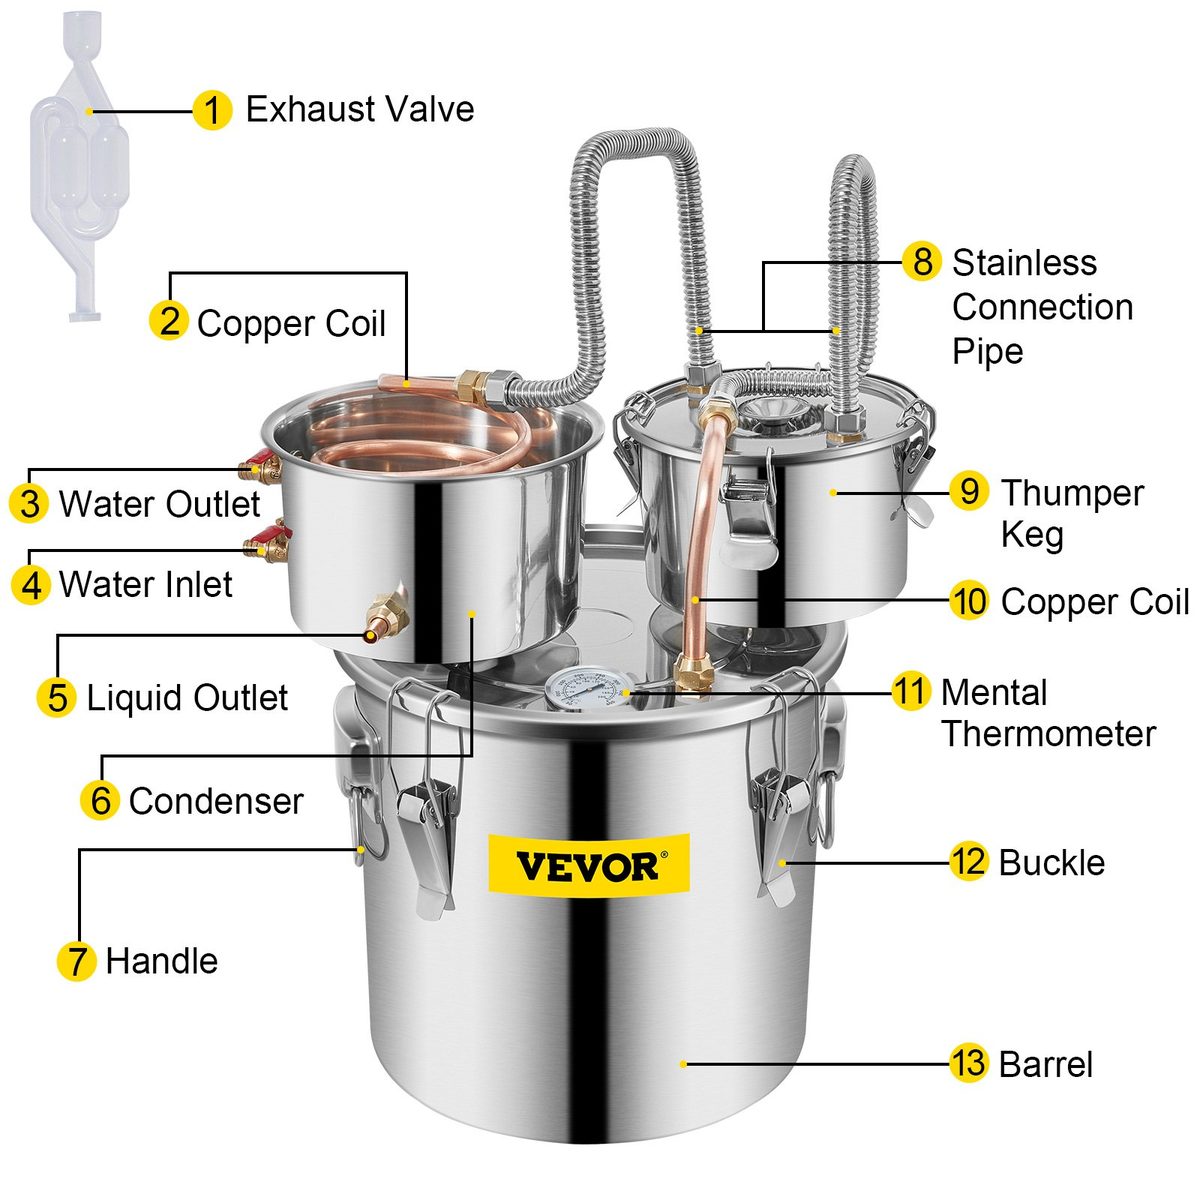
VEVOR is a Chinese direct-to-consumer tools brand (vevor.com) that also sells through Amazon, Home Depot, and Lowe’s. Their still line is meaningfully better quality than the generic Amazon segment: better welds, confirmed 304 stainless throughout, better lid seals, and brand accountability with accessible returns through physical retail.
Primary model: VEVOR 3-Gal / 12L Three-Pot with Thumper Keg
- vevor.com:
https://www.vevor.com/alcohol-distiller-c_10688/(search “3 gal”) - Amazon ASIN: B0CFKTPWML; also at Home Depot (SKU ZLSJ3GALZLQ000001V0) and Lowe’s
- Confirmed price: ~$87.99 (cited in VEVOR’s own March 2025 first-run review; Home Depot lists comparable variants at $65–$78 regular price, with occasional sales below that)
- Capacity: 3-gallon (12 L) boiler (9.8” × 9.8”); thumper 7” × 4”; condenser 7.9” × 4.3”
- Material: 304 stainless (pots, connectors, flex tubing) + copper coil inside condenser barrel
- Includes: boiler barrel, thumper keg, condenser keg, copper condenser coil, built-in dual C/F thermometer, circulating water pump, one-way exhaust valve, silicone hoses, manual
What VEVOR does better than the budget segment:
- Three-pot modular design is easier to disassemble, clean, and inspect
- 304 stainless confirmed throughout (not 201)
- Better weld quality and tighter lid gasket than most budget competitors
- Sold at Home Depot and Lowe’s — in-person returns if needed
- Better customer support (actual company with a support channel)
- Circulating pump included as standard
Same weaknesses as the broader category:
- Thumper still has the inlet-dip-tube issue; same fix applies (add copper tube extension)
- Condenser coil capacity is borderline for long runs; supplement with ice for summer operation
- Instructions remain vague on thumper fill level and operation
- Water supply lines in the kit are short; buy 6 feet of extra 3/8” ID tubing
Lower-cost VEVOR entry (no thumper):
- VEVOR 3-Gal / 10L basic: approximately $69–$79 from vevor.com directly; no thumper keg
- Appropriate choice if you prefer simplicity over the (imperfectly implemented) thumper
3.1.2.3 Path C — The DIY Hardware Store Build
The traditional beginner’s approach: a large stainless stockpot as the boiler, a coil of soft copper tubing bent into a worm condenser, and a bucket of cold water as the condenser bath. No soldering required for a workable result.
Why consider DIY:
- Educational — you understand exactly what every component does because you built it
- Repairable — every component is standard hardware
- Expandable — replace the 10-ft coil with 20 ft for better condensation at no design change
- No branded tracking — no product page associating a purchase with you
Why DIY is not always cheaper: At current prices, a quality pot ($35–45) + copper coil ($20–28) + bucket ($6) + fittings and sealant ($10–15) + thermometer ($10–15) totals $80–$110. Commercial kits at $65–$88 include all of this pre-assembled. The cost parity means the decision is really about the educational value of building vs. the time cost.
Parts list (Home Depot / Lowe’s pricing, 2024–25):
Table 1 — 3.2.3 Path C — The DIY Hardware Store Build
| Item | Spec | Source | Price |
|---|---|---|---|
| Stainless steel stockpot with lid | 20-qt (5 gal), tight-fitting lid | Walmart, Amazon, restaurant supply | $25–$45 |
| Soft copper tubing | 3/8” OD × 10 ft, Type L | Home Depot (Everbilt #203654407), Lowe’s (Mueller Streamline #5002616871) | ~$20–$28 |
| 5-gallon plastic bucket | Food-grade, with lid | Home Depot, Lowe’s | ~$5–$8 |
| 3/8” compression fitting or grommet | Seals tube through pot lid | Plumbing aisle | ~$3–$6 |
| Thermometer | Candy or bimetal dial type; 100–220°F range | Kitchen store, Amazon | ~$8–$15 |
| High-temp food-safe silicone sealant | GE Silicone I or equivalent; 400°F rated | Hardware store | ~$5–$8 |
| PTFE plumber’s tape | Seal threads | Hardware store | ~$2 |
| Total | ~$68–$112 |
Optional upgrade: second 10-ft copper coil ($20–$28) for a longer worm = better condensation; highly recommended for runs in warm weather.
Assembly steps:
- Drill a hole in the center of the pot lid sized for your compression fitting.
- Install fitting; run the copper tube through the lid so the coil will hang into the boiler side (just the last 2–3 inches as the downward lead; the coil itself is outside the lid).
- Bend the copper tube into a coil that fits inside your 5-gallon bucket. Wrap it around a 3–4 inch diameter form (a wine bottle works). 10 ft makes 5–6 turns of roughly 4” diameter.
- Run the outlet end through a hole drilled near the bottom of the bucket; seal with silicone.
- Seal all penetrations. Let silicone cure 24 hours.
- Fill bucket with cold water to submerge the coil. Change or supplement with ice during the run.
3.1.2.4 Why Copper Quality Matters (and Why Cheap Stainless Often Disappoints)
Before introducing the quality copper alternatives in Path D, it’s worth understanding why copper has dominated distillation for the past thousand years and why the bulk of mass-produced Chinese stainless kits (Path A and B) cut quality in ways that show up later.
The chemistry: copper isn’t a luxury, it’s a reagent.
During fermentation and distillation, yeast produces sulfur compounds — primarily hydrogen sulfide (H₂S) and dimethyl sulfide (DMS) — that smell of rotten eggs and cooked corn at concentrations below 1 ppm. These compounds vaporize at temperatures well within distillation range and carry over into the spirit unless something removes them.
Copper actively binds sulfur:
Cu(s) + H₂S(g) → CuS(s) + H₂(g)
The reaction happens at the copper surface during the vapor pass; the resulting copper sulfide (CuS) appears as a black or dark green residue on the inside of the still, the column, or the lyne arm. This is the active mechanism by which copper “cleans” a spirit. Stainless steel does not do this. A pure stainless still will produce a spirit that smells noticeably sulfury compared to one run through copper.
This is why even the cheapest Path A/B kits include a copper condenser coil — without it, the spirit would be undrinkable. The catch: in cheap kits, the only copper-vapor contact happens in those few feet of coil at the very end of the vapor path. In a full-copper still (Path D), the vapor contacts copper throughout the boiler, lid, lyne arm, thumper, and condenser — many times the contact area, many times the sulfur scrubbing.
Material grade matters more than thickness in the spec sheet suggests.
Not all copper is the same:
Table 2 — Not all copper is the same
| Grade | Designation | Where used | Why it matters |
|---|---|---|---|
| C-110 | Electrolytic tough pitch (ETP) | Quality artisan stills (Clawhammer, NG Still Co, American Copper Works) | 99.9% pure copper; food-safe; standard for US-built craft stills |
| C-122 | Phosphorus-deoxidized | Plumbing copper, some artisan stills | Equivalent food-safety to C-110; slightly different alloy |
| Unspecified “copper” | — | Most Chinese mass-produced stills’ coils | Frequently contains trace lead, arsenic, or zinc; tests in 2018–2022 by US home-distilling vendors found ~30% of imported coils failed XRF lead-content screens |
| Brass condenser fittings | Cu/Zn alloy | Some imports | Contains lead. Lead leaches into hot ethanol vapor. Never use brass anywhere vapor touches. |
Gauge (wall thickness) controls durability and lifespan. The US craft-still standard is 20 oz / 22-gauge copper sheet (about 0.8 mm / 0.032”). That weight resists denting, holds shape over decades of thermal cycling, and gives enough material for the artisan to hammer, dap, and rivet by hand without cracking. Cheap stills use 16 oz or even 14 oz copper sheet — visibly lighter, prone to dimple, and will develop pinhole leaks at high-stress joints (especially around the lyne arm and rivet seams) within 5–10 years of regular use. A 22-gauge copper still, treated reasonably, is a tool you hand down. A 16-gauge or unspecified-gauge still is a 5-year consumable.
Construction: solder, welds, and assembly tell you who built it.
What to look for in a quality build:
- Lead-free silver solder. Old stills (pre-1986 US) often used 60/40 tin-lead solder. Modern quality builders use silver-bearing lead-free solder (rated for potable water). Chinese imports frequently claim lead-free solder; XRF spot-checks by hobbyist distillers have found this claim is unreliable.
- Hand-hammered, riveted seams (vs. crimped and glued). A riveted-and-soldered seam built by a metalworker is mechanically continuous and gas-tight. A crimped seam with high-temp adhesive (common in budget kits) loosens with thermal cycling.
- TIG-welded stainless components (not gas-torch brazing). Inspect any visible weld bead — TIG welds look like uniform fish scales; gas-torch brazes look lumpy or “blobby.” Bad welds can fail catastrophically under pressure or develop pinhole leaks that contaminate the spirit.
- Properly designed thumper inlet (vapor enters below the liquid level via an internal dip tube). Most Chinese thumpers, including VEVOR’s, have the vapor inlet at or above the liquid level — the vapor bypasses the liquid entirely, defeating the thumper’s purpose. Quality builders get this right out of the box.
Why mass-produced stills from China typically disappoint.
The price floor in this segment is driven by Chinese OEM factories competing for Amazon and big-box-retailer shelf space. To hit $65–$130, corners get cut in places the buyer can’t see at purchase time:
- Material grade is rarely verified. A listing claiming “304 stainless” may actually be 201 — both look identical, but 201 has lower chromium/nickel and pits and rusts faster, especially with acidic wash exposure.
- Copper coils may not be C-110. Without an XRF lead-content certificate from the seller, you don’t know what’s in the metal touching your ethanol vapor.
- Welds and seams are produced quickly to volume targets. Quality control is statistical — a percentage of units get inspected. The other percentage ships as-is.
- Designs are copied without the engineer understanding them. The thumper dip-tube omission is the smoking-gun example: the original Appalachian-folk thumper design requires the dip tube; copies of copies lost that detail decades ago and the factories never restored it.
- No real warranty path. Chinese DTC brands offer “lifetime warranties” that mean “we’ll send another one if you ship the broken one to Shenzhen at your expense.” US artisan builders honor warranties by mail and answer the phone.
- Hidden externalities. No accountability for sourcing, no environmental standards verification, no labor-practice transparency.
This is not a moral argument against buying a Chinese still — many homebrewers start with one and learn the craft just fine. It’s a quality argument: if you plan to stay with distillation for more than a year, the math favors spending more once on a US-built copper rig that will outlast you, rather than replacing a $90 stainless rig every few years as the welds fail and the thin metal warps.
3.1.2.5 Path D — Quality Copper Alternatives ($199–$1,350)
These are US-built, all-copper (or copper-dominant) pot stills designed and assembled by people who understand the chemistry above. All three are appropriate for a Tier-1 beginner — the operating procedure is essentially identical to a VEVOR run — but each is a tool you’ll still own and use in 20 years.
Distillery Network 3-Gallon Mini Copper Pot Still
- Vendor: The Distillery Network (Manchester, NH, USA) —
https://www.thedistillerynetwork.com/ - Price: $199 on flash sale, $399 regular (check at time of purchase)
- Product: “3 Gallon Mini Copper Distiller — No Thumper” (
/products/next-day-shipping-1-5-gallon-copper-moonshine-still-no-thumper-flash-sale) - Capacity: 3 gallons (matches the VEVOR size class directly)
- Material: 100% lead-free heavy-gauge copper; hand-built in New Hampshire
- Includes: Pre-assembled still unit, polishing paste, lifetime warranty, free shipping
- Heating: Stovetop (gas or electric); same heat-source profile as VEVOR
- Output: ~0.15 gallons of high-proof spirit per run (single distillation on a 10% ABV wash)
Why this is the natural upgrade from VEVOR:
- Same form factor, same size, same operating procedure — no learning curve change. If you understand how to run a VEVOR, you understand how to run this.
- Full-copper construction instead of stainless-with-copper-coil. Vapor contacts copper from boiler to outlet, dramatically improving sulfur scrubbing (see §3.2.4).
- US-built, US-warrantied. Lifetime warranty backed by a phone number you can call (603-997-6786). If a seam ever leaks, they fix it.
- No assembly required. Unlike Clawhammer (D2), this arrives ready to run after a single polish with the included paste.
- No thumper means no thumper bug. The plain pot-still configuration is mechanically simpler and avoids the VEVOR/Seeutek dip-tube design flaw entirely. (Add a thumper later as a separate copper vessel if/when you want one.)
Trade-offs vs. VEVOR:
- ~2.3× the cost ($199 sale vs. $88) for materially better build and lifetime tool life
- No included pump or condenser — you’ll need a cooling bath (5-gal bucket of ice water with a submerged coil is standard) or buy a small submersible pump separately ($15–$30)
- No thumper means slightly less rectification per pass — but you can simply do a stripping run + spirit run for cleaner output, which is better practice anyway
Setup before first run:
- Inspect for shipping damage; report within 7 days of receipt
- Polish the exterior with the included paste (cosmetic only; the interior is the working surface)
- Run a vinegar pre-cleaning batch (1 gallon white vinegar diluted with 3 gallons water, distilled the same way as a real run, output discarded) — this passivates fresh copper surfaces and removes any residual machining oils
- Standard run procedure applies (see §3.5)
Clawhammer Supply 5-Gallon Copper Pot Still Kit
- Vendor: Clawhammer Supply (NC, USA) —
https://www.clawhammersupply.com/products/5-gallon-kit - Price: $249 (consistently — not a sale price)
- Capacity: 5 gallons (significantly larger than VEVOR/D1)
- Material: 100% food-grade C-110 copper (electrolytic tough pitch, 99.9% pure)
- Includes: Still bottom, boiler, vapor cone with collar, heavy-duty plate lid with skirt, 1.5” copper column, condenser, all copper fittings, pure copper rivets, step-by-step video assembly tutorials
- Important: kit form, not pre-assembled. You silver-solder the seams yourself.
- Heating: Stovetop or dedicated burner; 5-gallon scale is comfortable on a gas stove or hot plate
- Output: ~0.5 gallons per run on a 10% ABV wash
What makes the Clawhammer different:
This is the value champion of the quality-copper tier, but it asks something of you. The kit ships as pre-cut and pre-formed copper sheet pieces, with all required rivets and silver-bearing solder. You assemble it with a propane plumbing torch over the course of a 4–6 hour build session. Clawhammer publishes free, polished video tutorials walking through every step.
Why this is worth the assembly time:
- Genuine C-110 copper at $249 for 5 gallons is an unbeatable price-per-quality ratio. The same quantity of copper, finished and assembled, costs $700–$1,000+ from other US makers.
- You become qualified to repair and modify it. Once you’ve soldered the seams yourself, you can patch a future pinhole or add a sight glass without sending it back to anyone.
- C-110 is the industry-standard grade — same copper specification used in commercial craft distilleries. This is not a downgrade from artisan-built; it’s the same metal.
- Step-by-step video instruction means the assembly skill barrier is much lower than it sounds.
Trade-offs vs. D1 (Distillery Network):
- You need: a propane plumbing torch (~$30 at any hardware store), heat-safe work surface, basic shop ventilation, and a free Saturday
- No warranty on your own solder joints (Clawhammer warranties the materials only)
- First-build solder appearance is rarely as clean as a professional’s; aesthetic perfectionists may be disappointed by their own work
Setup:
- Watch Clawhammer’s full assembly video series end-to-end before unboxing
- Allocate a half-day for the build; do it in good lighting; have a fire extinguisher within reach (propane torch + flammable flux paste = manageable risk if you’re not careless)
- Pressure-test for leaks: seal the still, fill with air via a bicycle pump to ~3 PSI, brush soap-water over every solder joint; any bubbles = re-solder that joint
- Run a vinegar pre-cleaning batch as in D1
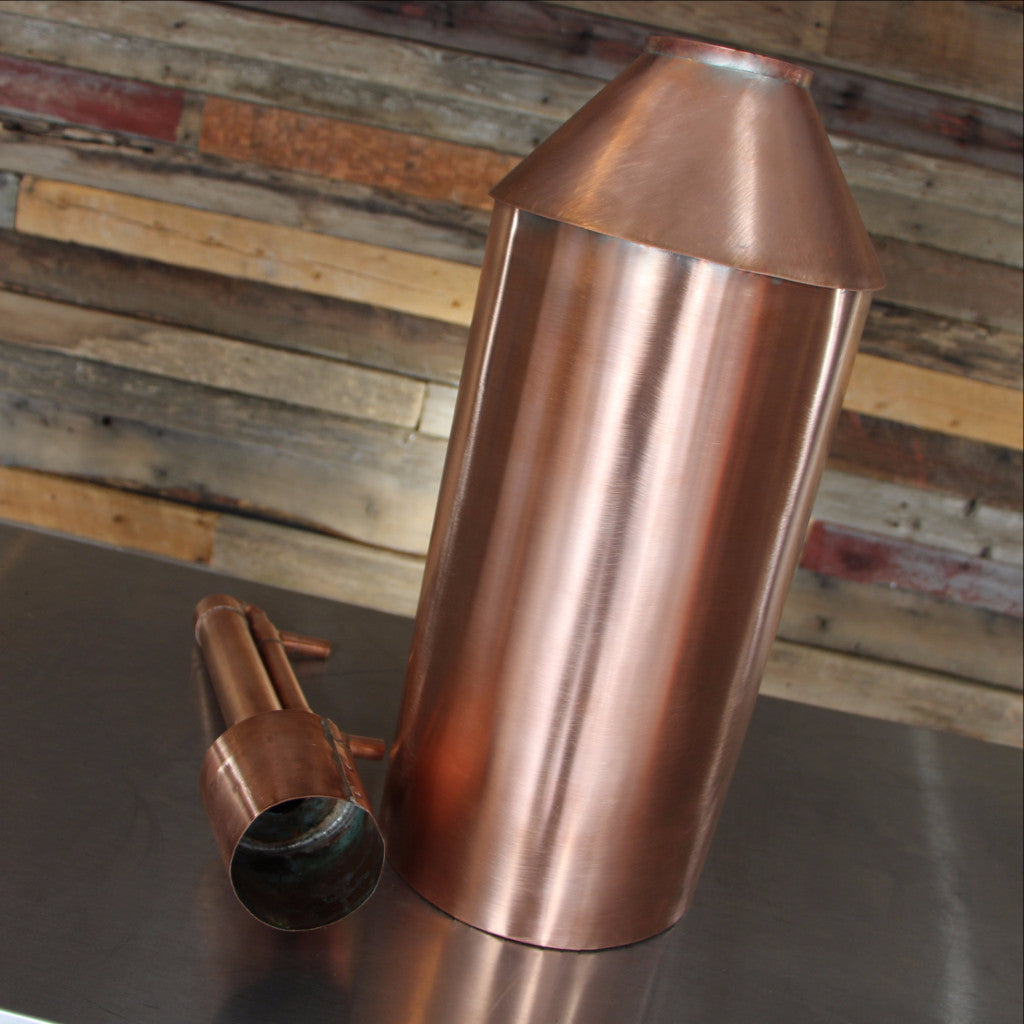
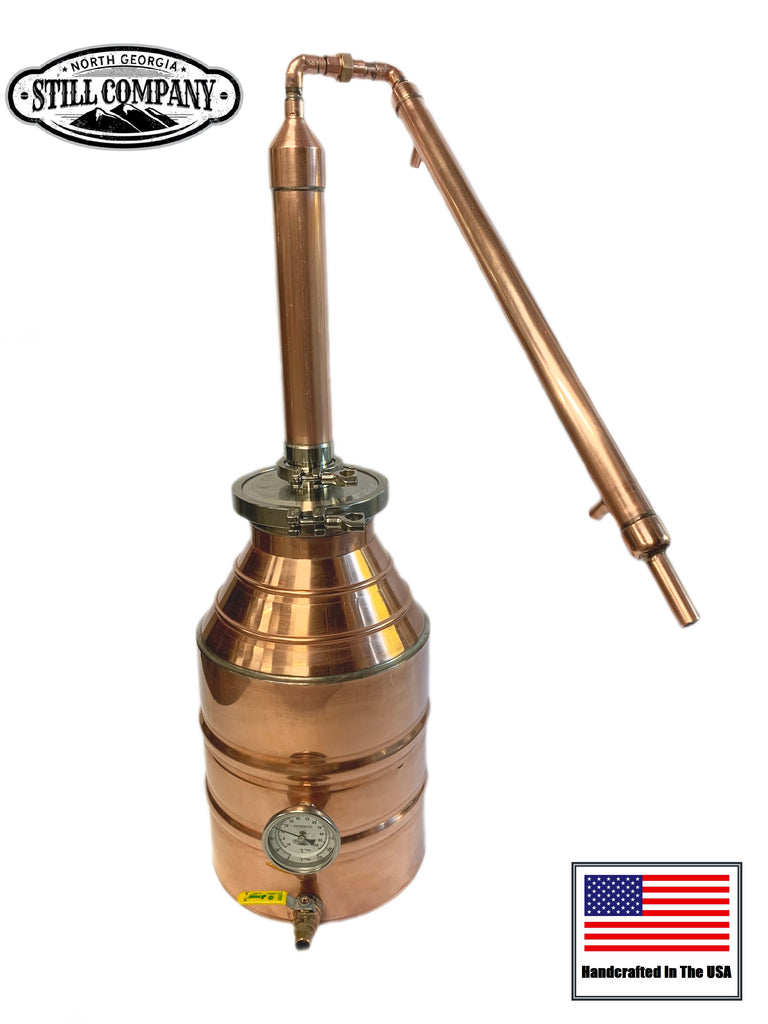
North Georgia Still Company 5-Gallon Distillers Kit
- Vendor: North Georgia Still Company (Dahlonega, GA, USA) —
https://north-georgia-still-company.myshopify.com/products/5-gallon-distillers-kit - Price: $1,350 with free shipping
- Capacity: 5-gallon still + 3-gallon thumper + 3-gallon worm condenser (12 ft copper coil)
- Material: 20 oz / 22-gauge copper throughout (industry-standard heavy gauge)
- Includes: Tri-clamp-capped still pot, thumper with fruit port (for adding flavorings to the thumper liquid), worm condenser, submersible water pump, 10 ft clear vinyl tubing, three thermometers, temperature gauges, relief valves
- Heating: Compatible with gas stovetop, induction adapter, dedicated propane burner, or electric hot plate at 5-gallon scale
- Output: 0.5–1 gallon per run on a 10–20% ABV mash
Why this is the no-compromise quality pick:
- Hand-built one at a time by NG Still Co coppersmiths — this is artisan craft work, not factory production
- 20 oz / 22-gauge copper throughout the entire vapor path — boiler, thumper, worm — not just the coil
- Tri-clamp lid seal is the commercial-distillery standard: instant on/off, gas-tight, no PTFE tape needed, no warping
- Thumper with fruit port lets you add botanicals or fruit between distillation stages (gin botanicals, peach for whiskey, etc.) without disassembly — a feature usually found only on stills costing $3,000+
- Three thermometers (boiler, thumper, condenser output) give you the temperature data needed to nail your cuts precisely — most kits at any price include only one
- A tool for the rest of your distilling life. Hand-built copper of this gauge, used reasonably, is generational. Buy it once.
Trade-offs vs. D1 and D2:
- 5–7× the cost of the smaller quality options ($1,350 vs. $199–$249)
- 5-gallon scale needs a dedicated heat source for best results — gas stovetop works but is slow; a dedicated propane burner or 1500–2000W induction unit is better
- Physical footprint and storage are real considerations — this is a kitchen-counter setup, not a closet-shelf setup
When this is the right pick:
You’re past testing the hobby — you’ve done a few VEVOR or D1 runs, you know you’re staying with distillation, and you want one purchase that won’t need replacing or upgrading for the next decade-plus. Or: you’re starting at this tier deliberately because you already brew, you understand the time investment, and you’d rather skip the cheap-tool frustration phase entirely.
Setup:
- Unbox carefully — copper at this gauge can be dented by careless handling
- The tri-clamp gasket arrives pre-installed; inspect for cleanliness
- Vinegar pre-cleaning batch as for D1 and D2; 5 gallons of dilute vinegar (1 gal vinegar in 4 gal water)
- Familiarize yourself with the three thermometer positions; understand which one drives your cuts (the condenser output, per §3.5)
3.1.3 The Choice: Budget Entry vs Quality Investment
The four paths above split into two camps:
Table 3 — The four paths above split into two camps
| Budget tier (Path A, B, C) | Quality tier (Path D) | |
|---|---|---|
| Cost | $65–$120 | $199–$1,350 |
| Material | Stainless + small copper coil | All copper or copper-dominant |
| Build origin | Chinese OEM mass production | US artisan, hand-built |
| Expected life | 3–7 years (welds fail; lid warps; coils pinhole) | 25+ years; generational with care |
| Sulfur scrubbing | Minimal (coil-only contact) | Extensive (full-vapor-path contact) |
| Warranty | Nominal; logistics-impractical to claim | Real; honored by phone |
| Frustration risk | High (design flaws like thumper dip tube; vague instructions) | Low (designed by people who use them) |
| Resale value | Near zero | Holds 60–80% of purchase price |
The honest recommendation has two paths depending on your commitment level:
If you’re test-driving the hobby and want to spend the absolute minimum to see if distillation is for you: buy the VEVOR 3-Gallon three-pot kit at $87.99 from VEVOR or Home Depot. Accept the trade-offs documented in §3.2.4: fix the thumper dip tube before first run, expect a 3–5 year service life, treat it as a learning tool rather than a forever investment. The Seeutek 3-gal at $65–$80 (§3.2.1) is functionally equivalent if you find a Prime deal — slightly worse welds, no Home Depot return path.
If you already know you want to learn distillation properly and stay with it: buy the Distillery Network 3-Gallon Mini Copper Pot Still at $199 (sale price; it hits this number regularly). For 2.3× the VEVOR cost you get a hand-built US-made all-copper still with a lifetime warranty that you’ll still be using in 20 years. This is the strongly recommended path for anyone who suspects this won’t be a one-summer experiment.
If you have shop skills and want maximum value-per-dollar: buy the Clawhammer Supply 5-Gallon Kit at $249 and spend a Saturday assembling it. You’ll have the most copper of any option under $700, you’ll understand every joint of your own still, and you’ll be able to repair or modify it indefinitely.
If you have the budget and the certainty: buy the North Georgia Still Company 5-Gallon Distillers Kit at $1,350 and skip the upgrade ladder. This is one of the last purchases you’ll make in this category.
What about DIY (Path C)? Recommended specifically if your goal includes understanding distillation hardware from first principles, or if you want a no-tracking, fully-anonymous purchase chain (no credit-card record of a still purchase). At current parts prices ($80–$110), DIY costs about the same as a pre-assembled VEVOR and somewhat more than the Clawhammer kit per gallon of capacity. The educational value is real; the cost savings are not.
A note on the China-mass-production question: This is not a blanket condemnation of Chinese manufacturing — many fine products come from China across many industries. It is, however, a specific observation about the home-still market segment, where the price floor is set by factories competing for marketplace shelf space at the lowest possible cost. The combination of unverified material grades, copied-without-understanding designs (e.g., the universal thumper dip-tube flaw), and warranty paths that are technically valid but practically unenforceable means that — in this specific category — the lowest-priced options carry quality risk that the price tag doesn’t communicate. The artisan US builders profiled in Path D charge more because they’re not cutting any of those corners. The math favors them if you’re staying with distillation.
3.1.4 Full Tier-1 Setup: Costed Bill of Materials
The still itself is only part of the picture. The complete Tier-1 fermentation-to-spirit kit:
3.1.4.1 Fermentation Equipment
Table 4 — 3.4.1 Fermentation Equipment
| Item | Price | Notes |
|---|---|---|
| 6.5-gal HDPE fermentation bucket + lid (drilled for airlock) | $10–$15 | Northern Brewer, Amazon, or local homebrew shop |
| 3-piece airlock (2-pack) | $3–$5 | S-type or 3-piece; 3-piece is easier to clean |
| Auto-siphon (racking cane) + 5 ft tubing | $12–$18 | Clamp/spring-type preferred; avoids disturbing lees |
| Hydrometer (triple-scale, 0.990–1.170) | $8–$12 | Plus graduated cylinder/sample tube |
| Star San sanitizer (16 fl oz concentrate) | $10–$14 | Makes ~50 gallons of sanitizer solution; lasts years |
| Stick-on thermometer strip or probe | $6–$12 | Stick-on for hands-free monitoring; probe for precision |
| Long stirring spoon (stainless or food-grade nylon) | $5–$8 | |
| Fermentation subtotal | ~$54–$84 |
3.1.4.2 Distillation Equipment
Table 5 — 3.4.2 Distillation Equipment
| Item | Price | Notes |
|---|---|---|
| VEVOR 3-gal three-pot still kit | ~$88 | Or Seeutek ~$70; or DIY ~$80 |
| 3/8” OD copper tubing, 1–2 ft spare | $3–$6 | For the thumper dip-tube fix and extra connections |
| PTFE plumber’s tape, 2 rolls | $3–$4 | Seal all threaded connections before first run |
| High-temp food-safe silicone sealant | $6–$8 | GE Silicone I; seal any gap at pot lid |
| Digital instant-read thermometer (probe) | $10–$20 | Backup for the built-in bimetal if needed; also useful for mash temp |
| Collection jars: quart Mason jars (12-pack) | $10–$14 | Wide-mouth preferred; label with marker for cuts fractions |
| Paper towel / cotton ball for proofing test | ~$0 | Traditional foreshots test: soak and light |
| Mini alcometer / alcoholmeter (parrot setup optional) | $15–$30 | Optional but highly recommended; see §3.8 |
| Distillation subtotal | ~$135–$170 |
3.1.4.3 Consumables (Per Batch)
Table 6 — 3.4.3 Consumables (Per Batch)
| Item | Cost per 5-gal batch |
|---|---|
| Sugar (6 lbs white granulated) | ~$4–$6 |
| Yeast (1 sachet EC-1118 or DADY) | ~$1–$2 |
| Yeast nutrient (1 tsp) | ~$0.50 |
| Campden tablet (1 tablet, dechlorinate water) | ~$0.10 |
| Star San (reuse diluted solution; replace after ~1 week) | ~$0.30 |
| Per-batch consumables total | ~$6–$9 |
3.1.4.4 Total First-Run Investment
Table 7 — 3.4.4 Total First-Run Investment
| Category | Low | High |
|---|---|---|
| Fermentation equipment | $54 | $84 |
| Still + distillation equipment | $135 | $170 |
| First-batch consumables | $6 | $9 |
| Total | ~$195 | ~$263 |
After the first purchase, ongoing cost per batch is $6–$9 (consumables only). Equipment amortizes rapidly.
3.1.5 Safety and Legal Notes Before You Begin
3.1.5.1 Federal and State Law
As noted in §3.1, home distillation of beverage alcohol is a federal felony in the United States. This book is educational. Consult _shared/legal_safety.md for detailed TTB federal law + state-by-state notes.
Summary: If you are in the US, know your state’s law. Some states have no enforcement history for small personal-use operations; others actively prosecute. Federal authorities focus on commercial-scale operations and tax evasion, not kitchen-scale hobby activity — but the law provides no safe harbor. Operate at your own informed risk.
3.1.5.2 Fire and Vapor Hazards
Ethanol is highly flammable (flash point 13°C / 55°F; autoignition 365°C). Working with a pot still means heating ethanol-containing liquid to above its boiling point and producing ethanol vapor.
Critical safety rules:
- No open flame during a spirit run. If you have a gas stove, this is a serious consideration. An electric induction or resistance cooktop eliminates the ignition-source risk entirely. If using gas: ensure the kitchen is well-ventilated; do not leave the still unattended; consider a portable electric hot plate ($25–$40) as a dedicated still heater.
- Never seal the still airtight. The one-way exhaust valve must be installed and unobstructed. A sealed still under heat builds pressure and will rupture. Check the valve before every run.
- Do not distill over-full. Fill the boiler to 50–70% capacity maximum. Boiling wash foams and can carry over into the condenser and output. Carry-over contaminates the distillate and can clog connections.
- Ground your still if using a metal stovetop — static buildup is a minor risk when working with ethanol vapor.
3.1.5.3 The Foreshots and Methanol Myth
Foreshots — the first 50–100 ml of distillate — contain elevated concentrations of acetaldehyde and methanol. Always discard the foreshots. The standard rule of thumb:
- Discard the first 50 ml per 5 gallons of wash (adjust proportionally for smaller batches; 15–20 ml per gallon is a safe working rule)
- Some distillers discard up to 100 ml per 5 gallons for extra caution
Methanol in a grain or sugar wash is present at trace levels (typically 10–100 ppm in the raw wash) and the foreshots cut effectively removes the bulk of it. The Prohibition-era “moonshine blindness” myth stems from denatured industrial alcohol intentionally adulterated with methanol and other denaturants — not from properly fermented and distilled grain or sugar wash. That said, discarding foreshots is standard practice and costs almost nothing.
No plastic in the vapor path. Ethanol vapor at distillation temperature (75–80°C) will leach plasticizers from PVC tubing and other plastics. Use only silicone hose, copper tubing, and stainless fittings anywhere the hot vapor flows. The cold condenser outlet (below 40°C) can use food-grade silicone or high-density polyethylene tubing; avoid PVC even there.
3.1.6 Assembling and Testing the VEVOR Three-Pot Kit
3.1.6.1 First-Assembly Checklist
- Unbox and inspect all parts. Verify you have: boiler barrel, thumper keg, condenser barrel, copper coil, circulating pump, one-way exhaust valve, silicone hoses (various lengths), thermometer (should already be installed in boiler lid), sealing rings, and manual.
- Clean all metal parts in hot water + unscented dish soap. Rinse thoroughly. The stainless and copper surfaces may have light machine oil from manufacturing.
- PTFE tape all threaded connections before assembly. Two wraps in the direction of thread engagement on every male fitting.
- Install the copper coil inside the condenser barrel per manual instructions. The coil inlet should connect to the vapor inlet at the top; the outlet exits through the bottom of the condenser barrel.
- Fix the thumper dip tube (critical mod): cut 3–4 inches of 3/8” OD copper tubing (from your spare; see BOM). Press or solder it into the vapor inlet port on the thumper keg so it extends 2–3 inches downward into the liquid interior. Now vapor will bubble through any liquid you add to the thumper, providing actual thumper function rather than simple bypass.
- Install the one-way exhaust valve in the port on the boiler lid. This is your pressure relief — do not omit it.
- Test-fit all hose connections without water or heat. Confirm vapor pathway: boiler → (thumper) → condenser → outlet. Confirm pump connects to condenser water jacket.
- Water test: Fill boiler with plain water to 60% capacity. Connect pump and cooling water. Apply heat; bring to boil. Watch for leaks at every joint. If drips appear, drain, dry, re-PTFE-tape the fitting, and re-test.
3.1.7 Your First Wash: The Tier-1 Sugar Wash
For the first distillation run, use the Simple Sugar Wash recipe from Vol 2, §2.3.1. Quick recap:
5-gallon sugar wash:
- 6 lbs white granulated sugar dissolved in warm water + cold water to 5 gallons
- 1 tsp yeast nutrient + ½ tsp DAP + optional ½ tsp citric acid
- 1 sachet EC-1118 or DADY yeast
- Ferment 3–7 days at 65–75°F; confirm FG stable at 0.998–1.005
For your very first run, you may choose to start with an even smaller 2-gallon batch to fit completely in the VEVOR’s 3-gallon boiler without overfilling:
- 2.4 lbs sugar in 2 gallons water
- Proportional yeast and nutrients
- Will produce 300–500 ml of 40–55% spirit per run
The trade-off: a smaller batch teaches the same skills on less material with lower risk.
3.1.8 Your First Distillation Run: Step-by-Step
3.1.8.1 Pre-Run Checklist
Before starting heat:
- Still assembled; all fittings PTFE-taped; exhaust valve installed and clear
- Water test completed (no leaks)
- Fermented wash confirmed done (hydrometer stable, no CO₂, clear or mostly clear)
- Wash siphoned — lees left behind in fermenter
- Still boiler filled to 60–70% capacity (no more than 70%)
- Collection jars labeled and ready: “Foreshots,” “Heads,” “Hearts,” “Tails”
- Pump submerged in cooling water bucket; pump hoses connected
- Fire extinguisher (Class B / CO₂) within arm’s reach if gas stove
- Notebook or phone to record: time started, temperature readings, volume collected at each cut
3.1.8.2 Startup and Heating
-
Start the pump. Confirm cooling water is circulating through the condenser before applying heat.
-
Set heat to medium-high (gas: medium-high burner; electric: 7–8 out of 10). You want to reach the distillation temperature range in 20–35 minutes without scorching the wash.
-
Monitor the thermometer. The still thermometer reads vapor temperature, not liquid temperature.
- 60–70°C (140–158°F): heating, no distillate yet
- 72–78°C (162–172°F): first drops incoming (ethanol and light congeners)
- 78°C (173°F): steady ethanol distillation temperature (varies with elevation and ABV of wash)
- Above 90°C (194°F): water fraction dominating — approaching tails territory
-
Watch the condenser outlet — the first drop is a milestone. Note the time.
3.1.8.3 Foreshots — Discard These
The first 50 ml (roughly 10 tsp, or ⅓ of a coffee mug) are the foreshots. Collect them in a dedicated small jar, not in your hearts jar. These contain the highest concentration of acetaldehyde and methanol. Discard down the sink.
Test the foreshots (traditional): Dab a few drops on your palm and smell. Foreshots typically have a sharp acetaldehyde/nail-polish smell that is clearly different from the hearts fraction that follows.
Flow rate during foreshots: expect slow, intermittent drops — perhaps 1–3 per second. The still is still building up to steady vapor production.
3.1.8.4 Heads Cut
After discarding foreshots (50 ml), begin collecting in your “Heads” jar. The heads fraction is:
- Character: Solvent-like, sharp, fruity in an unpleasant way; nail polish, paint thinner, or Granny Smith apple at high concentrations
- Temperature range: Roughly 78–81°C on the thermometer
- Volume: Approximately 50–200 ml in a 5-gallon sugar wash run; smaller batches proportionally less
- Flow rate: Moderate; 2–5 drops per second, increasing
How to find the heads/hearts transition:
- Use your sense of smell: taste a small drop (just touch your fingertip to the jar mouth and touch to tongue). The transition from heads to hearts is marked by a noticeable softening of the sharp solvent note and the emergence of a clean, warm alcohol smell.
- Watch the thermometer: steady at 78–80°C during hearts.
- Experienced distillers make this cut by feel, smell, and taste. For your first run, be conservative — collect a larger heads fraction to ensure clean hearts, rather than risking heads contamination in your hearts jar.
When you are satisfied the cut is clean: switch your collection jar to the clean “Hearts” jar.
3.1.8.5 Hearts — The Product
The hearts fraction is the distillate you keep:
- Character: Clean, warm, spirit-forward. A well-made sugar-wash hearts fraction should taste clean and neutral to mildly sweet. A corn-mash hearts fraction will have additional grain and corn sweetness.
- Temperature range: Roughly 78–86°C; stays fairly stable for most of the run
- ABV: 60–70% ABV during peak; declining as the run proceeds (the hearts/tails transition region drops below 50%)
- Flow rate: Steady; 5–10+ drops per second at peak
Continue collecting hearts until you detect the tails transition:
- Smell becomes slightly oily, musty, or “hot” — isoamyl alcohol’s characteristic harsh note
- Taste (careful — tails are harsh): slight bitterness, mushroom, or wet grain note
- Thermometer rising above 87–90°C
- ABV of distillate falling noticeably (if you are checking with an alcoholmeter)
3.1.8.6 Tails Cut
Switch to your “Tails” jar. Continue collecting tails (some distillers save them all; some stop the run entirely when tails begin):
- Why save tails: Tails contain heavier congeners including higher fusel oils and some ester complexity. Blending a small amount of tails back into hearts can add body and character — this is an advanced technique; skip it for the first few runs.
- When to stop the run: When the thermometer reads above 95°C (203°F) and distillate is below 20% ABV, there is very little ethanol left to recover. Shut off heat and let the still cool before disassembly.
3.1.8.7 End-of-Run Procedure
- Turn off heat. Leave cooling water pump running until vapor stops (usually 5–10 minutes).
- When still is cool (under 50°C), open the boiler. The spent wash (backset or pot ale) remaining is a spent grain/sugar liquid — fine for drain disposal.
- Rinse all metal parts with hot water while still warm. The copper coil benefits from a rinse with a diluted citric acid solution (1 tsp in 1 qt water) every few runs to remove mineral deposits.
- Record your run results in your notebook: run date, wash volume and ABV, foreshots volume discarded, heads volume, hearts volume and measured ABV, tails volume.
3.1.9 Measuring Your Product: The Alcoholmeter (Proof Hydrometer)
A standard wort hydrometer does not measure final product ABV accurately because it is calibrated for sugar solutions. For measuring distillate ABV, use an alcoholmeter (also called a spirits hydrometer or proof hydrometer):
- Calibrated 0–100% ABV (or 0–200 proof US)
- Reads accurately only on pure distillate-water mixtures (no residual sugar)
- Must be temperature-corrected (70°F / 21°C for most; check manufacturer spec)
A parrot is a self-filling funnel that diverts a small continuous stream of distillate over the alcoholmeter float, giving a real-time ABV reading throughout the run. This is the most efficient way to monitor the run and make precise cuts. Not necessary for Tier-1 but worth making or buying before your second still run.
Typical hearts-fraction ABV from a Tier-1 pot still:
- On a 10% ABV sugar wash: hearts will run approximately 55–70% ABV
- Dilute to 40% ABV (80 proof) for a standard drinking-strength spirit: add approximately 0.8 liters of distilled or RO water per liter of 60% ABV hearts
ABV dilution formula:
V_water = V_spirit × (ABV_spirit / ABV_target - 1)

Example: 0.5 L of 65% ABV → dilute to 40% ABV
V_water = 0.5 × (65/40 - 1) = 0.5 × 0.625 = 0.31 L water
Add 310 ml of water to 500 ml of 65% spirit = 810 ml at 40% ABV
3.1.10 What Comes Next: Tier-1 to Tier-2
After 3–5 successful Tier-1 runs, you will have:
- Confidence making foreshots/heads/hearts/tails cuts
- Experience reading your still’s temperature behavior
- Your first bottles of homemade spirit
- Enough low wines saved for a stripping-run / spirit-run double-distillation cycle
At this point you are ready to consider the Tier-2 bench rig (Vol 4): a dedicated still stand, a 10–20 gallon boiler, a proper column with copper packing, and a parrot. The Tier-2 setup produces meaningfully higher quality and yield, and introduces reflux control as a craft variable.
The Tier-3 upgrade (Vol 5) adds a full reflux column for neutral spirit production. Tier-4 (Vol 6) is a 5-gallon pot+column hybrid. From there, Volumes 7–8 cover small-batch commercial scale.
3.1.11 Summary: Tier-1 Decision Matrix
Table 8 — 3.11 Summary: Tier-1 Decision Matrix
| Criterion | Budget Amazon Kit (~$70) | VEVOR 3-gal (~$88) | DIY Hardware ($80–$110) |
|---|---|---|---|
| Out-of-box readiness | Good (minus thumper dip tube) | Good (minus thumper dip tube) | Requires assembly |
| Build quality | Adequate | Better; confirmed 304 SS | Depends on builder |
| Return policy | Amazon standard | Home Depot in-person | N/A |
| Expandability | Low | Low | High |
| Learning value | Medium | Medium | High (you understand every part) |
| Best for | Cost-minimum entry | Reliability-focused entry | Tinkerers; educational builder |
| Recommended? | Budget-constrained only | Yes (primary recommendation) | If you enjoy the build |
Cross-references: wash recipe → Vol 2, §2.3.1. Cuts theory → Vol 1, §1.11. Legal/safety detail → _shared/legal_safety.md. Equipment inventory → MY_EQUIPMENT/inventory.yaml (update when you buy).
Comments (0)