Distilling · Volume 4
Vol 4 — The Tier-2 Bench Rig: Dedicated Equipment, Two-Run Workflow
Phase 3 — Distilling deep-dive series. This volume covers the upgrade from a Tier-1 kitchen-stovetop still to a Tier-2 bench rig: a 10–15 gallon copper or copper-dominant pot/column hybrid with a dedicated electric heating element, larger condenser, optional bubble plates or reflux column packing, and a parrot for live ABV measurement. We cover the four most appropriate vendor paths for the quality-minded distiller, the chemistry and procedure of the two-run stripping + spirit workflow that becomes practical at this scale, the heating-power question (which is the real Tier-2 setup change), a costed bill of materials for the complete setup, and end-to-end walkthroughs of both runs.
4.1.1 What Tier-2 Means
The Tier-2 bench rig is defined by:
- Scale: 10–15 US gallon wash capacity per run (3–5× Tier-1)
- Equipment cost: $950–$3,000 for the still; $1,500–$4,500 for the complete fermentation-to-spirit setup
- Energy source: Dedicated electric heating element (1500W–5500W internal immersion or external band heater), almost always with a PID controller — not stovetop
- Skill level: Intermediate; you’ve completed at least 3–5 Tier-1 runs, you understand cuts intuitively, and you want better quality, larger batches, or the two-stage stripping+spirit workflow
- Spirit output per spirit run: ~1.5–4 liters of 50–75% ABV (5 gallons of combined low-wine at ~30% ABV → ~2 gallons of high-quality spirit at 65–70% ABV after spirit run)
- Equipment type: Pot still, pot-with-packed-column, or pot-with-bubble-plates; real rectification options enter at this tier
4.1.1.1 Tier-2 is qualitatively different, not just bigger
The 5-gallon Tier-1 still asks you to do single-pass distillation: ferment 5 gallons of wash, distill it once, end up with maybe half a gallon of 50% ABV spirit. Cuts are tight, runs are long relative to output, and there’s no efficient way to refine further.
At Tier-2 scale, the workflow splits into two stages:
- Stripping runs (fast, rough). Boil 10–15 gallons of wash down quickly into 3–5 gallons of low-wine at ~30% ABV. No precision cuts — just get the alcohol out of the wash and discard the spent backset. Each stripping run takes 2–4 hours and produces enough low-wine for one quarter of a spirit run.
- Spirit run (slow, careful). Combine the low-wines from 2–4 stripping runs (~12–20 gallons of low-wine at 30% ABV), then re-distill slowly through a packed column or bubble plates. The column does much more rectification work on a 30% ABV input than it could on a 10% wash directly. This is where the foreshots/heads/hearts/tails cuts happen, the temperature curves matter, and the spirit takes its final shape.
This two-stage workflow is the standard professional approach for a reason: cleaner spirit, more efficient use of column-time, and the ability to stockpile low-wines from several stripping sessions for one carefully-managed spirit run. Tier-1’s single-pass workflow approximates the spirit run on raw wash — it works for a first taste of distillation, but it can’t match what a properly-run two-stage process produces.
4.1.1.2 What stays the same from Tier-1
- The chemistry. Same wash recipes (sugar wash, corn mash, all-grain — see Vol 2). Same cut compounds (acetone in foreshots, methanol/acetaldehyde in heads, ethanol+esters in hearts, fusels in tails). Same need for vigilance.
- The legal posture. Federal felony to distill beverage alcohol in the US without a Distilled Spirits Plant (DSP) permit, regardless of scale. The “small batch personal use” exemption that exists for beer and wine (TTB Form 5130.10) does not extend to distilled spirits. State laws vary; a handful permit limited personal-use distillation.
4.1.1.3 What’s new at Tier-2
- Heat decisions. A 15-gallon kettle on a household gas stovetop takes 2+ hours to reach distillation temperature and stalls under reflux load. Dedicated electric heat is functionally mandatory. This is the most important Tier-2 setup change and is treated in detail in §4.3.
- Real column work. Packing (copper mesh, copper or stainless scrubbers, ceramic Raschig rings) or bubble plates start to make meaningful differences in spirit quality at this column diameter (typically 2”–4”).
- The parrot. A small clear vessel between the condenser outlet and your collection jar with an alcoholmeter floating in it, giving you a live ABV reading throughout the run. At Tier-1 you took ABV after the fact with a single measurement on the combined output; at Tier-2 the parrot lets you cut by ABV in real time, which is how professional cuts are made.
- Physical footprint. A 15-gallon bench rig with column, condenser, parrot, fermenter, heating element, and PID is a small-room setup — 20–30 square feet of floor and a 220V circuit if you go with a 5500W heating element. Plan the space before buying.
Legal posture at Tier-2 capacity: producing 2+ gallons of high-proof spirit per session looks more like “operating an unlicensed distillery” to federal enforcement than a kitchen-stovetop hobby. Your discretion should scale with capacity. See
_shared/legal_safety.mdfor state-by-state status and the TTB enforcement envelope.
4.1.2 The Vendor Landscape: Four Paths to a Tier-2 Bench Rig
Vol 3’s §3.2.4 (“Why Copper Quality Matters”) applies with full force at Tier-2 — arguably more force, because a Tier-2 still is a five-figure-lifetime-cost piece of equipment (initial purchase + heating element + controller + fermenter + ingredients across the years you’ll own it). The case for spending once on quality copper from a builder who understands the chemistry is stronger here than it was for Tier-1, where the budget VEVOR was at least a defensible “test the hobby” entry point.
Below are four vendor paths covering ~$950–$3,000+ for the still itself. All four use significant copper. Where they differ is in construction philosophy, material proportion, modularity, and what’s included out of the box.
4.1.2.1 Path A — Affordable Distillery Equipment 13-Gallon Copper + 2” Reflux Column (~$952)
- Vendor: Affordable Distillery Equipment (ADE) —
https://shop.distillery-equipment.com/ - Product: 13 Gallon Copper Still with 2” Copper & Stainless Reflux Column (
/collections/stills/13-gallon) - Price: ~$952 (similar configurations from $952 to $996)
- Capacity: 13 gallons (usable fill ~10–11 gallons; leaves headspace for boil)
- Material: Copper boiler and column; some stainless fittings (e.g., tri-clamp connections); ADE describes copper construction with stainless reinforcement at high-stress points
- Includes: Copper boiler, copper-and-stainless 2” reflux column (compatible with copper-mesh or scrubber packing), basic fittings
- Important: does not include heating element or controller — assume you’ll add $200–$400 for those (see §4.3)
- Country of origin: Mixed sourcing; ADE does not consistently claim full US manufacturing
- Lead time: Usually in stock; ships within 1–2 weeks
Why this is the budget-quality entry to Tier-2:
- Real copper boiler (the most important part — this is where vapor first contacts metal) at the cheapest Tier-2 price point we found that is not a Chinese stainless mass-produced kit
- 2” reflux column is the right size for 13-gallon scale: enough surface area for meaningful rectification, narrow enough that you can keep packing snug
- Established US-based vendor (Texas) — phone-and-email support; not a marketplace reseller
- Logical step up from Vol 3 — if you ran a Clawhammer 5-gallon and want roughly 3× the capacity at roughly 4× the cost, ADE is the natural choice
Trade-offs vs. the other Path B/C/D options:
- Material grade and copper-gauge specifications are less transparent than the artisan US builders (NG Still Co publishes 20oz/22ga; ADE does not). You’re trusting “copper” without a published spec sheet.
- Manufacturing isn’t fully US in the way the artisan paths are; some component sourcing is offshore
- Documentation is thinner than Brewhaus or StillDragon; expect to assemble from a brief manual or PDF
- No heating element included — budget another $200–$400 to get to operational
Setup before first run:
- Inspect all copper surfaces for shipping dents; report within ADE’s stated window
- Run a vinegar pre-clean batch (1 gallon white vinegar in 9 gallons water; distill as a regular stripping run; discard output) — passivates copper, removes machining residues
- Add packing to the column: 7–13 copper scrubbers or equivalent copper mesh (see §4.3.4 for packing detail)
- Pressure-test all tri-clamp joints with the dummy run
4.1.2.2 Path B — Brewhaus 15-Gallon 4” Sight Glass Still with 4 Bubble Plates ($1,399 sale / $1,999 reg)
- Vendor: Brewhaus America (Fort Worth, TX, USA) —
https://brewhaus.com/ - Product: “15 Gallon 4” Complete Sight Glass Moonshine Still — 4 Plate” (
/product/15-gallon-4-complete-sight-glass-moonshine-still-4-plate/) - Price: $1,399.99 on sale (regular $1,999.99 — sale is reliable, hits this price most months)
- Capacity: 15-gallon stainless kettle (usable ~12 gallons)
- Material: Stainless steel kettle with 4 copper bubble plates inside a sight-glass column — hybrid construction
- Includes: SS kettle, 4” sight-glass column with 4 removable copper bubble plates, dephlegmator, condenser, inline parrot, 3× 4” tri-clamps with EPDM gaskets, 3× 2” tri-clamps, 1× 1/2” tri-clamp, hoses with clamps, submersible water pump, water control system, analog thermometer
- Heating element NOT included — Brewhaus recommends two band heaters or two internal heating elements; budget $200–$400
- Country of origin: Assembled in Texas, USA; some components imported (specifically the copper bubble plates are imported per Brewhaus’s product description on related parts pages)
- Lead time: 1–5 business days standard processing; usually in stock
Why this is the “best learner’s still” pick:
- Sight-glass column with visible bubble plates — you can see the distillation happening, watch vapor bubble through liquid on each plate, observe the foreshots/heads/hearts/tails transition visually. This is the single best teaching tool for understanding rectification.
- Plates are removable — operate as a 4-plate reflux still for neutral spirit, or pull plates out for pot-still operation with the column as a vapor path. Maximum flexibility per dollar.
- Complete kit — parrot, condenser, dephlegmator, water control, hoses, pump all included. You add a heating element and you’re done.
- Tri-clamp construction throughout — commercial-distillery standard joints; gas-tight, instant on/off, no PTFE tape, no warping
- Established vendor with phone support (817-750-2739) and a US assembly point
Trade-offs vs. the more all-copper picks:
- Stainless kettle, not copper. The bubble plates and column internals contact vapor heavily, but the boiler itself (where the wash first heats and evolves the most vapor) is stainless. Less total copper-vapor contact than the all-copper picks (Path A or C). Sulfur scrubbing happens at the plates, but a copper boiler would scrub more.
- Imported bubble plates — Brewhaus’s plate components are sourced from overseas; the column hardware is US-assembled but the copper plates themselves are not US-made
- Sight glass is fragile — requires careful handling and protection from impact; replacements available but at additional cost
Setup before first run:
- Unbox the column carefully — sight glasses can crack if dropped; the metal rods are protective but not invincible
- Familiarize yourself with bubble-plate operation by watching Brewhaus’s video walkthrough on their product page
- Decide your first-run mode: 4 plates installed = neutral spirit / reflux mode; plates removed = pot-still mode. Start with all plates installed and learn the rectification behavior before moving to pot-still mode.
- Vinegar pre-clean (see Path A)

4.1.2.3 Path C — North Georgia Still Company 15-Gallon Distillers Kit ($1,924)
- Vendor: North Georgia Still Company (Dahlonega, GA, USA) —
https://north-georgia-still-company.myshopify.com/ - Product: 15 Gallon Distillers Kit (
/collections/distillers-kits— 15 gal listed alongside 5, 7.5, 10, and “Fat 10” gal kits at $1,350, $1,544, $1,786, $1,842, and $1,924 respectively) - Price: $1,924 (consistently — not a sale price)
- Capacity: 15-gallon still + proportionally-sized thumper + worm condenser (scales up from the 5-gallon kit reviewed in Vol 3 §3.2.5)
- Material: 20 oz / 22-gauge copper throughout — same grade as their 5-gal kit; the US craft-still standard
- Includes: Tri-clamp-capped still pot, thumper with fruit port (for botanicals/flavoring between stages), worm condenser with copper coil, submersible water pump, vinyl tubing, three thermometers (boiler, thumper, condenser output), temperature gauges, relief valves
- Heating element NOT included — propane burner or 5500W internal element recommended for 15-gal scale
- Country of origin: Hand-built one at a time in Dahlonega, GA, by NG Still Co coppersmiths
- Lead time: 1–2 additional days on top of standard processing (per their site)
Why this is the quality artisan pick:
- 20 oz / 22-gauge copper throughout the entire vapor path. Boiler, thumper, worm — all heavy-gauge food-grade copper. Maximum copper-vapor contact, maximum sulfur scrubbing, generational lifespan.
- Same builder, same construction philosophy as Vol 3 D3. If you bought the 5-gallon NG Still kit as your Tier-1 and want to scale up, this is the same builder making the same thing larger — your operating skills transfer directly.
- Thumper-based design (not column/plates) — produces traditional whiskey-style spirit with character intact, rather than the more rectified output of a column still. Different philosophy from Path B; arguably more appropriate for whiskey, rum, brandy, and fruit eaux-de-vie than for vodka/gin neutral base.
- Tri-clamp lid seal, three thermometers (boiler/thumper/condenser-output — the trinity you need for proper cuts), and an included pump
- Generational tool — hand-built copper at this gauge, used reasonably, is a piece of equipment your grandchildren can use
Trade-offs vs. Path B (Brewhaus):
- No bubble plates or sight glass. You can’t see the distillation happening internally; you learn from external thermometer readings and parrot ABV instead. This is harder for a first-time Tier-2 user.
- Less rectification per pass. Thumper-based design produces 55–70% ABV from a single spirit run; bubble-plate reflux can hit 80–90% in one run. If you want neutral spirit for gin or vodka base, Brewhaus is more direct.
- 5–7× the cost of the 5-gal version. Significant commitment.
Setup before first run:
- Unbox carefully — 22-gauge copper at this scale can dent if handled roughly
- Inspect the tri-clamp gasket on the lid (pre-installed); confirm cleanliness
- Vinegar pre-clean as in Paths A and B but at 15-gallon scale (3 gal vinegar in 12 gal water)
- Set up the three thermometer positions before first run; the condenser-output thermometer is the one that drives your cuts, so confirm calibration with a known-temperature water test (ice = 32°F/0°C; boiling = 212°F/100°C at sea level)

4.1.2.4 Path D — StillDragon Modular Build (~$1,500–$3,000+ depending on configuration)
- Vendor: StillDragon (Sebastian, FL, USA) —
https://stilldragon.com/ - Product: Modular components — kettle + head + column + condenser + dephlegmator chosen and assembled from their catalog
- Price: ~$1,500–$3,000+ depending on configuration; a 14-gal stainless kettle + 4” column + 4-plate setup + dephlegmator + condenser typically lands at $2,000–$2,800
- Capacity: Configurable; common Tier-2 builds use 8 gal, 14 gal, or 20 gal kettles
- Material: Stainless steel kettles with copper components (plates, columns optional in copper, dephlegmators) — mix and match to taste
- Includes: Whatever you order; StillDragon sells components, not pre-packaged kits. A “complete” build requires you to select and order: kettle, top fitting/head, column section(s), plate sections (optional), dephlegmator, condenser, parrot, hoses, controllers, fittings.
- Heating element separate — they sell screw-in element bushings; choose your wattage
- Country of origin: USA — designed and assembled in Florida; some components manufactured overseas to StillDragon specs, others made domestically
- Lead time: Variable by item; most components ship in 1–2 weeks
Why StillDragon is the “future-proof” pick:
- Modular design with no upgrade ceiling. Start with a 4” column and 2 plates; later add another column section, more plates, a CCVM (copper-condenser-vapor-management) head, a thumper section, a botanical basket. The system grows with you for the next 10+ years.
- Tri-clamp standard throughout — every component connects to every other via 2”, 3”, or 4” tri-clamps. Pieces from your starter setup remain compatible if you ever upgrade to a 50-gallon commercial rig.
- Used by actual craft distilleries. StillDragon equipment is in commercial production at hundreds of TTB-licensed distilleries. You’re buying the same component quality that pros buy, scaled to hobbyist sizes.
- Active forum community at StillDragon’s own discussion board, plus extensive documentation, sizing guides, and assembly videos. The learning curve is supported.
- Florida-based US company with phone-and-email support and an established 15+ year track record
Trade-offs vs. the pre-packaged Path B/C kits:
- You must specify the build yourself. No “click here for the Tier-2 starter kit” button. First-time buyers find StillDragon overwhelming because the right configuration depends on what spirit you want to make, what column rectification you want, and how you plan to heat. Read their “Sizing Your Still” guide before ordering, and budget 2–4 hours of research before committing to a build sheet.
- Higher total cost than Path B or C for a comparable Tier-2 capability — modular flexibility costs money
- Stainless kettles are the default; copper kettles are available but at significant upcharge. Full-copper StillDragon builds easily reach $4,000+.
- Component shipping is staged — different parts may arrive on different days; plan assembly time around the last delivery
When to choose StillDragon over the simpler kits:
- You know you want to grow into a 25-gal or 50-gal rig within a few years and want everything compatible from day one
- You want the option to switch between pot mode, reflux mode with 2 plates, reflux mode with 4 plates, gin-basket mode, etc. without buying separate stills
- You value being able to repair or upgrade any individual component without replacing the whole system
- You appreciate craft-distillery-grade engineering and are willing to pay the integration premium
Setup:
- Spend the research time first. Read StillDragon’s documentation, watch their build videos, post a sizing question on their forum if uncertain. The hard work is choosing the build sheet; assembly is easy once the parts are in hand.
- Confirm your power supply (240V availability for 5500W elements) and water source (you’ll want a recirculating water setup for the condenser at this scale)
- Assemble per their instructions; the tri-clamp standard means every joint is intuitive
- Vinegar pre-clean at chosen kettle scale
4.1.3 The Tier-2 Power Question: Heating Element, Controller, and Why This Is the Real Setup Change
Vol 3’s Tier-1 kitchen still ran on whatever your stovetop produced. That convenience ends at Tier-2. A 15-gallon kettle full of wash on a household gas stovetop takes 2+ hours to reach distillation temperature and then stalls under reflux load — the stovetop simply can’t keep enough heat in the wash to maintain steady vapor production against the column’s heat-loss profile. Dedicated electric heat is functionally mandatory at Tier-2. This is the most important Tier-2 setup change, and it deserves its own section before we get to the run procedures.
4.1.3.1 Element type: internal immersion vs. external band
Two basic heating approaches, both used heavily in the home-distilling community:
Internal immersion element (most common):
A water-heater-style screw-in element threaded through a port welded or fabricated into the side of the kettle near the bottom. The element heats the wash directly. Pros: maximum efficiency (no heat lost to ambient air); fast response to PID control; cheap (~$15–$40 for the element itself plus $30–$60 for the kettle-side weldment if your kettle didn’t come with one). Cons: element is in contact with the wash, so scorch/burn-on risk if you run with too little liquid; element wattage must be sized for your kettle volume; sediment can settle on the element and carbonize.
External band heater (less common but valid):
A clamp-on heating band wrapped around the outside of the kettle below the wash line. The kettle wall conducts heat into the wash. Pros: no element-in-wash issues; no risk of burning element if wash level drops; nothing to clean inside the kettle. Cons: less efficient (kettle wall is a thermal resistance); slower to respond to control input; more expensive (~$150–$350 for a quality band heater); requires the kettle wall to be conductive (stainless works; some copper kettles are too thin for safe band heating).
Most Tier-2 hobbyists use internal immersion. Brewhaus, Hillbilly Stills, and most kettle vendors sell kettles with pre-installed weldment ports for screw-in elements. The default recommendation is: pick a kettle with an element port, install a screw-in element matched to your kettle size, control it with a PID controller.
4.1.3.2 Wattage sizing
The rule of thumb: 400 watts per gallon of wash for steady distillation, doubled for fast heat-up.
A 10-gallon wash wants ~4000W of element capacity for fast heat-up and ~2000W maintained during the distillation itself. A 15-gallon wash wants ~6000W heat-up, ~3000W maintained. In practice:
- 1500W single element: good for 5–8 gal washes; slow heat-up at 15-gal scale (1.5+ hours); workable but tedious
- 3000W single element: good for 8–12 gal washes; reasonable heat-up at 15 gal (~45 min)
- 5500W single element: good for 12–20 gal washes; fast heat-up (~25 min on 15 gal); the most common Tier-2 choice
- Dual elements (e.g., 2× 3000W = 6000W): redundancy and trim — run both for heat-up, switch one off for the distillation, control the other via PID. This is the professional approach.
Critical: voltage and circuit capacity. A 5500W element draws ~23A at 240V — needs a dedicated 30A 240V circuit (the same kind that runs an electric dryer or water heater). On 120V at 5500W you’d be drawing 46A, which is not feasible on a household circuit. At 5500W you need 240V; period. If you don’t have 240V available in the location where the still lives, either run a 1500W or 3000W 120V element (with longer heat-up times) or run an electrician.
4.1.3.3 PID controller — the brain of the operation
A PID (proportional-integral-derivative) controller takes a temperature reading from the wash, compares it to your setpoint, and modulates power to the heating element via a solid-state relay (SSR) to hold the temperature. For distillation, the actual control variable isn’t usually wash temperature directly (which sits at 78–98°C across the run as ethanol-water ratio shifts); it’s typically:
- Wattage modulation: set the controller to deliver X% of element power continuously (e.g., 60% during heat-up, 40% during stripping, 25% during the spirit-run hearts cut). This is the simplest mode.
- Vapor temperature control: PID watches the column-output thermometer and modulates power to hold that temperature steady. More precise but more complex to tune.
Practical Tier-2 setup: a mains-rated PID with SSR rated at element amperage, mounted in a small project enclosure with a power switch, GFCI inlet, and a digital display. Pre-built units are available from many distilling vendors for $80–$200; rolling your own takes a few hours of wiring work and is satisfying if you have the comfort level.
Critical: GFCI protection on the input. Wet environment (you’ll be near water, possibly spills), high power, electric heat — a GFCI breaker on the dedicated circuit and/or a GFCI inlet on the controller is a near-zero-cost insurance policy against the worst electrical scenario.
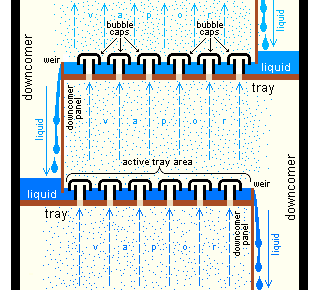
4.1.3.4 Column packing — the rectification step you control
At Tier-2 with a 2” or larger column, packing material in the column is what does most of the rectification work. Packing presents enormous internal surface area on which vapor condenses, runs down, contacts more vapor on its way back up, and progressively concentrates the more-volatile (lower-boiling) components in the rising vapor. More surface area = more rectification stages = higher final ABV.
Practical packing options for 2”–4” columns:
Table 1 — Practical packing options for 2"–4" columns
| Packing | Surface area | Pressure drop | Copper reactivity | Notes |
|---|---|---|---|---|
| Copper scrubbers (~$1 each) | High | Moderate | High (active scrubbing) | The home-distiller standard for 2”–3” columns; 7–13 scrubbers for a 2”-column-on-13-gallon kettle. Remove steel clip from center first. |
| Copper mesh roll (~$15–$25 for column-length) | Very high | Moderate-high | High | Roll to slightly larger than column ID; slide in carefully; don’t over-compress. Best rectification per inch of column. |
| Ceramic Raschig rings (~$25–$40 per cubic foot) | Moderate | Low | None | Easy to pack and unpack; chemically inert; lower pressure drop. Use copper mesh somewhere in the vapor path (column top or condenser) for sulfur scrubbing. |
| Stainless steel scrubbers | High | Moderate | None | Cheaper than copper; effective rectification; pair with copper mesh layer for sulfur scrubbing. |
| Marbles, glass beads, natural stones | Low | Low | None | Avoid — surface area too low to be effective. Old practice; community has moved past it. |
The standard recommendation for a Tier-2 packed column: copper mesh OR copper scrubbers throughout — gives both maximum rectification and active sulfur scrubbing in a single material. Use 99.9% copper (not the cheap copper-coated steel scrubbers sold for kitchen use; those rust and contaminate the spirit).
4.1.4 Why the Two-Run Workflow: Stripping + Spirit
A Tier-2 still makes the stripping run + spirit run workflow practical. Understanding why this two-stage approach produces better spirit than single-pass distillation is critical to running Tier-2 well.
4.1.4.1 The single-pass problem
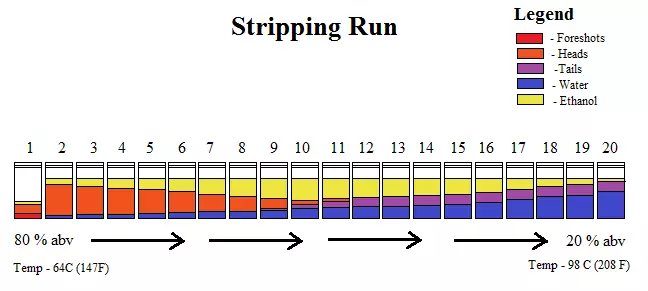
A 10% ABV wash distilled in a single pass through a column gives you a distillate that ramps from very high (~80% ABV from foreshots) down through hearts (60–70% ABV) and tails (40% ABV and dropping) over the course of a 4–6 hour run. The total spirit collected averages 50–60% ABV — but with significant variability between the early and late fractions.
The problem: a column’s ability to rectify is roughly proportional to the ABV difference between the wash below and the vapor above. With 10% ABV wash, the column is doing modest work — there’s only so much ethanol-concentrated vapor available to condense and re-vaporize. The packing helps, but you’re fundamentally limited by the low input concentration.
The other problem: you’re trying to do precision cuts (foreshots → heads → hearts → tails) on a run that’s dragging slowly through 6 hours of mixed-character output. By the time you’ve discarded the foreshots and started collecting hearts, the column has been heating for hours and your attention is divided. Mistakes get made.
4.1.4.2 The two-stage solution
Stripping run: boil the wash hard, no precision needed. Run the column wide open (no reflux, no plates engaged, possibly bypass the column entirely). Collect everything from start to finish — foreshots through tails, no cuts. Goal: get the alcohol out of the wash quickly. Result: 3–5 gallons of “low-wine” at ~30% ABV from 13–15 gallons of 10% wash. Takes 2–3 hours. Burns through the wash quickly; minimal column-tending required.
Repeat the stripping run 2–4 times (depending on how much low-wine you want to stockpile). Combine the low-wines into a single vessel.
Spirit run: load the combined low-wines (12–20 gallons at 30% ABV) into the kettle. Now the column has 30% ABV input rather than 10% — vapor concentration in the column is dramatically higher, packing has much more material to rectify, plates (if you have them) actually do meaningful work. Run slowly through the column with reflux engaged. Make tight, careful cuts (foreshots → heads → hearts → tails). Output: 4–8 gallons of high-quality spirit at 65–80% ABV depending on column configuration.
4.1.4.3 Why the spirit run produces cleaner spirit
Three reasons:
- Higher input ABV gives the column more to work with. Column rectification efficiency is roughly proportional to the ABV gradient between wash and vapor. At 30% input ABV, the column achieves more rectification stages per pass than at 10% input.
- You’re not distracted. Spirit run is one batch of low-wines, slow, controlled, precise cuts. You’re not also managing wash heat-up, vigorous initial boil, etc. — that all happened during the stripping runs.
- You can adjust the spirit-run feedstock. Combine 4 stripping-run outputs from different ferment batches if you want to “average out” any single batch’s quirks. Or run a single stripping batch’s worth at a time if you want each spirit run to represent one specific wash.
4.1.4.4 When single-pass is still OK
For brandies and some fruit eaux-de-vie, traditional practice is single-pass distillation specifically because the rough, broad-spectrum output preserves more fruit character. A second-pass spirit run would strip out aromatics. So: single-pass for brandy and high-character fruit spirits; two-stage for whiskey, rum, vodka, gin, and most other categories.
For Tier-1 5-gal scale, single-pass is also fine simply because the math doesn’t work — you’d need 4 stripping runs of 5 gallons (each producing ~1 gallon of low-wine) to fill the kettle for a spirit run, which means 4× the labor for the same output. Tier-2’s 10–15 gal capacity is the scale at which 2–3 stripping runs build a viable spirit-run batch.
4.1.5 The Choice: Bench-Rig Recommendation by Use Case
Following the Vol 3 §3.3 framework, the four-path lineup splits into recommendations by what you’re trying to accomplish.
Table 2 — 4.5 The Choice: Bench-Rig Recommendation by Use Case
| Use case | Recommended path | Why |
|---|---|---|
| Whiskey, rum, brandy, eau-de-vie (character-forward spirits) | C: NG Still Co 15-gal kit ($1,924) | All-copper thumper-based design preserves character. Maximum sulfur scrubbing. Generational tool. Direct upgrade from Vol 3 D3 NG Still 5-gal. |
| Vodka, gin, neutral spirit base (high-purity output) | B: Brewhaus 15-gal 4-Plate Sight Glass ($1,399 sale) | Bubble plates rectify to 85–90% ABV in a single spirit run. Sight glass teaches you to read the column visually. |
| Smallest defensible spend for real copper at scale | A: ADE 13-gal copper + reflux column ($952) | Cheapest Tier-2 with a true copper boiler; sacrifices manufacturer transparency but delivers the chemistry. |
| Building toward Tier-3+ over time | D: StillDragon modular ($2,000–$3,000 for entry config) | Every component you buy now stays compatible with whatever you add later. Used by commercial distilleries. The “buy once for the next decade” path. |
| I want to make multiple spirit types from one setup | B (Brewhaus) or D (StillDragon) | Both support pot-mode (plates removed) and reflux-mode (plates engaged) from the same kettle. NG Still is whiskey-leaning; ADE is rectification-leaning. |
The honest tier overview:
- $952 → ADE — minimum spend for real copper Tier-2 entry. Compromises on documentation and full provenance for the price advantage. Will run reliably for many years; not the artisan-grade lifetime tool that NG Still is.
- $1,399 (sale) → Brewhaus — best learning tool at the price. Stainless kettle is the meaningful concession vs. all-copper; bubble plates and sight glass are the meaningful gains. Recommended for a distiller who wants to learn rectification visually.
- $1,924 → NG Still Co — the quality-copper artisan pick. Whiskey-tradition design. Same builder as Vol 3 D3; consistent skill transfer. Best long-term value if you’re making spirits that benefit from copper character (most of them).
- $2,000–$3,000+ → StillDragon — the modular professional-grade pick. Highest upfront cost; highest upgrade ceiling. Recommended if you know you’ll keep growing and want everything compatible from day one.
Quality-tier caveat (continuing from Vol 3 §3.2.4): At Tier-2, the “budget Chinese kit” alternative that defined Path A in Vol 3 doesn’t really exist as a defensible category. The lowest defensible Tier-2 spend is ADE at $952; below that, the mass-produced Chinese stainless options at $400–$700 have weld failure rates, material-grade uncertainty, and design flaws that make them genuinely false economy at this scale. You’d spend two of them before you spent one ADE — and the ADE will still be running. Don’t go below Path A at Tier-2.
4.1.6 Full Tier-2 Setup: Costed Bill of Materials
The still itself is the largest line item, but Tier-2 is a fuller-system purchase than Tier-1. The complete setup, assuming Path C (NG Still Co 15-gal) as the still:
Table 3 — The still itself is the largest line item, but Tier-2 is a fuller-system purchase than Tier-1. The complete setup, assuming Path C (NG Still Co 15-gal) as the still
| Item | Spec / source | Price |
|---|---|---|
| Still | NG Still Co 15-gal Distillers Kit | $1,924 |
| Heating element + bushing weldment | 5500W Camco 240V screw-in element + 1.5” NPT bushing welded into kettle (if kettle didn’t include element port) | $40 + $75 = $115 |
| PID controller with SSR | Pre-built Auber or generic-import unit, 25A SSR, enclosed | $150 |
| 240V GFCI breaker + 30A circuit installation | Electrician if not DIY-capable; one-time cost | $300–$600 |
| Fermenter (food-grade) | 15-gal Speidel plastic or stainless conical | $200–$400 |
| Column packing | 13 copper scrubbers ($13) or copper mesh roll ($20) | $20 |
| Parrot with alcoholmeter | Glass parrot or copper parrot if not included with still ($60–$120) + 0–100% ABV alcoholmeter ($15) | $75–$135 |
| Hydrometer + test jar | Triple-scale brewing hydrometer + 250mL plastic test jar | $25 |
| Thermometers (digital, calibrated) | Boiler immersion + column-output if not included | $30–$50 |
| Cooling water setup | Recirculating pump + 5-gal bucket + ice OR cold-water supply line | $40 |
| Wash recipe ingredients (per 15-gal batch) | Sugar wash ingredients: 25 lbs sugar + 5 packets EC-1118 + nutrients | $50 |
| Safety: fire extinguisher (ABC), GFCI tester | Hardware store | $50 |
| Total — complete Tier-2 setup | ~$2,979–$3,659 |
Notes on the BOM:
- If you choose Path A (ADE) or B (Brewhaus) instead: subtract $972 or $525 from the still line. Total drops to ~$2,000–$2,700 for ADE-based setup, ~$2,500–$3,100 for Brewhaus-based setup. Path D (StillDragon) total varies widely based on configuration but is typically $3,500–$5,000.
- If the kettle already includes element port and pre-installed controller: subtract $115 (some Path B and D configurations include these).
- 240V installation is the wildcard. If you have an unused 30A 240V circuit already (dryer outlet near where the still will live, e.g.), the cost is $0. If you need an electrician to run a new circuit from the panel, $300–$600 covers most situations.
- First-year ingredients/consumables (sanitizer, yeast nutrients, replacement gaskets, column packing replacement, etc.) typically add another $100–$200/year on top of the per-batch ingredient cost.
The complete Tier-2 setup at $3,000–$3,700 is roughly 10× a complete Tier-1 setup (Vol 3 §3.4). The output, however, is roughly 6–8× the spirit per session — and the spirit quality is meaningfully higher because of the two-stage workflow.
4.1.7 Step-by-Step: Your First Stripping Run
The first run on a Tier-2 setup should always be a dummy run with plain water (or vinegar-water for copper passivation, see vendor sections), followed by your first real stripping run. This section covers the first real stripping run on a 15-gallon batch of sugar wash from Vol 2’s recipes.
4.1.7.1 Pre-run preparation (the day before)
- Verify the wash is fermented out. Hydrometer reading should be ≤0.998 (most sugar washes drop to 0.990–0.995); reading should be stable over 48 hours. If it’s still dropping, wait.
- Cold-crash the fermenter if possible (move to a cool spot for 24 hours) — lets sediment drop, gives a cleaner racking
- Sanitize all transfer equipment — siphon hose, racking cane, kettle if it’s seen previous use
- Inspect the still — all tri-clamps tight, gaskets clean and present, element clear of debris, condenser water lines connected
- Stage materials — collection vessels (jars, jugs) for ~5 gallons of low-wine total, thermometer, parrot ready, notepad for run log
4.1.7.2 Loading the kettle
- Open the lid; inspect the kettle interior — fully clean, no debris from previous run
- Pre-fill with 1 gallon of clean water before racking — protects the heating element and helps the first vapor production
- Rack the wash from fermenter to kettle. Use a siphon, not a pour — leaves the yeast sediment behind in the fermenter. Goal: 12–13 gallons of clear wash in the kettle (some loss to sediment is expected)
- Verify the wash level covers the heating element with at least 4 inches of liquid above the element. Running the element dry will burn it out in seconds.
- Seal the kettle — tri-clamp gasket clean, clamp evenly torqued
4.1.7.3 Stripping-run heat-up
- Start condenser water flow before energizing the element. Cool water flowing through the condenser is non-negotiable; vapor reaching a dry condenser will spray flammable distillate.
- Energize the element at full power (100% if controller, or full 5500W if uncontrolled). Stripping runs don’t need careful control — get to vapor as quickly as possible.
- Heat-up takes ~25–40 minutes to first vapor at 5500W on 15 gallons. Monitor wash temperature; it should climb steadily.
- First vapor at ~78°C wash temperature. First drips will appear at the parrot/collection vessel. This is the start of the run.
4.1.7.4 The stripping run itself
- Throttle back to ~75% power once vapor is established. Steady moderate boil is the goal — too aggressive and you’ll get carryover (foam and wash droplets coming up the column and into your distillate); too low and the run takes forever.
- Collect everything from first drop to end-of-run. No cuts on a stripping run. Use 1-gallon glass jugs for collection; switch when one fills.
- Monitor parrot ABV — first drips will be 70–80% ABV; will drop steadily through the run
- End-of-run criteria: parrot reads 10% ABV or condenser-output thermometer reads >99°C (mostly water coming over). At this point you’ve extracted essentially all the alcohol; further running is wasted energy.
- Total run time: typically 2–3 hours from element-on to end-of-run
- Total output: ~4–5 gallons of low-wine at ~30% average ABV from 13 gallons of 10% wash
4.1.7.5 End-of-run shutdown
- De-energize the element first — don’t let it run dry as the kettle empties
- Keep condenser water flowing for another 10–15 minutes — there’s residual vapor still working through the column
- Once the condenser feels cool to the touch, shut off the water
- Let the kettle cool before draining the spent wash (the “backset”). Cool kettles are easier to drain and clean.
- Drain backset through the kettle’s bottom drain (most Tier-2 kettles have one); compost it or discard
- Rinse kettle with hot water; wipe down the element. Don’t use soap (residues affect future runs). For deeper clean, vinegar rinse periodically.
- Log the run: start time, end time, wash recipe, total output volume, average ABV, anything notable
Repeat for 2–4 more stripping runs over the following days/weeks. Combine the low-wines from all runs into a single storage vessel (glass carboy with airlock works) — accumulate until you have 10–18 gallons of low-wines for a single spirit run.
4.1.8 Step-by-Step: Your First Spirit Run
The spirit run is where craft happens. Plan to dedicate a full afternoon — 5–7 hours of careful attention.
4.1.8.1 Pre-run preparation
- Combine low-wines into the kettle — usually 12–18 gallons of 30% ABV combined output from 2–4 stripping runs
- Add 1–2 gallons of clean water if the combined low-wines are above 35% ABV — running 35%+ ABV in the kettle increases vapor-velocity risk and can saturate column packing
- Pack the column if you haven’t already — copper scrubbers (7–13 for a 2” column at 15-gal scale) or copper mesh. For bubble-plate columns (Path B Brewhaus): confirm all plates installed.
- Stage collection vessels: small glass jars (250 mL each, 8–12 of them) for foreshots and heads; 1-quart jars (3–4 of them) for hearts; 1-gallon jugs for tails
- Have the run log ready — you’ll be making cuts based on parrot ABV and column-output temperature
4.1.8.2 Heat-up and equilibration
- Start condenser water before energizing
- Element at 100% to first vapor — same heat-up as stripping run (~25–35 minutes)
- At first vapor, throttle back hard — to ~30–40% power on the controller. The spirit run is a slow walk, not a sprint. You want vapor production matched to the column’s rectification capacity, not overwhelming it.
- Equilibration period (~30–60 minutes). Before collecting anything, let the column reach steady state. Vapor will fill the column, condense on the packing/plates, run back down, contact more rising vapor, slowly establish the rectification gradient. Column-output thermometer will hover at ~78°C (ethanol’s boiling point) for an extended period — that’s the equilibration plateau.
4.1.8.3 Foreshots (the first ~50–100 mL — DISCARD)
- First drips at the parrot are foreshots. Mostly acetone, methanol, and the lowest-boiling esters. Smell like fingernail polish remover and feel hot on the tongue.
- Collect into small jars; label DISCARD. Quantity: roughly 50 mL per gallon of kettle volume — so 750 mL–900 mL total foreshots for a 15-gal spirit run. Some practitioners use less; the more conservative cut is safer.
- Foreshots end when the smell shifts from harsh nail-polish to a softer, more solvent-like sweetness. The parrot ABV will be very high (85–93%) throughout foreshots.
4.1.8.4 Heads (the next ~500–1500 mL — DISCARD or set aside for re-distillation)
- Heads are the transition zone between foreshots and clean hearts. Contain acetaldehyde, ethyl acetate, more methanol traces, and “harsh” character notes
- Smell: sharp, solvent-like, “hot.” Tongue will sting/burn on a tiny taste
- Length: depends on wash recipe and column efficiency. Sugar wash heads are typically 500–800 mL on a 15-gal spirit run; grain wash heads can be 1000–1500 mL.
- End-of-heads marker: smell transitions from sharp-solvent to clean alcohol/sweet/grain. Parrot ABV will still be very high (85–90%).
- Some distillers save heads for re-distillation into the next spirit run rather than discard — recovers usable ethanol that’s mixed with the harsh compounds. This is fine practice if you have storage; just don’t use them in this batch’s hearts.
4.1.8.5 Hearts (the main spirit — KEEP)
- The clean spirit. This is what you’re making.
- Smell: clean alcohol, sweet, with character from the wash (grain, fruit, sugar — depending on recipe). The “good stuff.”
- Parrot ABV during hearts: typically starts at 88–90% and slowly drops through the run; collection continues until ABV drops to ~60–65%.
- Collection rate: slow and steady — maybe 100–200 mL per minute at the parrot. If output rate increases substantially, throttle the element down further; if it slows below 50 mL/min, the column may be flooding (too much liquid backing up against rising vapor).
- Switch collection vessels mid-hearts to allow tasting/smelling each quart separately — lets you back-cut into tails later if a later fraction is still clean
- End-of-hearts marker: parrot ABV drops below 60%, OR a noticeable shift in smell/taste toward “wet cardboard,” “sour mash,” or “stale.” This is the fusel-oil transition; you’ve reached tails.
4.1.8.6 Tails (the last collection — set aside for next stripping run)
- Tails contain fusel oils (higher-molecular-weight alcohols — propanol, butanol, amyl alcohol — and longer-chain organics). Heavy mouthfeel, oily, “musty” smell.
- Collect into a separate vessel (gallon jug) labeled TAILS. Continue until parrot reads ~10% ABV or output rate drops to negligible.
- What to do with tails: add to the next stripping run. Tails contain a meaningful amount of ethanol mixed with the fusels; the next stripping run will recover the ethanol and concentrate the fusels in that run’s tails, where they’ll be discarded.
- Do not blend tails into hearts. Even a small amount of tails has noticeable effect on flavor and mouthfeel. The discipline of clean cuts pays off.
4.1.8.7 End-of-run
- De-energize element when parrot ABV drops below 10%
- Maintain condenser water flow for 15 minutes
- Cool kettle; drain backset
- Total spirit-run time: typically 5–7 hours
- Total hearts output: 4–8 gallons of 65–80% ABV spirit from 14–18 gallons of 30% ABV combined low-wines
4.1.8.8 Post-run: dilution to drinking proof
Hearts at 65–80% ABV are at distillation proof, not drinking proof. Standard drinking proofs:
- Whiskey: 80–100 proof (40–50% ABV) at bottling
- Vodka: 80 proof (40% ABV) standard
- Brandy: 80–86 proof (40–43% ABV)
- Rum: 80–100 proof (40–50% ABV)
Dilution math (Pearson’s square):
To dilute a spirit at A% ABV down to target T% ABV using water at W% (typically 0% for distilled water):
Parts water per part spirit = (A − T) / (T − W)
Example: dilute 70% ABV hearts to 40% ABV target with distilled water (0%): (70 − 40) / (40 − 0) = 30/40 = 0.75 parts water per 1 part spirit. So 1 liter of 70% spirit + 750 mL water = 1.75 L at 40% ABV.
Use distilled water for dilution, not tap water — chlorine, fluoride, and dissolved minerals affect flavor at the dilution ratio. Allow the diluted spirit to rest at least 48 hours before judging final flavor; immediate dilution sometimes shows “soapy” character that mellows within a day.
For whiskey, dilute to ~62–65% ABV for cask aging (Vol 8’s territory), then to 40–50% ABV at bottling after aging.
4.1.9 Common Tier-2 Pitfalls and How to Avoid Them
The most common ways a first Tier-2 run goes wrong, and the prevention or fix for each:
1. Heating element burnout. Running the element with insufficient liquid coverage (less than 4” above the element) will burn it out in seconds during heat-up, or carbonize wash sugars onto it during the run. Prevention: always verify liquid level before energizing; never energize until you’ve confirmed 4”+ coverage. Keep a spare element on hand ($15–$40); they fail occasionally even with care.
2. Column flooding. Too much vapor production overwhelms the column’s downcomers (bubble plates) or saturates packing, causing liquid to back up against vapor and eventually erupt as foam through the column top. Output stops; column makes gurgling/coughing sounds. Prevention: throttle element to 25–40% during spirit run; watch for early signs (irregular drip pattern at parrot, sudden temperature spikes); back off power immediately if observed.
3. Foreshots not adequately separated. Common rookie mistake — keeping foreshots in the hearts because “I only got a little methanol.” Methanol toxicity is real; even small amounts (~10 mL ingested) cause permanent blindness. Prevention: always discard foreshots; the 50 mL/gallon-of-wash rule is a minimum; err generous on the discard.
4. Bad cuts during a fatigued spirit run. 5–7 hours of careful attention is genuinely tiring. Late-run cuts (hearts-to-tails transition) suffer from attention fatigue. Prevention: take a 10-minute break before the hearts-to-tails decision; smell and taste the most recent collection fraction with fresh attention; if uncertain, cut earlier rather than later (you can always recover too-early tails by adding to next stripping run).
5. Cooling water failure. Pump dies mid-run, or supply hose pops off, or ice in cooling bucket melts and no one notices. Result: vapor reaches a hot condenser, condensation stops, hot flammable distillate vapor sprays out the parrot. Fire risk is real. Prevention: check cooling water flow at the parrot every 15 minutes; install a flow switch if running unattended for any reason; keep an ABC fire extinguisher within arm’s reach.
6. Stuck wash (incomplete fermentation). Sugar wash sometimes finishes at higher residual gravity than expected (1.010–1.015 instead of 0.995), meaning unfermented sugars enter the kettle. Result: scorch/burn-on at the heating element; possible flavor taint. Prevention: verify gravity stability over 48 hours before distilling; if stuck, add yeast nutrient and re-pitch fresh yeast; wait another 7–10 days.
7. Backset contamination. Spent wash (“backset”) drained from the kettle still contains acidic and proteinaceous material that can grow bacteria fast in warm weather. Prevention: discard or compost backset immediately; do not let it sit in the kettle overnight; rinse kettle the same day.
8. Electrical shock or fire. High-power electric heating in a wet environment with flammable distillate is the worst-case hazard set in this hobby. Failure modes include: ungrounded element, frayed cord, water spray from a leaking joint contacting hot element, faulty SSR shorting. Prevention: GFCI breaker AND/OR GFCI inlet on the controller (both is best); annual visual inspection of all wiring; never run with visible damage; install the dedicated 240V circuit per code (or hire an electrician); keep distillate collection vessels at least 3 feet from heating element power connection.
9. Bubble-plate cleaning neglected (Path B). Plates accumulate residue from each run; over 5–10 runs without cleaning, the residue affects rectification efficiency and can taint the spirit. Prevention: between spirit runs, soak plates in dilute citric acid solution (1 tbsp per gallon water) for 4 hours; rinse thoroughly with clean water. Annual deep clean with PBW or equivalent brewery cleaner.
10. Skipping the dummy run on a new setup. First run on a new still should be water-only (or vinegar-water) so any leaks, control issues, or assembly problems show up without wasting wash and without producing flammable distillate. Prevention: always dummy-run a new setup; verify tri-clamps don’t leak under heat, condenser flow works, parrot is positioned correctly, controller behaves predictably.
4.1.10 Where Tier-2 Leaves You; What Tier-3 Adds
A well-run Tier-2 setup with Path C (NG Still Co thumper-style) produces excellent whiskey, rum, brandy, and character-forward spirits at 5–8 gallons per spirit run — enough for serious aging projects, gifting, and personal consumption (in jurisdictions where that’s legal). With Path B (Brewhaus 4-plate) you produce neutral spirits at 85–90% ABV suitable for gin, vodka, and infusion bases.
Tier-2’s natural limits:
- Output volume: 5–8 gallons of hearts per spirit run, with 3–6 spirit runs per year as a realistic hobbyist cadence = 15–48 gallons of finished spirit per year. Plenty for personal use and gifting; insufficient for any commercial or quasi-commercial volume.
- Rectification ceiling: 85–90% ABV from a 4-plate column or packed 2”–3” column is the practical limit. True neutral spirit (95%+ ABV) requires more plates or a longer column.
- Multi-spirit flexibility: good but not unlimited. Switching between whiskey-style (plates out / thumper engaged) and neutral-style (plates in / column packed) is feasible on Path B and D but tedious.
Vol 5 (Tier-3) introduces the dedicated reflux column with reflux-ratio control — packed columns 4–6 feet tall, dephlegmators that let you control how much condensed liquid returns to the column vs. continues to the parrot, and the ability to produce 92–96% ABV neutral spirit in a single spirit run. The hardware step is moderate ($500–$1,500 added to your Tier-2 base if you’re already on Path D StillDragon; more if you’re starting fresh).
Vol 6 (Tier-4) introduces the pot+column hybrid at the ~5-gallon dedicated scale — a setup optimized for switching cleanly between rich whiskey production and neutral spirit production within the same equipment, with proper compartmentalization between the two modes.
Vols 7–8 (Tier-5 and Tier-6) move into small-batch dedicated rigs (15–25 gal commercial-style) and small craft distillery floor scale (50–100+ gal). These tiers cross the line into “you should consider TTB DSP licensing” territory; the legal posture in those volumes will be treated in detail.
End of Vol 4. Next: Vol 5 — Tier-3 Reflux Column Upgrade.
Comments (0)