Distilling · Volume 5
Vol 5 — The Tier-3 Reflux Column: Active Rectification, Reflux Ratio, Neutral Spirit
Phase 3 — Distilling deep-dive series. This volume covers the upgrade from Tier-2 (pot-and-thumper or basic plates) to Tier-3 (dedicated reflux column with active reflux-ratio control via dephlegmator). We cover the chemistry of reflux — why it produces higher ABV and cleaner spirit than passive column packing — the four common Tier-3 column architectures, four vendor paths spanning DIY to professional-modular, the dephlegmator hardware that turns a packed column into a real reflux column, and complete walkthroughs of a neutral-spirit run and a gin run on a Tier-3 setup.
5.1.1 What Tier-3 Means
The Tier-3 reflux column rig is defined by:
- Scale: typically 5–15 US gallon kettle (same as Tier-2 — Tier-3 is about column sophistication, not capacity)
- Equipment cost: $250–$1,500 added to an existing Tier-2 base for column-only upgrades; $1,450–$4,000 for standalone Tier-3 kits if starting fresh
- Energy source: unchanged from Tier-2 — dedicated electric element with PID control
- Skill level: advanced; you’ve completed many Tier-1 and Tier-2 runs, you understand cuts intuitively, and you want either neutral spirit (vodka/gin base) or genuinely fine-tuned rectification control
- Spirit output: ~2–5 liters of 92–96% ABV neutral spirit per spirit run on a 15-gallon kettle of combined low-wines; alternatively, the same hardware run with reflux disengaged produces character spirit at 75–85% ABV
- Equipment type: dedicated reflux column with active reflux-ratio control — a dephlegmator (partial condenser) at the column top diverts a tunable fraction of the rising vapor back down the column as liquid, while the remainder continues to the main condenser and parrot
5.1.1.1 Tier-3 is the rectification-control step
The Tier-2 column did passive rectification: vapor rose through packing, condensed on cool surfaces, ran down a little, re-evaporated. The amount of “reflux” — liquid returning down the column to contact rising vapor — was whatever happened to happen as the column lost heat to the surrounding air. You could nudge it by varying element power, but you couldn’t control it directly. The ABV ceiling was ~85–90% on a well-run Tier-2 spirit run with copper-packed column.
A Tier-3 column adds a dephlegmator (literally: “removes the phlegm” — the German chemistry term for the heavier, less-volatile fraction). The dephlegmator is a partial condenser mounted at the top of the column, fed with its own cooling-water supply. By controlling how much cooling water flows through the dephlegmator, you control how much of the rising vapor gets condensed (and falls back down the column as reflux) versus how much passes through to the main condenser and out the parrot. This is active reflux-ratio control, and it is what separates Tier-3 from Tier-2.
With high reflux ratio (most of the vapor condensed and returned), the column reaches very high rectification — 92–96% ABV at the parrot, approaching the ethanol-water azeotrope ceiling at 95.6%. With reflux ratio backed off (less condensed, more passes through to the parrot), the column behaves more like a pot still — lower ABV, more character, faster output. Same hardware, two very different products, controlled by a needle valve on the dephlegmator cooling line.
5.1.1.2 What stays the same from Tier-2
- Wash chemistry, fermentation, stripping runs (Vol 4 §4.7). Tier-3 is a spirit run only upgrade — you still strip down 10–15 gallons of wash into low-wines using Tier-2 procedure, then run the low-wines through the Tier-3 column.
- Heating (Vol 4 §4.3) — same electric element, same PID, same 240V circuit if you have 5500W.
- Cooling-water management — except now you have two condensers to feed (dephlegmator and main condenser), and the dephlegmator’s water flow is your active control variable.
- Legal posture — same federal felony exposure as Tiers 1 and 2; producing high-proof neutral spirit at Tier-3 output volumes (2+ gallons per run) is the same legal category as a Tier-2 hearts run.
5.1.1.3 What’s new at Tier-3
- The dephlegmator (the central new hardware — §5.3 covers types, §5.5 covers operation in detail)
- Reflux-ratio thinking — you’ll spend the spirit run continuously adjusting the dephlegmator water flow to maintain target column behavior (specific temperature at the column output, specific parrot ABV, specific output flow rate)
- Longer columns — typical Tier-3 column heights are 4–6 feet versus Tier-2’s 2–3 feet. Each additional foot adds rectification stages (the “HETP” concept — Height Equivalent to a Theoretical Plate — see §5.2.4)
- Neutral spirit becomes practical — Tier-2 caps around 85–90% ABV; Tier-3 reliably hits 92–95% in a single pass, which is the difference between “needs polishing for vodka” and “ready for vodka after carbon filtration”
- The gin run becomes a real option — vapor infusion through a gin basket (§5.9) requires a column tall enough to support a basket above the kettle but below the dephlegmator, which is straightforward at Tier-3 dimensions
5.1.2 Reflux: The Chemistry of Active Rectification
The case for Tier-3 rests on chemistry that goes beyond what passive Tier-2 packing can deliver. The key concept is the theoretical plate (or “stage”) — the unit of rectification work.
5.1.2.1 The theoretical plate concept
Imagine a perfect distillation stage: vapor of composition x (in mole fraction ethanol) enters the bottom, contacts liquid of composition y already on the stage, and reaches full vapor-liquid equilibrium. The vapor leaving the top of this stage now has composition y', where y' is whatever the ethanol-water VLE diagram says the vapor in equilibrium with liquid of composition y would contain. For ethanol-water below the azeotrope, y' > y (vapor is richer in ethanol than the liquid it equilibrated with). The stage has done one increment of rectification.
A “perfect” column has many such stages stacked vertically; each stage incrementally enriches the rising vapor. Real columns approximate this — every inch of packing or every bubble plate adds some fraction of a theoretical stage, and the cumulative rectification across the column determines the final ABV.
The maximum possible ABV from a single distillation pass is the azeotrope — the composition at which the vapor coming off a boiling liquid has the same ethanol/water ratio as the liquid itself. For ethanol-water at atmospheric pressure, this is 95.6% ethanol by volume (~97.2% by mole), 4.4% water. No amount of rectification at atmospheric pressure can push past this; the system reaches an equilibrium where further plates do no further enrichment.
Practical neutral spirit at 95% ABV is essentially at the azeotrope. To go above 95.6% requires either azeotropic distillation (adding a third compound to disrupt the binary equilibrium — benzene historically, cyclohexane now) or molecular sieves (adsorbent that selectively traps water molecules). Neither is in scope for home distillation.
5.1.2.2 HETP — Height Equivalent to a Theoretical Plate
A real packed column doesn’t have discrete stages; rectification happens continuously along the length of the packing. The empirical measure of rectification efficiency is HETP — the height of packing required to achieve the equivalent of one theoretical plate of separation.
Table 1 — 5.2.2 HETP — Height Equivalent to a Theoretical Plate
| Packing | Typical HETP | Practical implication |
|---|---|---|
| Bubble-cap plates | 1 plate per actual physical plate | 4 plates ≈ 4 theoretical stages |
| Sieve plates | 0.7–0.9 per actual plate | 5 sieve plates ≈ 4 theoretical stages |
| Copper mesh (rolled, snug) | ~6 inches per stage | 4-foot column ≈ 8 stages |
| Copper scrubbers (loose) | ~9 inches per stage | 4-foot column ≈ 5 stages |
| Ceramic Raschig rings (1/4”) | ~12 inches per stage | 4-foot column ≈ 4 stages |
| Empty column (no packing) | meaningless — minimal rectification | passive condensation only |
A 4-foot column packed with copper mesh approximates 8 theoretical plates. Starting from a 30% ABV low-wine input, 8 stages of rectification can drive the parrot output to 93–95% ABV at reasonable reflux ratio — within striking distance of the azeotrope. This is why Tier-3’s 4–6 ft packed columns hit neutral-spirit targets that Tier-2’s 2–3 ft columns can’t.
5.1.2.3 What reflux ratio actually controls
Reflux ratio (R) is the ratio of liquid returned to the column (from the dephlegmator) to liquid collected at the parrot:
R = (liquid returned to column) / (liquid taken off as product)
At R = ∞ (total reflux, nothing collected), the column reaches its maximum rectification — every theoretical stage is fully exercised. This is the equilibration mode used during column warm-up. At R = 0 (no reflux, all vapor passes through to the parrot), the column behaves like an empty pipe; rectification is limited to whatever passive condensation happens on the packing.
In practice, Tier-3 spirit runs use R = 3 to R = 10 during hearts collection — enough reflux to maintain near-maximum rectification, but not so much that output drops to zero. Higher R = cleaner spirit but slower output; lower R = faster output but lower ABV. Tuning R during the run is the main thing you do at Tier-3 that you didn’t do at Tier-2.
5.1.2.4 Why the dephlegmator beats valved reflux
There are two ways to implement reflux control:
Valved reflux (VR): the column output goes to a single condenser that condenses all vapor. A tee at the bottom of that condenser splits the liquid — some returns to the column via a return line; some goes to the parrot via the product line. A needle valve on the product line controls the split: tighten the valve, more reflux; open the valve, more product.
Dephlegmator (partial condenser, sometimes called CCVM — Coil Cooler Vapor Management): a short column-mounted condenser with its own cooling water supply, mounted above the main packed column and below the main condenser. Cool water flow through the dephlegmator partially condenses the rising vapor, returning the condensed liquid as reflux down the column. Uncondensed vapor continues upward to the main condenser and parrot. The cooling water flow rate to the dephlegmator controls reflux ratio.
Why dephlegmator is preferred for serious work:
- Direct vapor-phase control. The dephlegmator acts on rising vapor before it leaves the column. Reflux returns immediately to the top of the packing, contacting the most-rectified vapor zone first. Valved reflux returns fully condensed liquid to the column top, which has to re-evaporate to do useful work.
- Better temperature stability. Dephlegmator reflux is at the column-output temperature (~78°C for ethanol). Valved reflux is at the main-condenser-output temperature (~25–30°C); the column has to use thermal energy to bring it back up.
- Smoother control. Cooling water flow modulates more gracefully than a needle valve on a liquid line.
- Lower product losses. Less ethanol stays trapped in cold-reflux holdup; better recovery during the heart cut.
Valved reflux is simpler and cheaper to build, which is why it appears in many DIY designs (especially the Bokakob — §5.4.1). For a first Tier-3 build, VR is workable. For production-quality neutral spirit at scale, dephlegmator is the standard.

5.1.3 The Four Reflux Column Architectures
Modern Tier-3 columns fall into four basic families:
5.1.3.1 Dephlegmator-controlled packed column
Most common modern Tier-3 design. A 2”–4” packed column (copper mesh, scrubbers, or Raschig rings) with a dephlegmator at the top and a main condenser/parrot above that. Reflux control via dephlegmator coolant flow. What StillDragon, Hillbilly Stills, Mile Hi Distilling, and most quality builders sell. ABV ceiling: 95% reliably, 93% comfortably, configurable down to ~80% for character work.
5.1.3.2 Bubble-plate sight glass column (e.g., Brewhaus 4-plate, Mile Hi flute)
Sight-glass sections each containing a copper or stainless bubble plate (sometimes called “fluted” or “flute” stills). Vapor bubbles through the liquid on each plate; rectification happens at each plate stage. Often combined with a dephlegmator at the top for reflux-ratio control. Excellent learning tool because the action is visible through the sight glasses. ABV ceiling: 93–94% with 4 plates plus dephlegmator; 95% with 6+ plates. Hardware cost is the highest per-rectification-stage of the four families, but the visibility makes it pedagogically valuable.
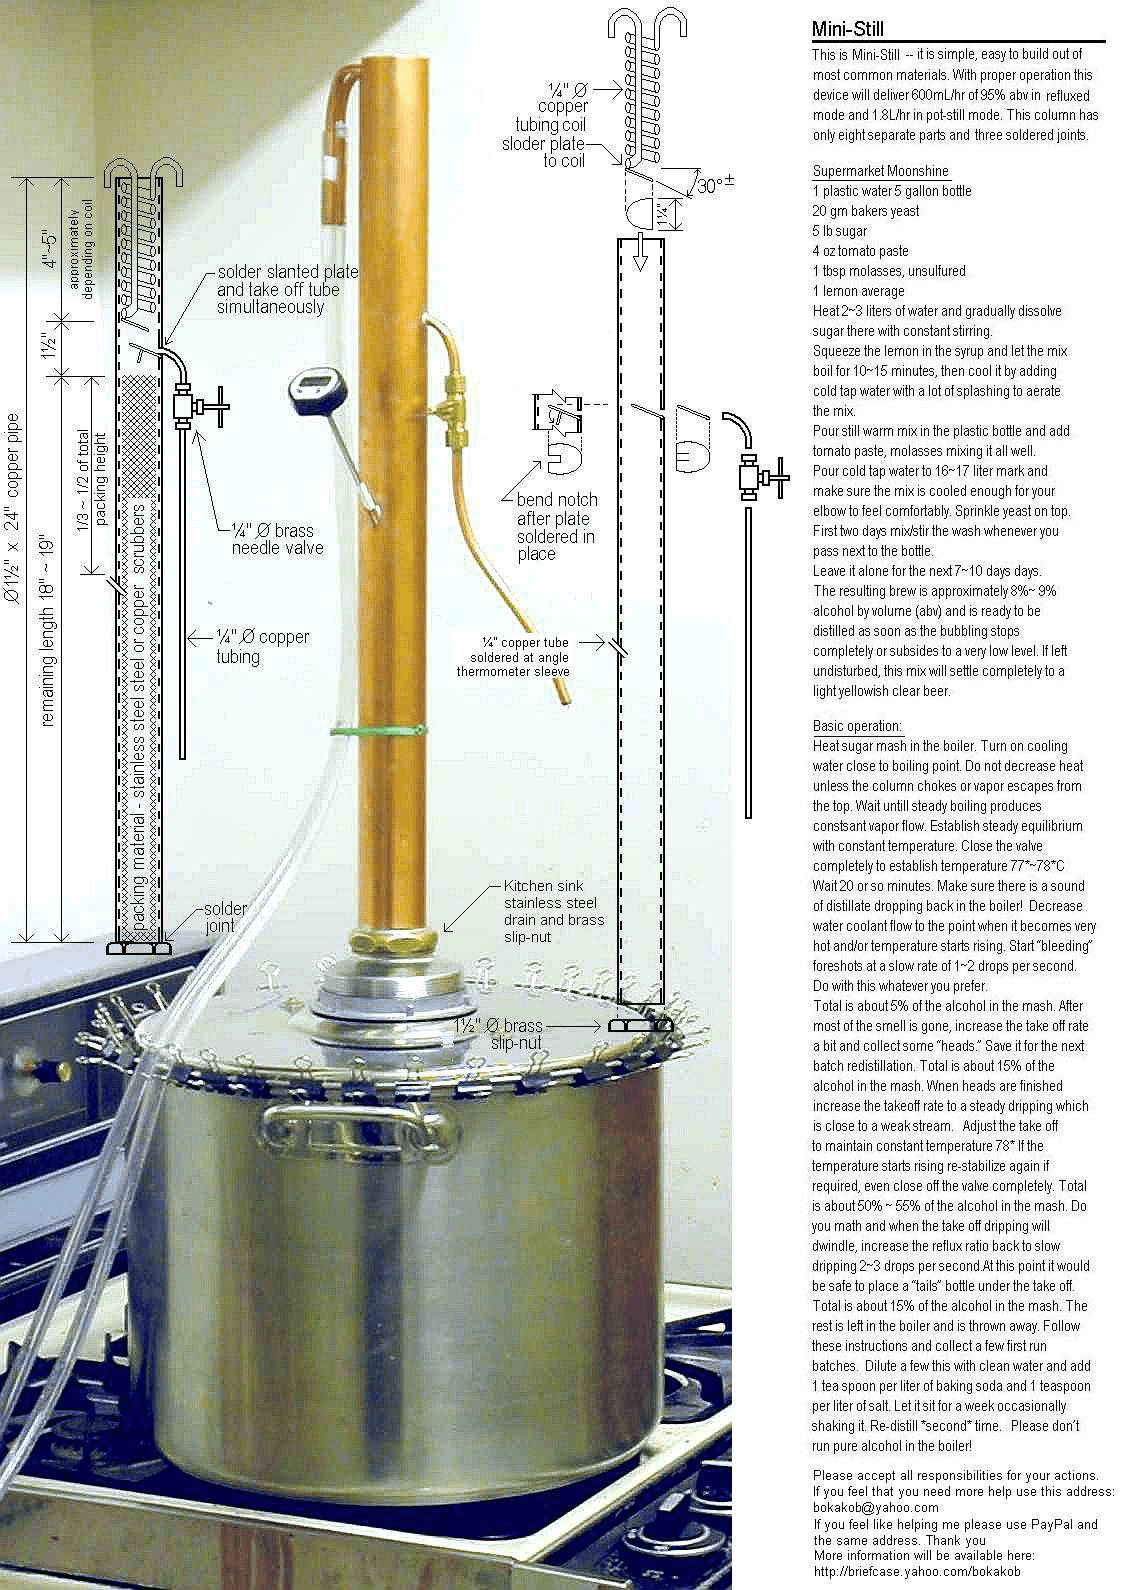
5.1.3.3 Bokakob — DIY classic
Designed by Alex Bokakob (who used the Yahoo username “Bokakob”) and shared on home-distilling forums starting in 2001. A short (~2 ft) 1.5”–2” copper column with a fixed amount of packing (copper scrubbers), a fixed partial condenser at the top (no active reflux control — the geometry sets the reflux ratio), and a simple take-off tube to the main condenser. Three solder joints. Total parts cost: ~$250–$400. The classic homebrewer reflux design. ABV ceiling: 90–95% depending on packing density and how slowly you run it. Operates closer to “set it and forget it” than the actively-controlled designs above. The right answer for a builder who wants to learn the principles cheap and proven.
5.1.3.4 Liquid Management (LM) head
Less common in the hobbyist segment. A reflux head that totally condenses all rising vapor, then uses a tilt-needle or pivoting take-off arm to divide the resulting liquid between reflux-return and product-takeoff. Conceptually similar to valved reflux but with finer mechanical control. Used in some lab-scale and older homebrewer designs. Workable but largely superseded by dephlegmator architectures in modern Tier-3 builds.
For the rest of this volume, when we say “reflux column” we mean the dephlegmator-controlled packed column or the bubble-plate variant — those are the production paths.

5.1.4 The Vendor Landscape: Four Paths to Tier-3
These four paths are organized by total Tier-3 cost (assuming you already own a Tier-2 kettle from Vol 4 — most of these are column-only upgrades that drop onto an existing kettle). Standalone Tier-3 kits that include the kettle are flagged where applicable.
5.1.4.1 Path A — DIY Bokakob 2” Reflux Column (~$250–$400)
- Source: free plans online (
https://homedistiller.org/wiki/index.php/How_To_Build_A_Bokakob_Reflux_Still, alsohttps://learntomoonshine.com/how-to-build-a-boka-reflux-still-free-plan-with-step-by-step-instructions/) - Parts: ~2 ft of 1.5” or 2” Type L copper pipe, copper end caps, 3/8” copper tubing for the partial condenser coil, copper scrubbers for packing, fittings, lead-free silver solder
- Total cost: $250–$400 in parts; ~6–10 hours to build with basic plumbing-torch skills
- Mounts on: any standard Tier-2 kettle with a 1.5” or 2” weld-flange or tri-clamp at the top
- Output: 90–95% ABV depending on element power, run speed, and packing density
- Heating element: separate; reuses your Tier-2 5500W setup
- Country of origin: yours — built in your shop
Why DIY Bokakob is the right starting Tier-3 for many people:
- Educational. You build the column, you understand exactly what every part does. When you later evaluate a $1,500 StillDragon column, you’ll know what you’re paying for.
- Cheap proof-of-concept. $300 and a weekend buys you a working reflux column. If you discover you don’t actually like making neutral spirit, you’re out a small amount.
- All copper, all the time. Every surface vapor touches is copper. Maximum sulfur scrubbing.
- Proven design. Tens of thousands of homebrewers have built this exact column since 2001. Forums full of build photos, tuning advice, common-mistakes notes.
- Repairable forever. Every joint is your own solder; every part is standard plumbing copper.
Trade-offs vs. commercial Tier-3 paths:
- No active reflux control. The Bokakob’s “partial condenser at the top” is a fixed geometry — you tune effective reflux ratio by varying element power and run speed, not by direct dephlegmator coolant flow. Less precise than commercial dephlegmator designs.
- Soldering skills required. Three joints isn’t many, but they all need to be clean and pressure-tight. If you’ve built the Vol 3 Clawhammer kit, you’re ready; if not, expect a learning curve.
- Cosmetic finish depends on you. First-build solder appearance is rarely as clean as commercial work. Functional but not pretty.
Setup:
- Follow the published Bokakob plans exactly the first time — improvise later when you understand what each dimension is doing
- Pressure-test all joints with soap-water and a bicycle pump before first run
- Pack snug with copper mesh; not so tight you stall vapor flow, not so loose that packing collapses on heat-up
- Vinegar pre-clean before first wash-based run
5.1.4.2 Path B — Add-On Dephlegmator + Packed Column (~$500–$900 add to existing Tier-2)
The “modular upgrade” path: keep your Tier-2 kettle from Vol 4 (NG Still 15-gal, ADE 13-gal, or similar), add a dedicated 4-foot packed column with a dephlegmator at the top, and you have Tier-3.
Representative component picks:
- OakStills 2” copper dephlegmator (
https://oakstills.com/products/2-inch-copper-condenser-dephlegmator) — $259 for the dephlegmator alone; or $259 for the 2” glass reflux column variant. Pure copper construction, tri-clamp fittings. - PhilBilly Moonshine 2” stainless dephlegmator — bundle includes dephlegmator + PEX cooling fittings + tri-clamps + gaskets; pricing on inquiry but typically $200–$300
- 2-foot 2” copper column section (DIY or from any of the artisan vendors) — $100–$200 for the bare column
- Column packing (copper scrubbers or mesh) — $20
Total upgrade cost: $379–$679 for column + dephlegmator + packing; plus you need a 2” tri-clamp port on your existing kettle (most quality Tier-2 kits already have one)
Why this is the path for an existing Tier-2 owner:
- Lowest spend to add real reflux capability to equipment you already own and like
- Preserves your kettle investment — if you bought a $1,924 NG Still 15-gal kit, that boiler is excellent; you’re just upgrading the top-of-kettle hardware
- Pure copper everywhere — OakStills and PhilBilly both ship genuine copper components
- Modular thinking — column sections, dephlegmator, and condenser are all separate tri-clamp parts; you can swap individual pieces as you learn what works best for your spirits
Trade-offs vs. complete-kit paths C/D:
- You’re integrating components from different vendors. Tri-clamp standardization makes this manageable but you’ll spend time confirming gasket sizes, fitting compatibility, and proper torque on every connection.
- No included instructions for the integrated system — you’ll consult the dephlegmator vendor’s manual, the column vendor’s manual, your kettle vendor’s manual, and forum threads to integrate everything
- Cooling-water plumbing is on you — you need to run a separate cool-water line to the dephlegmator (in addition to the main condenser line) and ideally install a needle valve for reflux-ratio control
Setup:
- Confirm your kettle’s top-of-still tri-clamp size matches the column section (2” is most common at this scale)
- Pack the column with copper scrubbers or mesh per §4.3.4 (Vol 4) — 7–13 scrubbers for a 4-foot 2” column
- Plumb the dephlegmator’s cooling-water inlet to a separate needle-valved supply line; outlet returns to your cooling-water reservoir
- Test reflux behavior with a water-only dummy run before any wash-based work
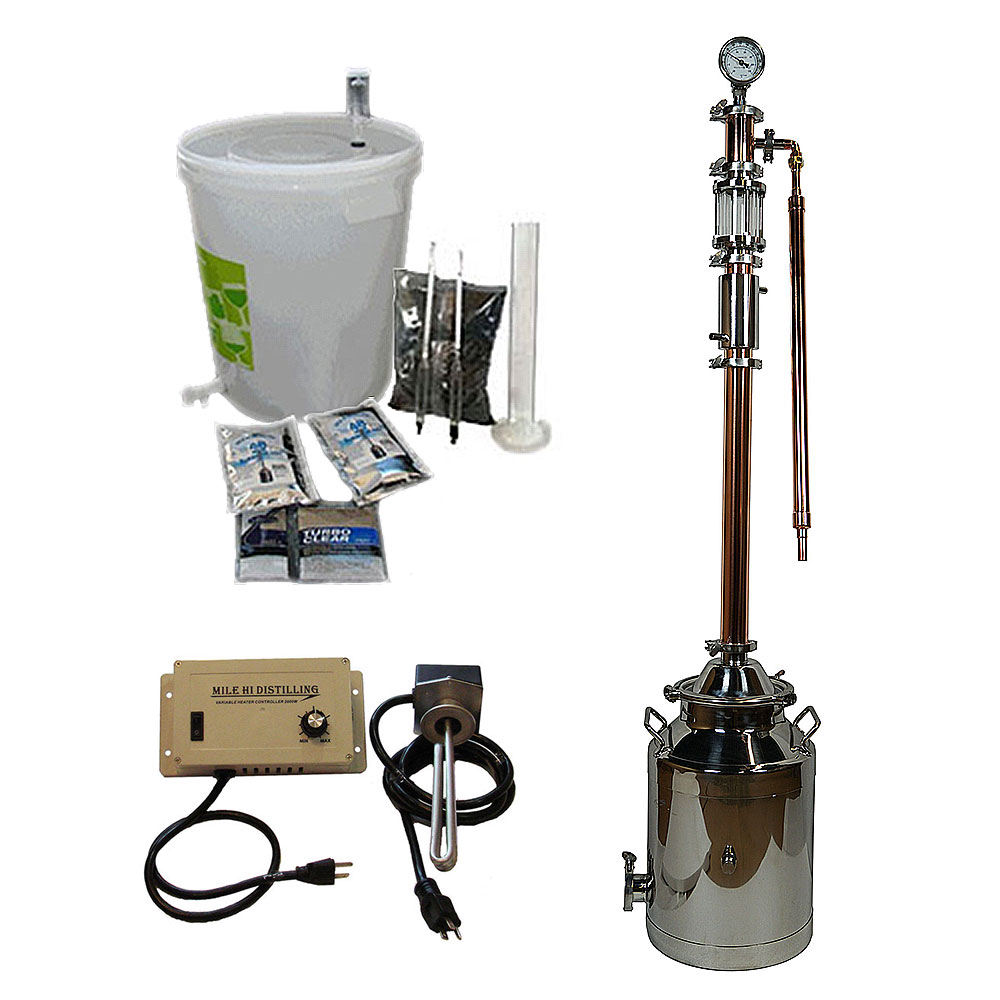
5.1.4.3 Path C — Mile Hi Distilling 8-Gallon 2” Copper Dual-Purpose Pro Kit ($1,450)
- Vendor: Mile Hi Distilling (Denver, CO, USA) —
https://milehidistilling.com/product/8-gallon-with-2-inch-copper-dual-purpose-pro-kit/ - Price: $1,450 for the complete kit
- Capacity: 8-gallon stainless kettle (usable ~6.5 gallons)
- Column: 2” copper with multiple sight-glass sections containing copper bubble plates; switchable plate engagement (pull plates for pot mode, install for reflux mode — hence “dual-purpose”)
- Includes: kettle, copper column with plates, dephlegmator, main condenser, parrot, tri-clamps, hoses, manual
- Heating element separate — Mile Hi recommends and sells matching 240V elements (
$80) and controllers ($150) - Country of origin: Denver, CO — Mile Hi assembles and sells direct
- Lead time: most kits ship within 1–2 weeks
Why this is the “best learner’s Tier-3” path:
- Sight-glass column with visible copper bubble plates — same teaching value as the Brewhaus 4-plate in Vol 4 §4.2.2, but with a dephlegmator added for active reflux control. You can see the plates flooding, the reflux returning, the rectification behavior in real time.
- Plates are removable — operate as a reflux still for neutral spirit, or pull plates for pot-still operation. Maximum flexibility per dollar.
- Complete kit at a single price — kettle, column, dephlegmator, condenser, parrot. Add an element and you’re done. Much simpler than the Path B “integrate four vendors” experience.
- Active US-based vendor with phone-and-email support (303-587-5117) and a well-regarded YouTube channel walking through their kits
- 8-gallon scale is sweet-spot for learners — large enough to do real stripping+spirit workflow with multiple runs, small enough to manage in a typical home workshop or large kitchen
Trade-offs:
- Stainless kettle — same compromise as Vol 4 Brewhaus pick. Plates and column are copper; kettle is stainless. Less total copper-vapor contact than the all-copper Path B/D builds.
- Smaller capacity than Vol 4’s 15-gal kits — 8-gallon kettle means more stripping runs to accumulate enough low-wines for a spirit run. Workable but more total labor per spirit run.
- Imported plates — Mile Hi sources some plate hardware from overseas; the column shell and dephlegmator are US-made
Setup:
- Watch Mile Hi’s full assembly + first-run video before unboxing (linked from their product page)
- Decide first-run mode: all plates installed = reflux/neutral; plates removed = pot/character
- Start with all plates installed to learn reflux-ratio control; move to pot mode later when you understand both
- Cooling water: two lines — one to dephlegmator, one to main condenser. Both controllable; the dephlegmator is your reflux-control variable.
5.1.4.4 Path D — StillDragon Modular Tier-3 Build ($1,500–$2,500+ column hardware on existing kettle)
- Vendor: StillDragon (Sebastian, FL, USA) —
https://stilldragon.com/andhttps://shop.stilldragon.com/ - Product: assembled from modular components — column section(s) + plate section(s, optional) + dephlegmator + main condenser + parrot
- Price: $1,500–$2,500 for typical Tier-3 column hardware on an existing Tier-2 kettle; $3,500–$5,000 if buying kettle separately (StillDragon’s 14-gal kettle + Tier-3 column + dephlegmator + control hardware)
- Column options: 2”, 3”, or 4” diameter; 2 ft, 3 ft, 4 ft, or 6 ft heights; plain packed-column section, ProCap (bubble-plate) section, or sight-glass column with plates
- Dephlegmator: 4” Stainless Short or Long (SKU DE4 or DE4L); High-Efficiency variant adds ~$80 over standard
- Materials: stainless column shells with copper plates (in ProCap configurations); pure-copper column sections available at upcharge
- Country of origin: USA-designed; some components manufactured to spec overseas
- Lead time: most components ship within 1–2 weeks
Why StillDragon is the future-proof Tier-3 pick:
- Modular component architecture — start with a 2-plate column, add another plate section later, swap in a higher-capacity dephlegmator next year, all using the same tri-clamp standard
- Commercial-distillery-grade — same components used in production at hundreds of TTB-licensed distilleries. Reliability, repeatability, and parts availability are commercial-tier.
- Active forum and documentation — StillDragon’s own community forum (
stilldragon.org) has thousands of build posts, troubleshooting threads, and configuration discussions. The learning curve is heavily supported. - The dephlegmator + plates combination in ProCap configurations gives you both bubble-plate visibility AND active reflux control — best of both pedagogical worlds.
Trade-offs vs. complete-kit paths B/C:
- You build the spec sheet. First-time Tier-3 buyers can be overwhelmed by component choice. Spend the research time first — read StillDragon’s sizing guide, post a configuration question on the forum, get the spec right before ordering.
- Higher total cost than the integrated kits for a comparable feature set — modular flexibility costs money
- Multi-component shipping — different parts may arrive on different days; plan assembly around the last delivery
- Stainless-column default — copper-column variants exist but at notable upcharge. Full-copper StillDragon Tier-3 builds easily reach $3,000+.
When to choose StillDragon Path D:
- You bought a StillDragon Tier-2 setup in Vol 4 Path D — the upgrade is literally adding components to the existing system
- You’re planning to grow into a Tier-4 or Tier-5 rig within a few years and want everything compatible from day one
- You value the active forum community and the assurance that any failure mode has been seen and solved by someone before you
- You want the option to switch among many spirit modes (vodka/gin neutral, whiskey, brandy, rum, gin-via-basket) without buying separate equipment
Setup:
- Confirm power and water before ordering. A 4” StillDragon column at full reflux can move serious water through the dephlegmator and main condenser; plan a recirculating chiller or substantial cooling-water supply.
- Assemble per the component manuals; the tri-clamp standard makes joints intuitive
- Vinegar pre-clean at chosen kettle scale
- Spend an evening doing a water-only dummy run with the dephlegmator engaged — practice reflux-ratio control on something non-flammable before doing it with real spirits

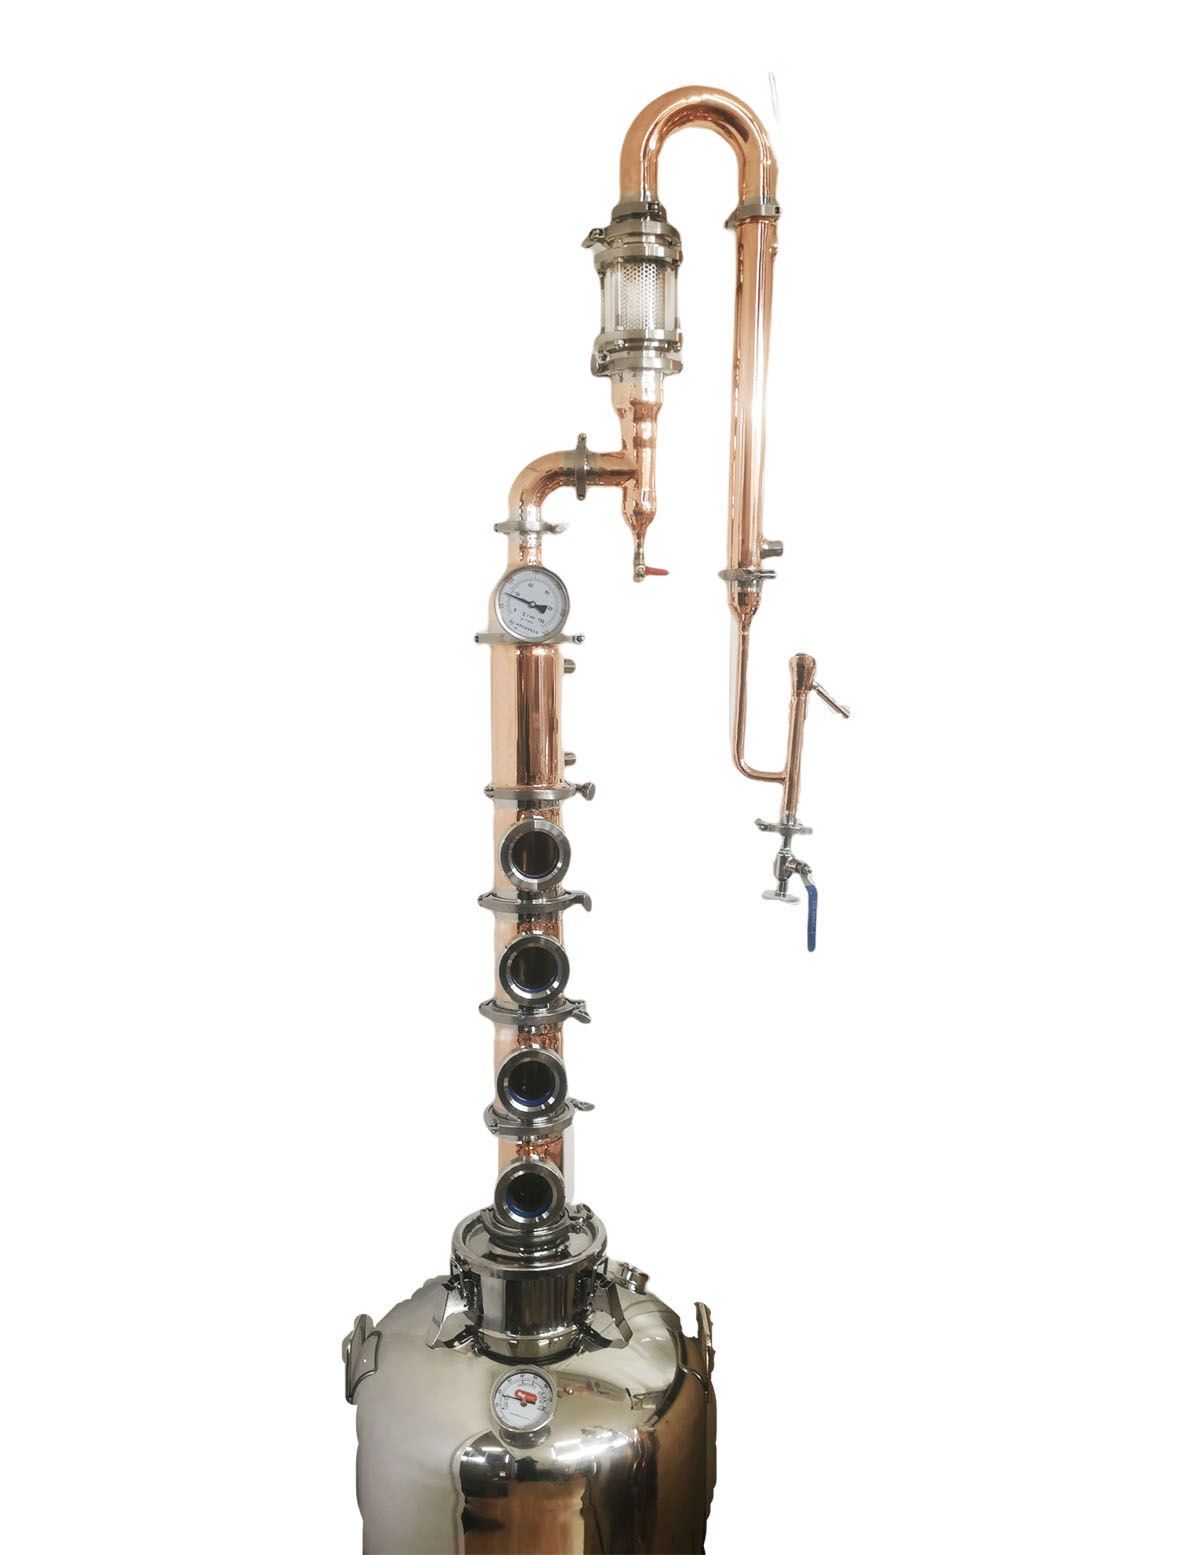
5.1.5 The Dephlegmator Up Close: How Reflux-Ratio Control Actually Works
The dephlegmator is the central new piece of hardware in Tier-3. Worth understanding in detail.
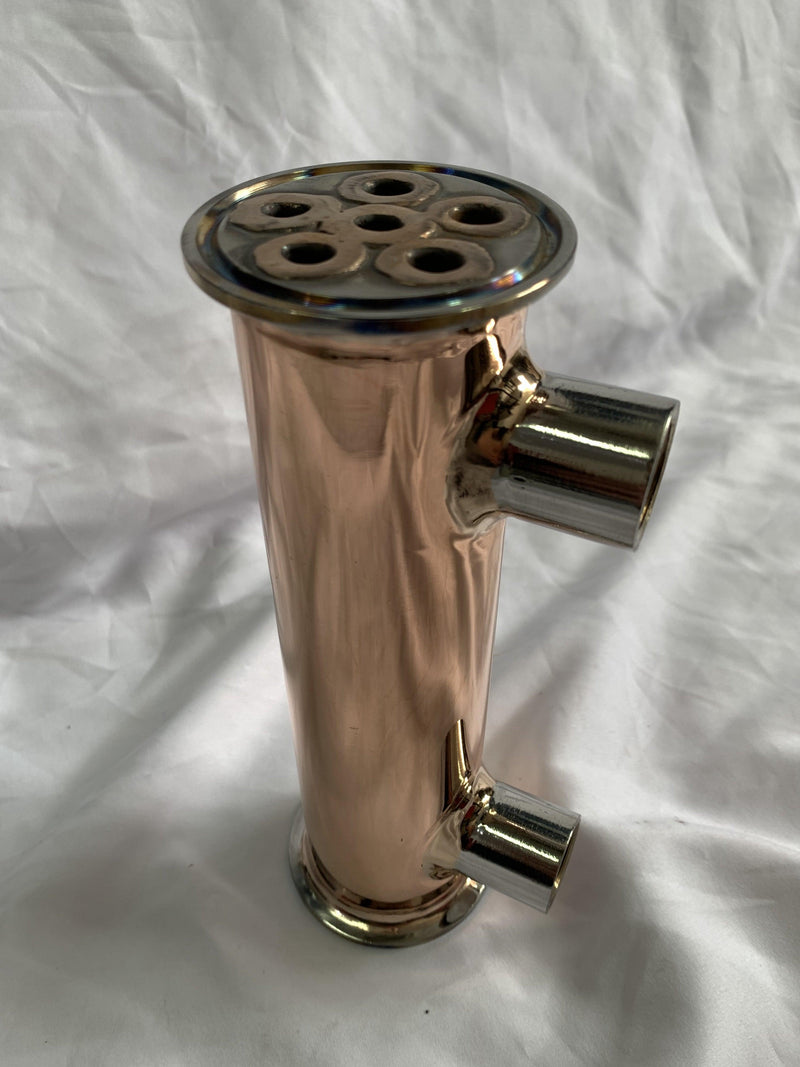
5.1.5.1 Construction
A dephlegmator is, in essence, a short shell-and-tube heat exchanger mounted at the top of the main column. Common designs:
Coil-in-shell: the rising vapor flows through the vertical “shell” (the outer pipe); cooling water flows through a copper coil inside the shell. Compact, simple, modest efficiency. Standard for hobbyist 2”–3” columns. OakStills 2” copper dephlegmator is this type.
Tube-in-tube: vapor flows through the central tube; cooling water flows through an annular jacket around the tube. Higher efficiency per unit length; more expensive to manufacture. Common in larger StillDragon and commercial designs.
Shell-and-tube (multiple tubes): vapor flows through multiple parallel tubes inside a water-jacketed shell. Highest efficiency; used at commercial scale.
Length matters. A longer dephlegmator has more heat-exchange surface, so it can condense more vapor at a given water flow rate. StillDragon’s DE4L (Long) versus DE4 (Short) is exactly this distinction — the Long version gives you more reflux at lower water flow rates, which translates to finer control.
5.1.5.2 The cooling-water control loop
The reflux ratio is set by how much vapor the dephlegmator condenses. Cool water flow controls that. Practical setups:
Manual needle valve. Simplest and most common. A needle valve on the dephlegmator’s cooling-water inlet line lets you dial in flow rate by hand. You watch the parrot output rate and column-top temperature, adjust the needle valve, repeat. Workable but requires constant attention during the spirit run.
Thermostat-controlled solenoid. A temperature sensor on the dephlegmator outlet (or on the vapor column above the dephlegmator) drives a solenoid valve that pulses water flow to maintain a target temperature. Better than fully manual; requires basic electronics integration.
PID-controlled water flow. A PID controller modulates a proportional water-flow valve based on column-top vapor temperature. Closest to “set the target temperature and walk away” but adds $200–$400 in controller hardware and integration complexity. Standard at commercial scale.
For first-Tier-3 builds, manual needle valve is the right starting point. You learn the dynamics of your column by hand before automating; the eventual transition to PID control (if you want it) is a $200 upgrade later.
5.1.5.3 Sizing the dephlegmator versus the main condenser
A common Tier-3 build error: oversizing the dephlegmator so that it can condense 100% of vapor produced (which leaves nothing for the main condenser / parrot). The dephlegmator should be sized for partial condensation at the reflux ratios you intend to run.
Rule of thumb for a 2” column producing ~2 L/hour of vapor at the parrot end of hearts:
- Dephlegmator surface area: ~150–250 cm² (typical 2” coil-in-shell is in this range)
- Main condenser surface area: ~400–600 cm² (larger; sized to fully condense parrot-output vapor)
- Cooling water flow capacity: at least 2 L/min available to each (water can be the same supply teed before the inlets)
If your dephlegmator is too small, you can’t get to high reflux ratios — even at full water flow, too much vapor passes through to the parrot. If it’s too large, fine reflux-ratio control gets twitchy — small water-flow changes produce large reflux-ratio swings.
5.1.5.4 Pre-cooling for cleaner control
Some Tier-3 builds add a pre-cooler between the dephlegmator and the main condenser — a small water-cooled section that knocks down vapor temperature without significant condensation. This gives the main condenser less thermal work to do and stabilizes parrot output temperature. Optional but useful in summer or in hot workshops.
5.1.6 The Choice: Tier-3 Path Recommendation by Use Case
Table 2 — 5.6 The Choice: Tier-3 Path Recommendation by Use Case
| Use case | Recommended path | Why |
|---|---|---|
| First Tier-3 build; learning the principles cheaply | A: DIY Bokakob ($250–$400) | Build it, understand it, use it for years. Educational value alone justifies the time. |
| Already own a Tier-2 kettle from Vol 4 | B: Add-on dephlegmator + packed column ($500–$900) | Reuses your kettle investment; lowest spend for real reflux capability on existing hardware. |
| Want a complete kit and the best visual learning | C: Mile Hi 8-gal Dual-Purpose Pro ($1,450) | Sight-glass column with visible plates AND active dephlegmator control. Best teaching tool at a fixed price. |
| Building toward Tier-4/5 or already on StillDragon Vol 4 D | D: StillDragon modular ($1,500–$2,500+) | Modular upgrade path with no ceiling. Same components scale up. Commercial-grade engineering. |
| Want to make gin specifically | B, C, or D (any with a basket port) | The gin basket goes between the kettle and the column on Path B/D, or in the vapor path above the plates on Path C. DIY Bokakob can be modified to accept one but it’s less elegant. |
| Want pot-mode flexibility | C: Mile Hi (plates fully removable) | Plates pull out cleanly for pot mode; reinstall for reflux mode in 30 minutes. Path B requires un-packing the column. |
The honest recommendation by commitment level:
- You’ve completed 3–5 Tier-2 spirit runs and you’re sure you want neutral spirit capability → start with Path A (Bokakob, $250–$400). Build it, run 5–10 spirit batches through it. You’ll learn more about reflux dynamics than you would buying a commercial unit. After that experience, you’ll know exactly whether Path B, C, or D is right for your next upgrade.
- You’ve completed 10+ Tier-2 spirit runs and you’re ready to invest in a forever Tier-3 setup → choose between B, C, or D based on the use case table above. All three produce excellent neutral spirit.
- You skipped Tier-2 entirely (started straight into Tier-3) → C (Mile Hi) is the most beginner-friendly complete kit. Path D StillDragon is excellent but the configuration overwhelm is real for first-time buyers.
The quality-copper lean (continuing from Vol 3 §3.2.4 and Vol 4 §4.5): at Tier-3, all four paths use significant copper in the vapor-contact zone — that’s table stakes for neutral spirit production. The differences are in how much copper and where (Path A and B are all-copper builds; C has stainless kettle + copper plates + copper column; D’s default is stainless with copper plates, copper-column variants at upcharge). For whiskey-character work where copper-sulfur scrubbing matters most, prefer all-copper. For pure neutral spirit production where the final product is filtered and aged in glass, the copper-in-vapor-path is sufficient — Path C’s stainless kettle is a defensible choice.
5.1.7 The Tier-3 Incremental BOM (Adding to a Tier-2 Setup)
Assuming you have a Vol 4 Tier-2 setup already (NG Still 15-gal kettle, 5500W element, PID controller, fermenter, etc.) and are adding Tier-3 column hardware to it:
Table 3 — Assuming you have a Vol 4 Tier-2 setup already (NG Still 15-gal kettle, 5500W element, PID controller, fermenter, etc.) and are adding Tier-3 column hardware to it
| Item | Spec / source | Price |
|---|---|---|
| Column hardware | Path A DIY Bokakob: $300 in parts; Path B add-on dephlegmator + 4ft column: $500–$900; Path C Mile Hi complete kit: $1,450 (includes 8-gal kettle — replaces Tier-2 kettle); Path D StillDragon column: $1,500–$2,500 | $300–$2,500 |
| 2” or 3” tri-clamp adapter if your kettle’s top port doesn’t match the new column | Brewing supply | $25–$60 |
| Dedicated dephlegmator cooling-water line | 1/2” or 3/8” tubing + needle valve + fittings | $25–$40 |
| Auxiliary recirculating chiller if your existing cooling setup can’t handle two condensers in parallel | Used aquarium chiller or BrewJacket-style recirculating pump | $150–$400 (optional) |
| Additional thermometers | One for column-top vapor temperature, one for dephlegmator outlet | $30–$60 |
| Gin basket (if you want to make gin) | Copper basket; sits in vapor path between kettle and column | $80–$150 |
| Column packing replacement (Bokakob and Path B) | Copper mesh roll or scrubbers (refresh every 50+ runs) | $20–$40 (recurring) |
| Activated carbon for vodka polish (optional) | Activated carbon column or jar-filtration setup for post-distillation polishing of neutral spirit | $40–$120 |
| Subtotal — Tier-3 hardware upgrade | ~$400–$3,200 |
Plus your existing Tier-2 setup at $2,979–$3,659 (Vol 4 §4.6). Total integrated Tier-3 setup at $3,400–$6,860 depending on path.
Notes:
- If you’re starting fresh into Tier-3 (no existing Tier-2): add ~$2,000 to the BOM above for the kettle, element, controller, fermenter, and basic accessories from Vol 4 §4.6, even if you don’t intend to use the kettle for pot-mode Tier-2 runs.
- Path C Mile Hi replaces rather than adds to your existing Tier-2 setup if you’re swapping kettles. Net cost depends on whether you keep the Vol 4 kettle as backup or sell it.
- First-year recurring costs: column packing refresh, gaskets, occasional plate cleaning supplies, ~$50–$100/year.
5.1.8 The Neutral-Spirit Spirit Run with Reflux
This is the canonical Tier-3 run: take 12–18 gallons of combined low-wines (from 2–4 Tier-2 stripping runs, see Vol 4 §4.7) and convert them into 4–8 liters of 92–95% ABV neutral spirit suitable for vodka, infusions, or gin base.
5.1.8.1 Pre-run preparation
- Confirm low-wines volume and ABV — measure with the hydrometer; you want a total kettle charge of 12–18 gallons at 25–35% ABV
- Inspect column packing — copper mesh or scrubbers should be free of debris from previous runs; replace if visibly fouled
- Confirm cooling water supply — both the dephlegmator and the main condenser need flow; if you’re recirculating, top up the reservoir with fresh cold water (50°F or colder for best results)
- Confirm dephlegmator needle valve operation — closed all the way, open all the way, repeat once or twice to confirm clean action
- Stage collection vessels — small glass jars (250 mL) for foreshots/heads; quart jars for hearts; gallon jug for tails
5.1.8.2 Heat-up and equilibration
- Start cooling water to both dephlegmator (close needle valve initially) and main condenser before energizing the element
- Element at 100% to first vapor (~25–35 minutes on a 15-gal kettle at 5500W)
- At first vapor, throttle element back hard — to ~30–40% power. The spirit run is slow.
- Open the dephlegmator needle valve to full flow — this engages maximum reflux. Vapor reaching the dephlegmator at full water flow condenses almost completely; very little reaches the main condenser or parrot.
- Watch the column-top thermometer — should rise steadily to ~78°C and plateau there. This is the equilibration plateau. Hold full reflux for 45–90 minutes before collecting anything; you want the column at full theoretical-plate operation before any product comes out.
- Signs of equilibrium: column-top thermometer holds at 78.0–78.5°C steadily; no significant flow past the dephlegmator; column packing visibly wet (look at sight glasses if your column has them — plates should be fully flooded and bubbling)
5.1.8.3 Foreshots (the first ~50 mL — DISCARD)
- Slightly close the dephlegmator needle valve to allow a small flow of vapor past it to the main condenser. Reflux ratio drops from ~∞ to ~10:1.
- First drips at the parrot are foreshots. Acetone, methanol, light volatile esters. Sharp solvent smell.
- Collect into small labeled DISCARD jars. Volume: 50 mL per gallon of kettle charge, so 750–900 mL total foreshots for a 15-gal kettle
- Parrot ABV during foreshots: 92–95% (very high; column is well-rectified at this point)
- End-of-foreshots marker: smell shifts from harsh-nail-polish to softer solvent/sweet
5.1.8.4 Heads (the next ~500–1500 mL — DISCARD or save for next spirit-run feedstock)
- Continue slowly opening the dephlegmator needle valve — reflux ratio slowly drops from ~10:1 toward ~5:1 as the column transitions out of full-equilibration mode
- Smell sharpens, then softens — heads carry the harshest character compounds; the transition to hearts is the smell going from “burning eyes” to “clean alcohol”
- Length: 500–1500 mL depending on low-wines source and column efficiency; sugar-wash heads are shorter, grain-wash heads longer
- Parrot ABV during heads: still very high (88–93%) — the column is doing such effective rectification that even heads come over at near-azeotrope concentration
- End-of-heads marker: taste a tiny drop — when it goes from “burns the tongue” to “clean and slightly sweet,” you’re at hearts
5.1.8.5 Hearts (the main collection — KEEP)
- Hold dephlegmator at ~5:1 reflux ratio — adjust needle valve so the column-top thermometer holds at 78.0–78.5°C steadily; if temperature climbs above 78.5°C, you’re losing rectification (close the valve a bit, increase reflux); if temperature drops below 78°C, you’re refluxing too hard (open the valve, decrease reflux)
- Parrot output ABV during hearts: typically 92–95% sustained. This is neutral spirit.
- Collection rate: slow and steady — ~100–150 mL per minute. Resist the urge to speed up by reducing reflux; the additional minute per hundred mL is worth the cleaner product.
- Switch collection vessels every quart or half-gallon — lets you taste-evaluate each fraction and back-cut into tails later if late hearts go off
- Watch the column-top thermometer closely — the hearts-to-tails transition is marked by the thermometer beginning to climb above 78.5°C as ethanol concentration in the kettle drops and water content in the vapor rises
- End-of-hearts marker: column-top temperature climbs above 80°C and stays there, OR parrot ABV drops below 85%. This is where tails begin.
5.1.8.6 Tails (collect separately — feed into next stripping-run kettle)
- Open the dephlegmator needle valve significantly — reflux ratio drops to ~2:1 to maintain reasonable output rate as the kettle ethanol depletes
- Smell turns “wet-cardboard” and oily — fusels (propanol, butanol, amyl alcohol) coming over
- Collect tails into a separate gallon jug labeled clearly — these go into your next stripping run for ethanol recovery
- Continue until parrot output ABV drops below 30% or the run becomes pointless (essentially all-water output)
5.1.8.7 End-of-run
- De-energize element when ABV is below 30% or output is mostly water
- Maintain cooling water flow for 15 minutes (dephlegmator and main condenser both)
- Cool kettle; drain backset
- Total spirit-run time: typically 7–9 hours for a Tier-3 reflux run (longer than Tier-2 because of the equilibration period and slower hearts collection)
- Total hearts output: 4–8 liters of 92–95% ABV neutral spirit from 14–18 gallons of 30% ABV low-wines
5.1.8.8 Post-run: carbon polishing for vodka
For vodka use, your 92–95% ABV hearts can benefit from carbon polishing — passing the spirit through a column of activated carbon to remove trace organic compounds that survive distillation. This is the “vodka polish” step that distinguishes high-quality craft vodka from raw neutral spirit.
Practical methods:
- Jar method: add 2–3 tablespoons of activated carbon per liter of spirit; shake daily for 5 days; filter through a coffee filter or fine cloth
- Column method: pack a 12”–18” column with activated carbon; slowly drip the spirit through (1 drop per second); collect from the bottom. More effective per gram of carbon; more setup.
Activated carbon specifically for distilling — sometimes labeled “vodka carbon” or “spirit polishing carbon” — is available from most distilling supply vendors for $20–$40 per pound. Don’t use aquarium-grade activated carbon (different size distribution, may not be food-safe).
After carbon polishing, dilute the now-polished neutral spirit to drinking ABV (40% standard) using distilled water per the Pearson’s-square formula in Vol 4 §4.8.8. Rest 48 hours before tasting.
5.1.9 The Gin Run: Botanical Vapor Infusion
Gin is, fundamentally, neutral spirit re-distilled through a basket of botanicals — juniper, coriander, citrus peel, angelica, orris root, cardamom, and whatever else the gin recipe calls for. The Tier-3 column makes a proper gin run practical because the dephlegmator allows you to control rectification while the vapor passes through the botanicals.
5.1.9.1 The gin basket
A gin basket is a small wire-mesh or perforated copper vessel mounted in the vapor path above the kettle and below (or within) the column. As ethanol vapor passes through the basket, it picks up volatile aromatic compounds from the botanicals — essential oils, terpenes, esters — and carries them into the final spirit.
Position matters:
- Above the kettle, below the column (vapor-only contact) — produces the cleanest, most aromatic gin; botanicals contact vapor only, not boiling liquid. Standard for craft gin production. The basket sits in a dedicated section between the kettle’s top tri-clamp and the column’s bottom tri-clamp.
- In the kettle (immersed in wash/spirit) — produces a heavier, more rustic gin with deeper extraction; some traditional gins (Old Tom style) are made this way. Less elegant; harder to control flavor balance.
- In a thumper — alternative position for thumper-equipped stills (Vol 4 Path C NG Still or DIY); botanicals sit in the thumper and contact thumper liquid + passing vapor.
For Tier-3 work, the dedicated vapor-only basket between kettle and column is standard.
5.1.9.2 Botanical loading
Gin recipes vary enormously, but a starting recipe for a 5-gallon neutral-spirit charge:
- Juniper berries — 30 g (1.1 oz) — the defining botanical; without juniper it isn’t gin
- Coriander seed — 15 g — bright citrus-pepper character; second-most-important after juniper
- Angelica root — 8 g — earthy, peppery, also acts as a flavor fixative
- Orris root (powdered or sliced) — 5 g — floral; also a fixative
- Citrus peel (lemon, orange, or grapefruit zest) — 5 g fresh — bright top notes
- Cardamom pods — 3 — gentle spice
- Cassia or cinnamon — 1 small piece — warm spice
- Optional botanical of choice — anise seed, ginger, black pepper, etc. — explore later
Crush hard botanicals (juniper, coriander, cardamom) lightly with a pestle or rolling pin before loading to expose more surface area. Don’t pulverize — you want vapor contact, not a powder. Add citrus peel fresh, not dried — fresh peel has 3–4x the essential-oil content.
5.1.9.3 The gin run procedure
A gin run is essentially a Tier-3 spirit run with the basket installed and a different kettle charge:
- Kettle charge: dilute neutral spirit (from a previous Tier-3 spirit run) to 40–50% ABV using distilled water. Volume to suit your kettle — usually 4–6 gallons of dilute spirit. Don’t run a gin batch on 95% ABV; the high concentration extracts harsh notes.
- Load the gin basket with the botanical recipe
- Install basket in the vapor path between kettle and column
- Heat-up, equilibration, and run per the Tier-3 procedure (§5.8) but expect: shorter total run (smaller kettle charge); foreshots are minimal (already removed in the original neutral spirit production); heads are minimal; hearts come off at 70–80% ABV with full gin aromatics; tails are short
- Collect hearts only — discard foreshots and heads; tails can be added to the next neutral-spirit stripping run
- Total gin hearts output: 2–4 liters of 70–80% ABV gin spirit from 5 gallons of 40% ABV neutral-spirit charge
5.1.9.4 Post-run: dilution and rest
Gin is typically bottled at 40–47% ABV. Dilute your 70–80% ABV hearts using the Pearson’s-square formula. Rest the diluted gin for 1–2 weeks before judging — botanical aromatics shift and integrate over the first few weeks; freshly-cut gin always tastes harsher than the same spirit two weeks later.
For London Dry-style gin: no further additions; the spirit is the product. For Compound or Old Tom gins: add a small amount of simple syrup (sugar dissolved in water) to taste, typically 1–3 grams of sugar per liter of finished gin.
5.1.10 Common Tier-3 Pitfalls and How to Avoid Them
The most common ways a first Tier-3 reflux run goes wrong:
1. Skipping the equilibration period. Most common Tier-3 mistake. You see vapor at the column top, you assume the column is “warmed up,” you start collecting. Result: hearts come over at 75–80% ABV instead of 92–95% because the column never reached full theoretical-plate operation. Prevention: always hold full reflux at the equilibration plateau for at least 45 minutes before opening the dephlegmator. Watch the column-top thermometer; equilibration is reached when it holds steady at 78.0–78.5°C for 15+ minutes.
2. Running the element too hot during hearts. Tier-3 reflux work requires gentle boil — vapor production matched to column capacity. Too much vapor floods the column (downcomers can’t handle the liquid load) and rectification collapses. Prevention: throttle to 25–35% element power during hearts; back off further if you hear gurgling or see erratic parrot output.
3. Confusing dephlegmator water flow with main condenser water flow. You think you’re opening the reflux valve but you’re opening the main condenser valve. Result: confused control behavior, frustrated runs. Prevention: label both valves clearly at install time; trace the lines visually before every run; use distinctly colored handles (red = dephlegmator, blue = main).
4. Insufficient cooling water capacity. A 4” column at full reflux can demand 4+ L/min of cooling water across both condensers. If your supply can’t keep up, vapor escapes through the parrot and you lose product. Prevention: test the cooling-water supply at full flow during dummy-run setup; install a recirculating chiller if your supply is marginal.
5. Column packing fouling. After 50–100 spirit runs, copper packing accumulates copper sulfide residue and starts losing rectification efficiency. Prevention: monitor your achievable peak ABV over time; if it’s dropping (was 95%, now 92%), pull packing, soak in dilute citric acid solution overnight, rinse, repack. Replace packing entirely every 200–300 runs.
6. Bad cuts on neutral spirit. Tier-3 cuts are more subtle than Tier-2 — the parrot ABV barely moves through hearts, so the smell/taste markers matter more. Prevention: practice the foreshots and hearts-start transitions on water-only and cheap-spirit dummy runs before doing them on a real spirit run; develop your nose for the transition.
7. Forgetting to switch fully to neutral-spirit mode (plates installed, dephlegmator engaged) on Path C/Mile Hi systems. If you accidentally leave plates out or dephlegmator water off, you’ll run a Tier-2-equivalent pot run when you intended Tier-3 reflux. Prevention: pre-run checklist — element off, water off, plates installed, dephlegmator valve set, parrot positioned. Run the checklist out loud before every run.
8. Gin botanicals burning at the basket. If basket sits too close to the kettle and the kettle runs too hot, juniper and citrus peel can scorch — producing acrid, “burnt” notes in the gin. Prevention: keep the basket at least 4 inches above the kettle’s vapor-output port; throttle element power especially during gin runs (target gentle, sustained vapor production rather than aggressive boil).
9. Carbon polishing too aggressively. Activated carbon removes flavor along with off-notes. For vodka, this is desirable; for gin or character spirit, it’s catastrophic. Prevention: carbon polish only neutral spirit destined for vodka or as a base for further infusion. Never carbon polish gin, whiskey, brandy, or rum.
10. Electrical safety still applies. Same hazards as Tier-2 (Vol 4 §4.9): high power, wet environment, flammable distillate. Prevention: GFCI breaker AND/OR GFCI inlet on the controller; annual visual inspection of wiring; never run with visible damage; fire extinguisher within arm’s reach.
5.1.11 Where Tier-3 Leaves You; What Tier-4 Adds
A well-run Tier-3 setup produces both neutral spirit (92–95% ABV, ideal vodka base after carbon polish, ideal gin base after re-distillation with botanicals) and — with the dephlegmator backed off or removed — character spirit at 80–90% ABV suitable for whiskey, rum, or brandy. The same hardware handles both modes; you change behavior by changing the run procedure.
Tier-3’s natural limits:
- Output volume: still bounded by kettle size — typically 4–8 L of hearts per spirit run, 3–6 spirit runs per year as realistic hobbyist cadence
- Switching between modes is operational, not free. Going from “this morning ran neutral spirit; this afternoon want whiskey character” requires cleaning the column (lingering high-rectification residue affects whiskey character), changing the run procedure (no equilibration plateau, lower reflux ratio), and accepting that the column tuned for one mode isn’t optimal for the other.
Vol 6 (Tier-4) introduces the dedicated pot-and-column hybrid — a 5-gallon-scale rig designed from the ground up for switching cleanly between rich whiskey production and neutral spirit production via mode-specific valves and removable column sections. The Tier-4 approach is “same kettle, two different distillation paths, switched by physical reconfiguration” rather than Tier-3’s “same path, tuned differently by control variables.” Different philosophy, complementary capability.
Vol 7 (Tier-5) moves to 15–25 gallon dedicated single-purpose rigs with proper mash tuns, dedicated heating circuits, and the production cadence to actually fill bottles regularly. Legal posture starts to shift here.
Vol 8 (Tier-6) addresses the small craft distillery floor at 50–100+ gallon scale — equipment, infrastructure, and the TTB DSP licensing path required to operate legally at this scale.
End of Vol 5. Next: Vol 6 — Tier-4 Pot+Column Hybrid Dedicated Rig.
Comments (0)