Brewing · Volume 3
Vol 3 — The Brewing Process & Science
Vol 2 introduced the four ingredients. This volume is about what you do with them: the step-by-step process of turning malt, hops, yeast, and water into beer, and the science underneath each step. By the end you will understand not just how to mash, boil, ferment, and package, but why each step works — and you’ll be able to predict a beer’s gravity, bitterness, color, and strength with arithmetic before you ever brew it.
This is the most technical of the foundation volumes, and it is where the process-control and repeatability threads come fully into focus: brewing well is brewing measurably and reproducibly. The equipment volumes (5–10) will hand you progressively better tools for executing this process; this volume is the process itself, tool-agnostic.
3.1.1 Introduction: Grain to Glass
Every batch of all-grain beer follows the same eight-step arc, regardless of scale — a kitchen stovetop or a commercial brewhouse does the same things in the same order.

The brew day (the “hot side”) is steps 1–4: milling, mashing, lautering, and boiling — a single session of a few hours that ends with cooled, hopped wort. The “cold side” is everything after: fermentation, conditioning, and packaging, which play out over days to weeks. (Extract brewing, Vol 5, skips the mash and lauter by buying the sugar pre-made as malt extract — but boil, ferment, and package are identical.)
3.1.2 Milling and the Grist
Brewing begins by milling the malt: cracking each kernel to expose the starchy interior while keeping the husk reasonably intact. The crushed grain is called the grist. The husk matters: during lautering it forms the filter bed that clarifies the wort, so the goal is to crack the kernel open without shredding the husk. Too fine a crush gives higher extraction but risks a stuck, slow runoff; too coarse a crush wastes sugar.
3.1.3 Mashing and Enzyme Conversion
Mashing is the heart of all-grain brewing: the grist is mixed with hot water (the “strike water”) and held, typically around 148–158 °F for 30–60 minutes. In that warm bath the malt’s enzymes — developed during malting (Vol 2 §2.2) — convert the grain’s starch into fermentable sugar.
Two enzymes do the work, and the mash temperature decides which one dominates:
- Beta-amylase works best at the lower end (~145–150 °F) and chops starch into maltose, a highly fermentable sugar → a drier, more alcoholic beer.
- Alpha-amylase works best at the higher end (~154–162 °F) and produces more dextrins, larger sugars that yeast can’t fully ferment → a fuller-bodied, sweeter beer.
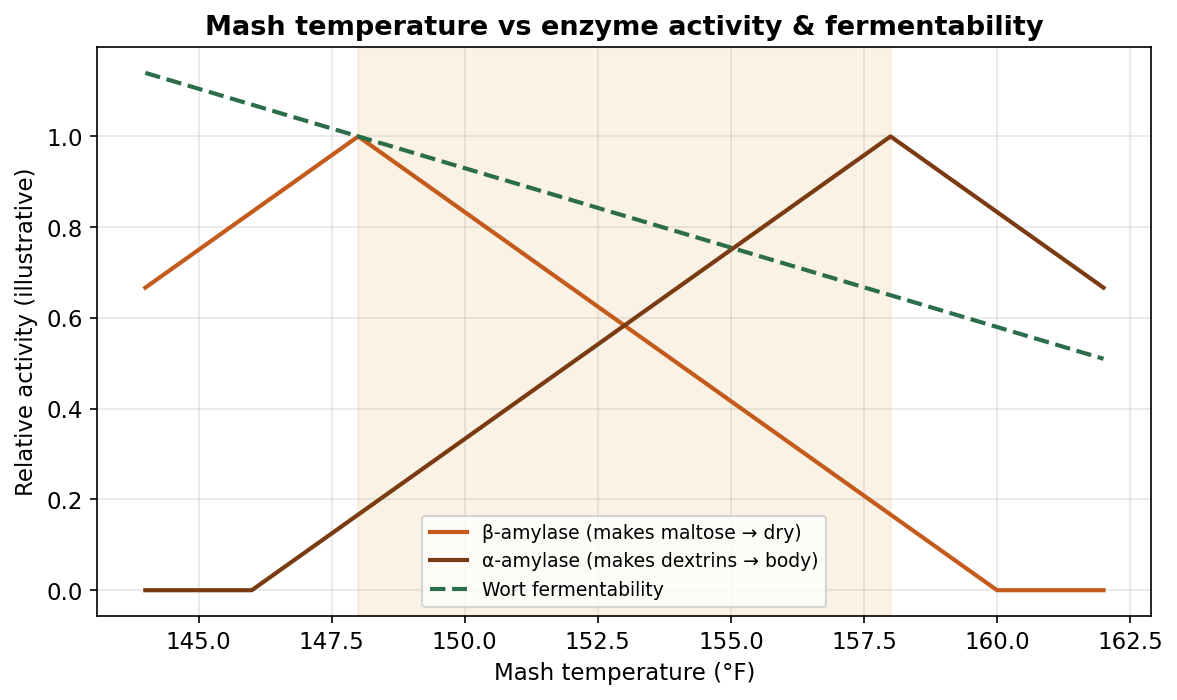
This is why a brewer chooses a mash temperature deliberately: ~149 °F for a crisp, dry beer; ~156 °F for a malty, full one; ~152 °F as a balanced default. Mash pH (Vol 2 §2.5) should sit in the 5.2–5.6 window for the enzymes to work cleanly. A single-infusion mash (one temperature) suffices for modern well-modified malt; step mashes (rising through several rests) are used for certain styles and under-modified grain.
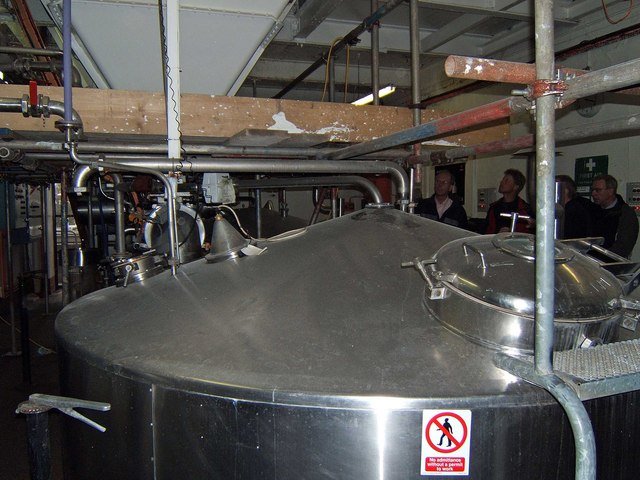
3.1.4 Lautering and Sparging
Once conversion is complete, the sugary liquid (now wort) must be separated from the spent grain. This is lautering, and it happens right in (or after transferring to) a vessel with a screen or false bottom.

The grain bed acts as its own filter. The first runnings come out cloudy with grain bits, so the brewer recirculates them (the German vorlauf) — gently drawing wort off the bottom and returning it to the top — until it runs clear. Then the wort is collected, and the grain is sparged (rinsed) with more hot water to recover the sugar left clinging to it. There are two common approaches:

- Batch sparge — drain the tun, add a measured volume of hot water, stir, rest, and drain again. Simple, fast, forgiving.
- Fly (continuous) sparge — sprinkle hot water onto the top of the bed at the same rate wort is drawn from the bottom, gently rinsing throughout. A little more efficient but requires more attention.
Sparge water is kept around 168–170 °F: hot enough to keep the wort flowing freely, but not so hot (above ~170 °F) that it extracts harsh tannins from the husks.
3.1.5 The Boil
The collected wort is brought to a vigorous boil, typically for 60 minutes. The boil does several jobs at once:
- Sterilizes the wort and denatures residual enzymes (locking in the sugar profile set during the mash).
- Isomerizes hop alpha acids into soluble iso-alpha-acids — i.e., it creates bitterness (Vol 2 §2.3). This is why bittering hops go in early.
- Drives off DMS (dimethyl sulfide, a cooked-corn aroma) and its precursor; this needs a vigorous, uncovered boil.
- Concentrates the wort as water evaporates (the “boil-off”), and forms the hot break — proteins coagulating and dropping out, improving clarity.
Hop timing is everything in the boil. Because bitterness needs time to isomerize but aroma oils are volatile and boil away, brewers split hops across the boil:
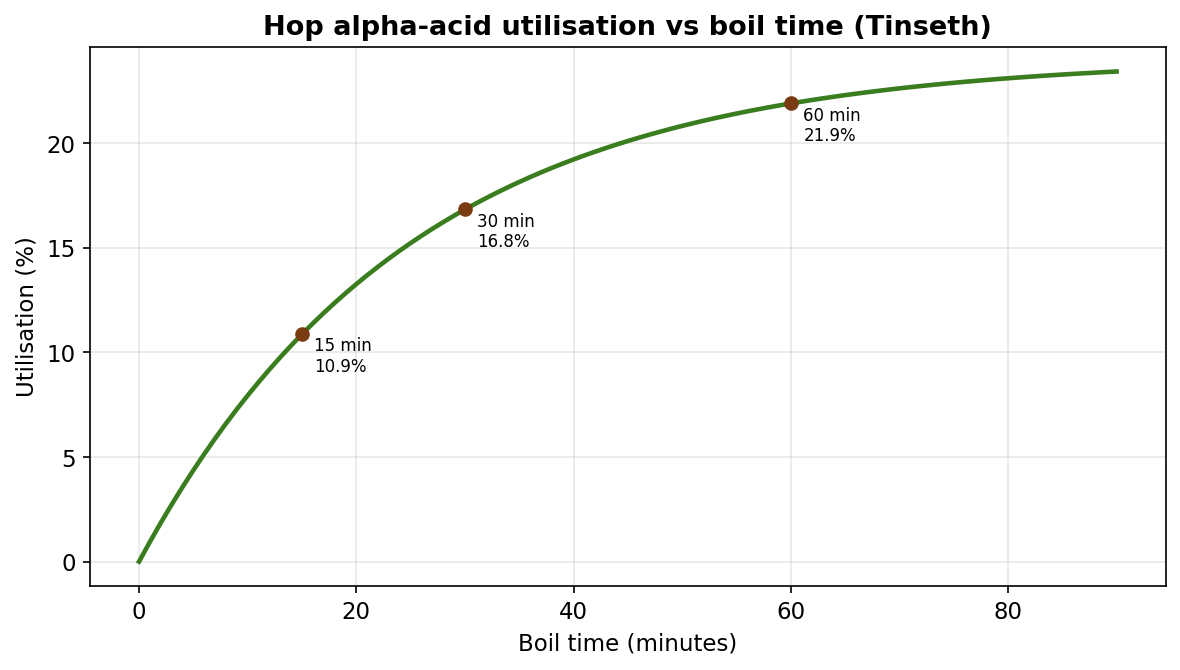
- Bittering additions go in at the start (e.g., 60 min) for maximum isomerization.
- Flavor additions go in mid-boil (~15–20 min).
- Aroma additions go in at flameout (0 min) or as a whirlpool/hop-stand (steeping in hot-but-not-boiling wort), preserving the oils.
- Dry hops are added later, in the fermenter, for pure aroma with no added bitterness.
3.1.6 Chilling and the Cold Break
After the boil, the wort must be cooled quickly to yeast-pitching temperature (roughly 65–70 °F for ales). Fast chilling produces a good cold break (more proteins dropping out, for clarity), minimizes the window in which airborne bacteria can infect the still-unprotected wort (the sanitation thread — the wort is most vulnerable between flameout and active fermentation), and reduces DMS formation. Chilling is done with an immersion chiller (a coil of cold-water tubing dropped into the kettle), a counterflow or plate chiller (wort and cold water exchange heat through metal), or — for small extract batches — simply an ice bath.
3.1.7 Fermentation
Cooled wort is transferred to a sanitized fermenter, aerated (the one time you want oxygen in beer — the yeast needs it to grow), and pitched with yeast. Fermentation then proceeds in phases:

- Lag phase (~6–24 h) — the yeast takes up oxygen, multiplies, and adapts. No visible activity yet; this is the most infection-vulnerable window, so a strong, healthy pitch that starts fast is itself a defense.
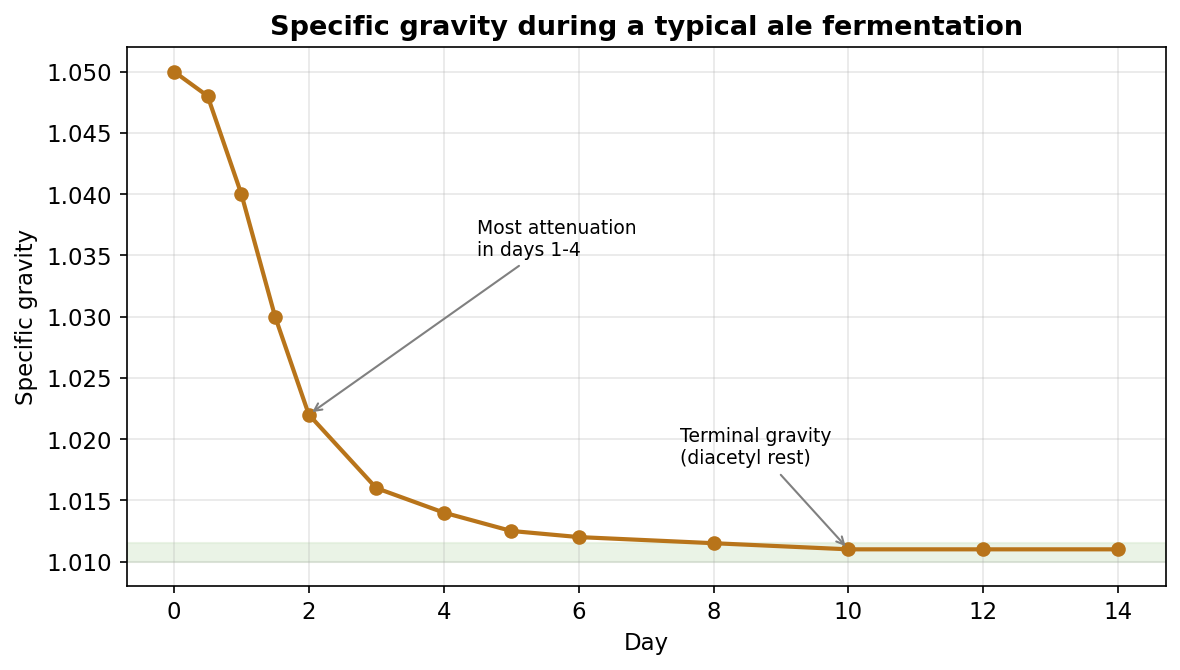
- Active / exponential phase (days ~1–4) — vigorous fermentation, a foamy krausen on top, and steady CO₂. Most of the attenuation happens here, and most of the flavor compounds (esters, etc.) are set — which is why fermentation temperature control is the single biggest flavor lever (Vol 2 §2.4).
- Stationary / conditioning phase (day ~4 onward) — fermentation slows and gravity flattens. The yeast reabsorbs diacetyl (a butter flavor it made earlier); a few days warm at the end (a diacetyl rest) ensures cleanup before the yeast settles out.
The progress is tracked by specific gravity, which falls as sugar becomes alcohol and then flattens at the final gravity (FG) — the signal that fermentation is complete.
The discipline that defines a good brewer here is measurement and patience: confirm fermentation is finished with two identical gravity readings a few days apart, rather than guessing by the calendar — the heart of the repeatability thread.
3.1.8 Conditioning, Lagering, and Clarification
After primary fermentation, beer benefits from conditioning — time for flavors to mature and rough edges to mellow. Ales condition for days to a couple of weeks; lagers are held cold (near freezing) for weeks — the long cold “lagering” that gives them their smooth, clean profile. Clarity improves as yeast and proteins settle; a cold crash (chilling near freezing for a few days) speeds this, and finings (gelatin, isinglass, biofine) can be added to drop yeast and haze for bright beer. Time, here, is itself an ingredient.
3.1.9 Packaging and Carbonation
Finished beer is flat; it must be carbonated by dissolving CO₂ into it. Two methods:
- Bottle conditioning — a measured dose of priming sugar (typically ~4–5 oz / ~110–140 g of corn sugar for a 5-gallon batch) is added at bottling. The remaining yeast ferments it in the sealed bottle, producing CO₂ that dissolves into the beer. Simple and cheap; takes ~2 weeks.
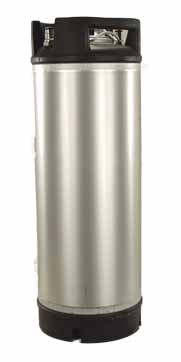
- Force carbonation — the beer is kegged and CO₂ is dissolved under pressure from a tank, set by a temperature/pressure relationship. Fast and precise.
How much CO₂ a beer should carry is a style decision, measured in volumes of CO₂:
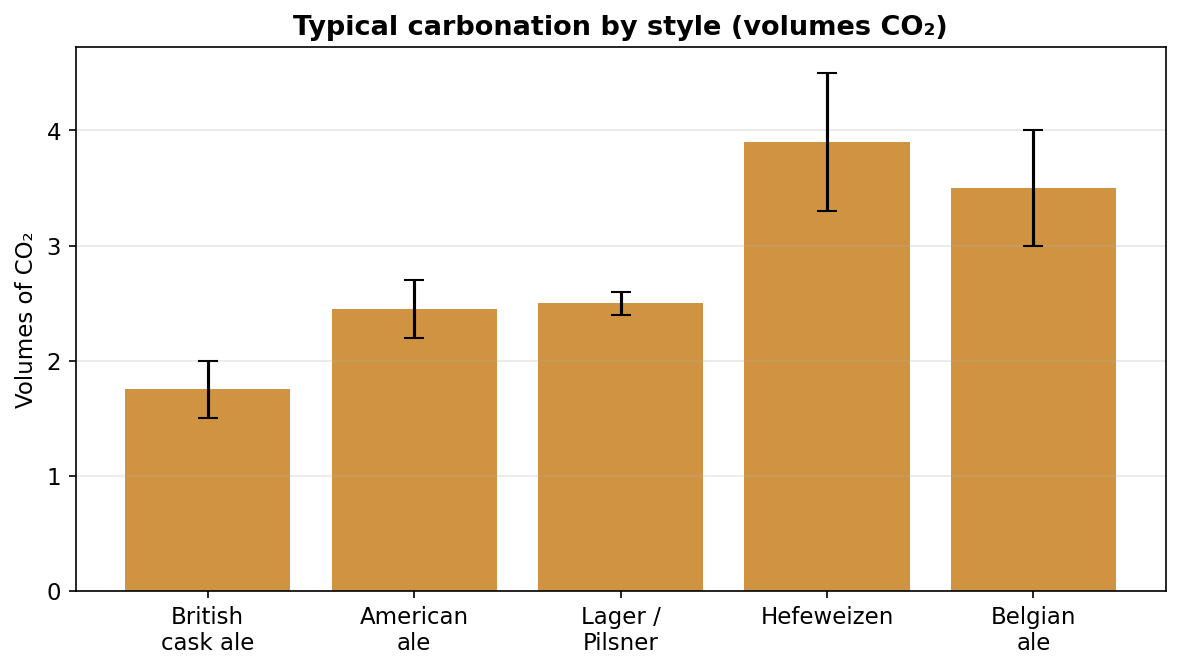
Whichever method, the enemy at packaging is oxygen: the finished beer should be protected from air to avoid stale, cardboard flavors.
3.1.10 The Brewing Math
The reason brewing is reproducible is that all of its key outcomes can be predicted with arithmetic before brewing. Here are the core formulas, worked through one consistent example — a 5-gallon American Pale Ale — that Vol 4 §4.12 will reuse when it teaches recipe formulation.
The recipe: 9 lb American 2-row (≈2 °L), 1 lb crystal-40 (40 °L); 1 oz Centennial (10% AA) at 60 min, 1 oz Cascade (6% AA) at 15 min; American ale yeast; 5 gallons; assumed brewhouse efficiency 72%.
(a) Original gravity (OG). Each malt has a potential extract in points per pound per gallon (PPG) — about 37 for base malt, 34 for crystal. Multiply by weight, sum, multiply by efficiency, divide by batch volume:
Gravity points = [(9 × 37) + (1 × 34)] × 0.72 ÷ 5 = [333 + 34] × 0.72 ÷ 5 = 367 × 0.72 ÷ 5 = 264.2 ÷ 5 ≈ 52.8 points → OG ≈ 1.053
(b) Final gravity (FG) and attenuation. With a typical apparent attenuation of ~75% for this yeast:
FG = 1.000 + (0.053 × (1 − 0.75)) = 1.000 + (0.053 × 0.25) ≈ 1.013 Apparent attenuation = (OG − FG) ÷ (OG − 1.000) = (0.053 − 0.013) ÷ 0.053 ≈ 75%
(Apparent attenuation reads high because alcohol is less dense than water and skews the hydrometer; real attenuation is lower, ~62%. The apparent figure is the one brewers quote.)
(c) Alcohol by volume (ABV). The standard approximation:
ABV = (OG − FG) × 131.25 = (1.053 − 1.013) × 131.25 = 0.040 × 131.25 ≈ 5.3% ABV
(d) Bitterness (IBU), Tinseth method. Utilization U = bigness factor × boil-time factor, where bigness = 1.65 × 0.000125^(OG−1) and boil-time factor = (1 − e^(−0.04 t)) ÷ 4.15. Then IBU = (U × AA_decimal × weight_oz × 7490) ÷ volume_gal.
Bigness = 1.65 × 0.000125^0.053 ≈ 1.65 × 0.621 ≈ 1.025 60-min hop: boil-time factor = (1 − e^(−2.4)) ÷ 4.15 ≈ 0.219 → U ≈ 0.225 IBU = (0.225 × 0.10 × 1 × 7490) ÷ 5 ≈ 34 IBU 15-min hop: boil-time factor = (1 − e^(−0.6)) ÷ 4.15 ≈ 0.109 → U ≈ 0.111 IBU = (0.111 × 0.06 × 1 × 7490) ÷ 5 ≈ 10 IBU Total ≈ 44 IBU
(e) Color (SRM), Morey method. First the malt color units: MCU = Σ(malt °L × weight_lb) ÷ volume_gal. Then SRM = 1.4922 × MCU^0.6859.
MCU = [(9 × 2) + (1 × 40)] ÷ 5 = (18 + 40) ÷ 5 = 11.6 SRM = 1.4922 × 11.6^0.6859 ≈ 1.4922 × 5.37 ≈ 8 SRM (golden / light amber)
The prediction: before touching a kettle, we know this beer will be OG 1.053, FG 1.013, ~5.3% ABV, ~44 IBU, ~8 SRM — squarely an American Pale Ale (compare Vol 4 §4.2). Brewhouse efficiency — the fraction of the grain’s theoretical sugar you actually collect — is the one figure you must measure for your system (it’s typically 65–80%); once you know it, the rest of the math is reliable.
3.1.11 Summary
Brewing is a sequence of controllable, measurable steps:
Table 1 — Brewing is a sequence of controllable, measurable steps
| Step | What happens | Key control |
|---|---|---|
| Mill | Crack grain, expose starch | Crush gap (husk intact) |
| Mash | Enzymes convert starch → sugar | Temperature (149–158 °F), pH (5.2–5.6) |
| Lauter / sparge | Separate & rinse wort from grain | Recirculate to clarity; sparge < 170 °F |
| Boil | Bitter, sterilize, drive off DMS | Time + hop schedule |
| Chill | Cool to pitch temp | Speed (cold break, sanitation) |
| Ferment | Yeast: sugar → alcohol + flavor | Temperature + healthy pitch |
| Condition | Mature, clarify, lager | Time + cold |
| Package | Carbonate, protect from O₂ | Volumes of CO₂ by style |
And its outcomes are predictable: OG from the grain bill and efficiency, FG from attenuation, ABV from the gravity drop, IBU from the hop schedule, and SRM from the malt colors. Master measurement and temperature control and you can brew the same good beer every time — which is precisely the capability the equipment ladder (Vols 5–10) is designed to make easier at every tier.
Cross-references: the ingredients behind every step are in Vol 2; the styles these processes target are surveyed in Vol 4 (which reuses §3.10’s worked Pale Ale in §4.12); and the equipment that performs these steps, from a stovetop extract kit to an automated electric system, is built up tier by tier in Vols 5–10.
Comments (0)