Brewing · Volume 7
Vol 7 — Tier 3: All-Grain Brewing in a Bag (BIAB)
This is the rung where you become an all-grain brewer. Tier-1 (Vol 5) bought sugar as extract; Tier-2 (Vol 6) mashed a token amount of grain alongside it. Tier-3 drops extract entirely and mashes the whole grain bill — and it does so with almost no new equipment over Tier-2, by mashing the grain inside a big mesh bag right in the kettle. That technique, brew-in-a-bag (BIAB), is the most popular way to brew all-grain today: cheap, simple, and capable of any beer in this book.
7.1.1 What Tier-3 Means
All-grain means you make all your own sugar by mashing malt (Vol 3 §3.3), with no extract. BIAB achieves it in a single vessel: the crushed grain goes into a mesh bag suspended in the kettle’s full volume of water; you hold the mash temperature, then lift the bag out and boil the wort that remains.


What it gains you:
- Full recipe control. Any grain bill, any style — you’re no longer limited by what extracts exist (Vol 2 §2.2, Vol 4).
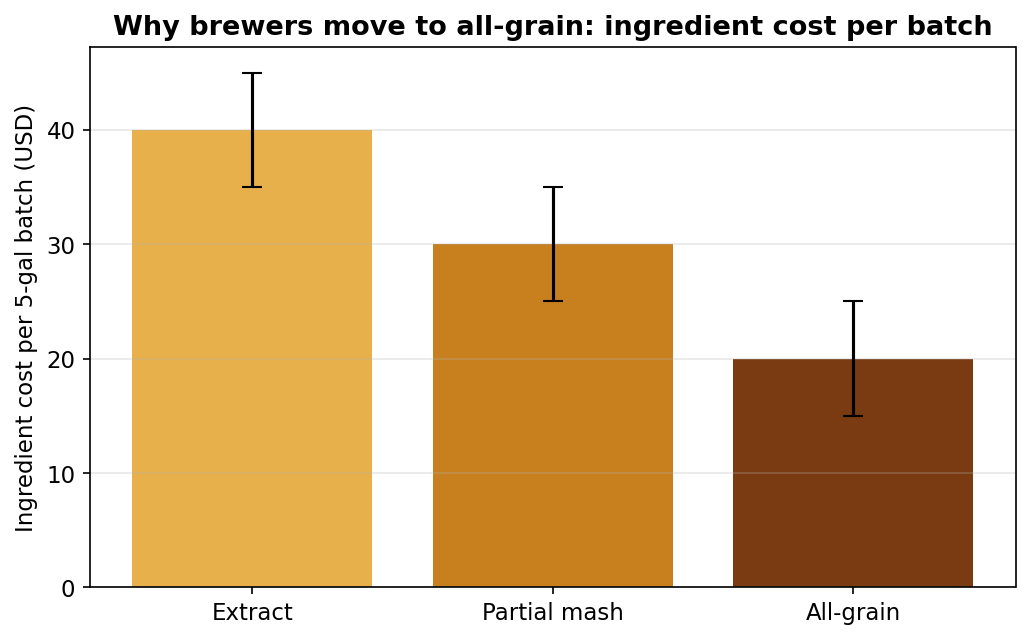
- The cheapest ingredients. Grain costs a fraction of extract per batch — the payoff first previewed in Vol 5 finally lands:
What it asks of you: a way to crush grain (a mill, or buy it pre-milled) and a way to lift a heavy, hot, dripping bag safely. Neither is expensive.
7.1.2 The Vendor Landscape
BIAB is mostly technique layered onto the Tier-2 kit. Four paths. (Prices approximate, 2026.)
- Path A — Bag + your existing kettle (cheapest). A reusable BIAB bag — The Brew Bag or a Wilserbrewer custom bag (~$25–40; Wilserbrewer’s “Grand Slam” bundles a bag, hop bag, and a ratchet pulley for ~$34–37) — dropped into the 10-gallon Tier-2 kettle. Often the only purchase needed.
- Path B — Add a safe bag lift. A small ratchet pulley or a sturdy rack/board across the kettle to hoist and drain the full grain bag (5–12 lb of hot wet grain). Cheap, and it saves your back and the bag.
- Path C — A grain mill. Crushing your own grain (a Cereal Killer or Monster Mill roller mill, ~$100–150) is cheaper per pound, fresher, and lets you control the crush. Optional — most shops will mill grain for you for free.
- Path D — An electric all-in-one (the BIAB upgrade path). Systems like the Anvil Foundry 10.5 gal or BrewZilla (~$300–450) are essentially an insulated electric kettle with a built-in grain basket and pump — BIAB made push-button, with precise temperature control. This foreshadows Tier-5 (Vol 9); many brewers jump here directly.
7.1.3 Costed Bill of Materials
Incremental over the Tier-2 kit (Vol 6 §6.3). Prices approximate, 2026.
Table 1 — 7.3 Costed Bill of Materials
| Item | ~Price |
|---|---|
| Reusable BIAB bag (The Brew Bag / Wilserbrewer) | $25–40 |
| Ratchet pulley or sturdy lifting rack | $10–35 |
| Grain mill (Cereal Killer / Monster Mill) — optional | $100–150 |
| 10-gal kettle, burner, chiller, fermenter, temp control | carried over from Tier-2 |
| Incremental subtotal (bag-only) | ~$35–75 |
| With a grain mill | ~$135–225 |
| Or electric all-in-one (Path D, replaces kettle+burner) | $300–450 |
The headline: if you already own the Tier-2 kit, you become an all-grain brewer for well under $100.
7.1.4 Assembly and Setup
- Fit the bag. A BIAB bag should line the kettle with enough overhang to fold over the rim; secure it with the lid, a bungee, or clips.
- Rig the lift first. Before brew day, set up the pulley or a board to rest the drained bag on. A bag holding 12 lb of hot wet grain is heavy and slippery — never plan to “just lift it by hand” over a kettle of boiling-hot wort.
- Set the mill gap (if milling your own): ~0.035–0.045″ — crack the kernels, keep the husks intact (Vol 3 §3.2). Too fine and the bag clogs and the wort turns grainy.
7.1.5 Step-by-Step Brew Day
This volume brews the American Pale Ale costed in Vol 3 §3.10 (9 lb 2-row + 1 lb crystal-40; 1 oz Centennial @ 60 min + 1 oz Cascade @ 15 min) — a chance to measure your real result against the prediction.

- Heat the full volume. Heat all your water (~7 gal for a 5-gal batch — full mash + boil-off, no sparge) to a strike temperature a few degrees above your mash target.
- Mash in the bag. Lower the bag, stir in the crushed grain, and settle at ~152 °F for 60 minutes (Vol 3 §3.3). A thin kettle loses heat — wrap it in a blanket or apply brief low heat with a stir to hold temperature.
- Lift and drain. Hoist the bag with your rig, let it drain into the kettle, and optionally dunk-sparge (dip it in a separate pot of ~170 °F water) to recover more sugar. Don’t wring it hard.
- Boil. Boil 60 minutes with the hop schedule — Centennial at 60, Cascade at 15 (Vol 3 §3.5).
- Chill, ferment, package. Chill with the immersion chiller to ~68 °F, take the OG reading, pitch, and ferment in the temperature-controlled chamber (Vol 6 §6.4); package as in Vol 5 §5.5.
- Close the loop. Compare your measured OG to the §3.10 prediction of 1.053. If you came in lower, your brewhouse efficiency is below the assumed 72% — note your real number and use it for every future recipe (Vol 3 §3.10). This is the repeatability thread made concrete: one measurement turns the math from estimate to reliable.
7.1.6 Common Pitfalls and How to Avoid Them
- Crush too fine for the bag. Flour-fine grain clogs the mesh and makes grainy, hazy wort. Fix: a coarser BIAB crush; keep husks intact.
- Dropping the hot bag. A heavy, slippery bag over boiling wort is a real burn hazard. Fix: rig the pulley/rack before brew day; never freehand it.
- Mash-temperature loss. A thin single-wall kettle sheds heat fast. Fix: insulate (blanket/jacket) during the mash, or pulse low heat while stirring.
- Boil-over with a full kettle. BIAB uses the full water volume, so the kettle is fuller. Fix: stay under ~75% capacity (use a 10-gal kettle for 5-gal batches); watch the hot break.
- Missing your gravity. New all-grain brewers often undershoot OG. Fix: don’t “correct” mid-brew — finish, measure, and calculate your actual efficiency for next time.
7.1.7 Where Tier-3 Leaves You; What Tier-4 Adds
At Tier-3 you are a complete all-grain brewer at minimal cost, in full control of every recipe in Vol 4, with measured, repeatable results. For most homebrewers this is a destination, not a way-station — many brew happily at Tier-3 forever.
Tier-4 (Vol 8, Phase C) is for those who want more: a dedicated multi-vessel system — a separate mash tun, a hot-liquor tank, and a boil kettle, moved by pumps — that handles bigger batches, frees you from lifting heavy bags, and improves consistency through dedicated, repeatable hardware. From there the ladder continues to electric/automated (Tier-5) and the commercial threshold (Tier-6).
Cross-references: the mash science is Vol 3 §3.3–3.4; the worked recipe is Vol 3 §3.10 and Vol 4 §4.12; the Tier-2 gear carried forward is Vol 6; Tier-4 (3-vessel) and beyond are Vols 8–10.
Comments (0)