Brewing · Volume 5
Vol 5 — Tier 1: Extract Brewing with Steeping Grains
This is where you actually start brewing. The foundation volumes (1–4) gave you the history, ingredients, process, and styles; now the equipment ladder begins, and its first rung is extract brewing — the cheapest, simplest, most forgiving way to make five gallons of genuinely good beer on your kitchen stove.
Every tier volume from here to Vol 10 follows the same seven-section shape: what the tier means, the vendor landscape, a costed bill of materials, assembly, a step-by-step brew day, common pitfalls, and what the next tier adds. Read them as an ascending staircase — each tier builds on the last.
5.1.1 What Tier-1 Means
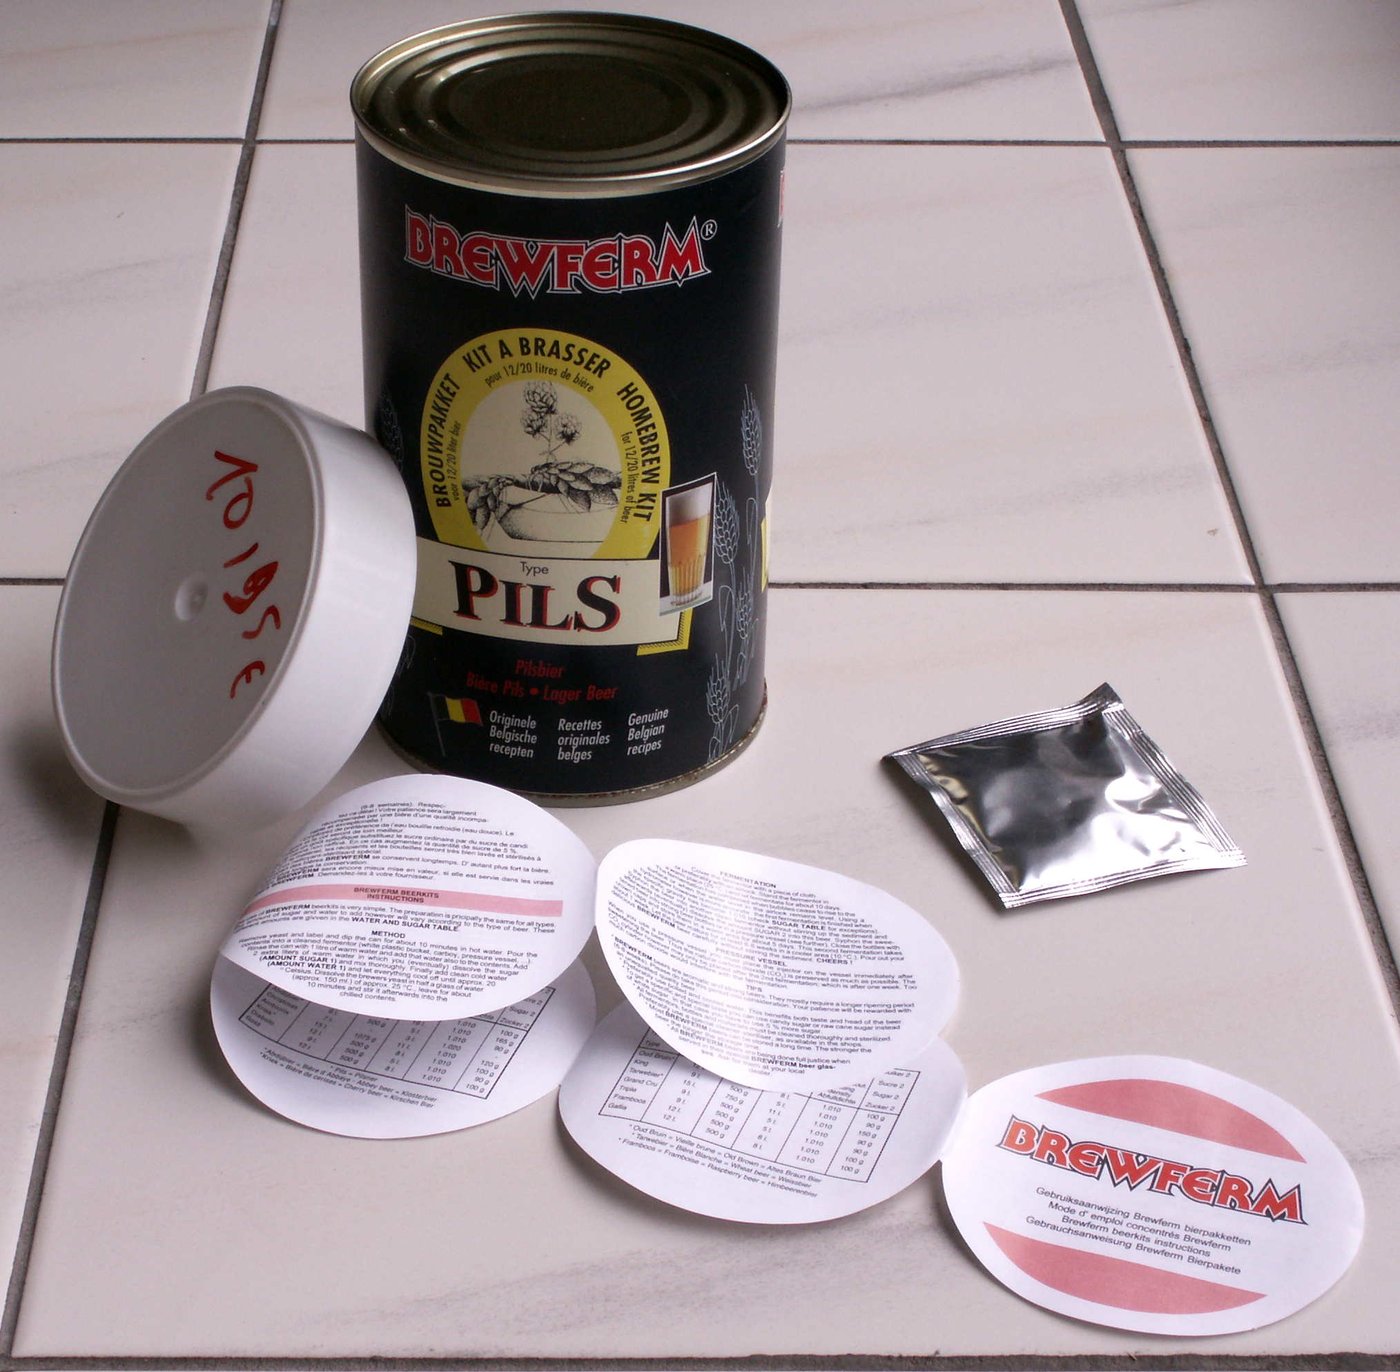
Tier-1 is extract brewing: instead of mashing grain to make sugar (Vol 3 §3.3), you buy that sugar pre-made as malt extract — liquid (LME) or dried (DME) — and the maltster has done the mash for you. You still boil, hop, ferment, and package exactly as every other tier does; you simply skip the two hardest-to-control hot-side steps. Steeping grains (a small bag of specialty malt held in hot water) add color and flavor that extract alone can’t, without requiring a true mash.
- Scale: a 5-gallon batch (~50 bottles), brewed on a kitchen stove with a partial or full boil.
- Who it’s for: absolute beginners, and anyone who wants to brew without a big equipment or space commitment.
- The goal: learn the three things that actually determine beer quality — sanitation, the brew-day rhythm, and fermentation temperature control — on easy mode. Master these here and every higher tier is just better hardware.
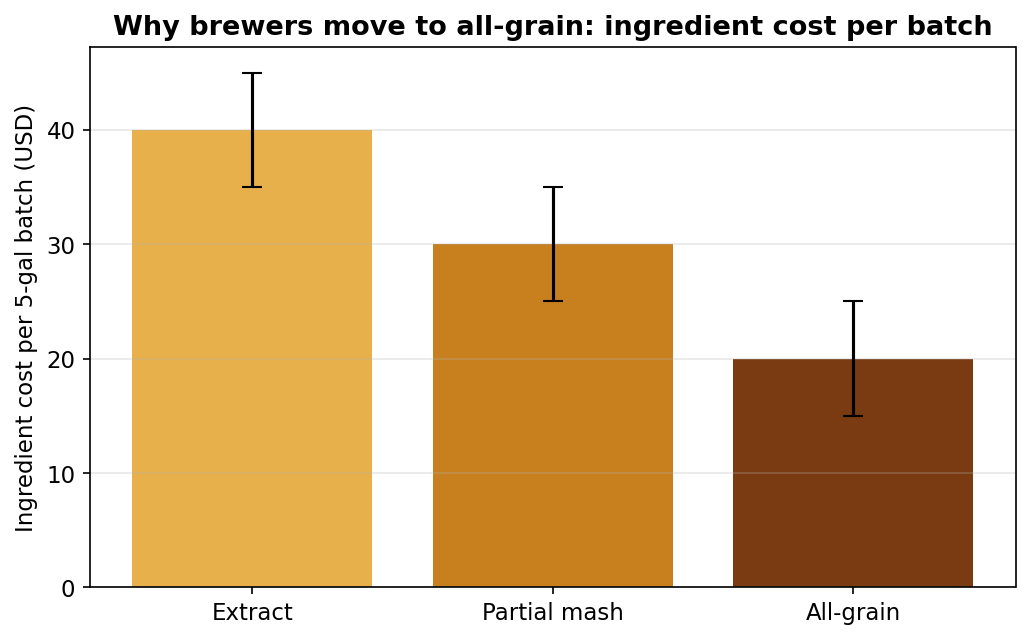
Tier-1’s one cost penalty: malt extract is the most expensive way to buy fermentable sugar. That’s the trade for convenience, and it’s the reason brewers eventually move down the ladder.
5.1.2 The Vendor Landscape
There are four sensible ways to get started. (Prices are approximate, 2026; check current vendor pricing.)
- Path A — All-in-one starter kit + ingredient kit (recommended first buy). A packaged kit such as Northern Brewer’s Brew. Share. Enjoy. (
$110–130) bundles a 5-gallon stainless kettle, fermenter, airlock, hydrometer, siphon, and the core tools, and ships with a first recipe. Add a fresh ingredient kit per batch ($35–45). The fastest turnkey start. - Path B — Brewer’s Best Deluxe Equipment Kit (~$110–140). A long-standing, widely-stocked equipment kit: a 6.5-gallon “Ale Pail” fermenter, a bottling bucket with spigot, a glass carboy, the core tools, and a beginner’s guide. Pair it with a Brewer’s Best ingredient kit (~$35–45).
- Path C — One-gallon small-batch kit (~$45–50). Craft a Brew or Brooklyn Brew Shop sell tiny all-in-one kits that make ~10 bottles. The cheapest toe-dip; great for testing the hobby or brewing on a countertop, but the small batch is fiddly per-bottle.
- Path D — À la carte from a homebrew shop (~$120–180). Buy the bill of materials below piece by piece. The most flexible (you choose each item’s quality) and the path most brewers settle into.
5.1.3 Costed Bill of Materials
A complete à-la-carte 5-gallon extract setup (Path D). Prices approximate, 2026.
Table 1 — 5.3 Costed Bill of Materials
| Item | ~Price |
|---|---|
| 5-gallon brew kettle | $40 |
| 6.5-gal fermenting bucket + grommeted lid + airlock | $20 |
| 6.5-gal bottling bucket + spigot | $18 |
| Auto-siphon + 6 ft tubing | $14 |
| Bottle capper | $18 |
| Bottle caps (gross) | $5 |
| Hydrometer + plastic test jar | $12 |
| Thermometer | $10 |
| Star San sanitizer (8 oz) | $14 |
| Nylon steeping/grain bag | $3 |
| Bottles (24 × 12 oz, or reuse pry-off bottles) | $0–12 |
| Equipment subtotal | ~$155–170 |
| Per-batch consumables (extract + steeping grains + hops + yeast + priming sugar) | ~$35–45 |
| First-batch total | ~$190–215 |
A packaged starter kit (Path A/B) lands a bit lower (~$110–140 + ingredients) by bundling. Either way, Tier-1 is the cheapest rung on the ladder (compare the tier-cost ladder in Vol 6 §6.1).
5.1.4 Assembly and Setup
There’s almost nothing to assemble — Tier-1’s “assembly” is really sanitation discipline, the single most important habit in brewing (Vol 2 §2.4).
- Mix sanitizer. Star San is a no-rinse acid sanitizer: ~1 oz per 5 gallons of water. Anything that touches the wort after the boil — fermenter, lid, airlock, siphon, spoon, hydrometer, bottles, caps — must be sanitized. “After the boil” matters: the boil sterilizes the wort, so only post-boil contact is a risk.
- Pre-brew checklist: kettle clean; ingredients weighed; sanitizer mixed; fermenter and lid sanitized and set aside; chilling plan ready (a sink full of ice); yeast at the ready.
5.1.5 Step-by-Step Brew Day

- Steep the grains. Heat ~2.5–3 gallons of water to 150–160 °F. Submerge the specialty grains in the mesh bag for 20–30 minutes, then lift and let drain (don’t squeeze hard — that extracts tannins). This is a “tea,” not a mash.
- Add extract and boil. Take the kettle off the heat and stir in the malt extract until fully dissolved (adding off-heat prevents scorching it onto the kettle bottom). Return to a boil. Watch closely at the hot break — the foam can boil over fast.
- Hop schedule. Once boiling, add hops on the recipe’s timeline (Vol 3 §3.5): bittering at 60 minutes, flavor around 15, aroma at flameout. A 60-minute boil is standard.
- Chill. Cool the kettle in an ice-water bath to ~70 °F as quickly as you can (a good cold break and less infection risk — Vol 3 §3.6).
- Transfer, top up, measure, pitch. Siphon into the sanitized fermenter, top up to 5 gallons with cool clean water, take an original-gravity reading with the hydrometer, then pitch the yeast and aerate by stirring or shaking.
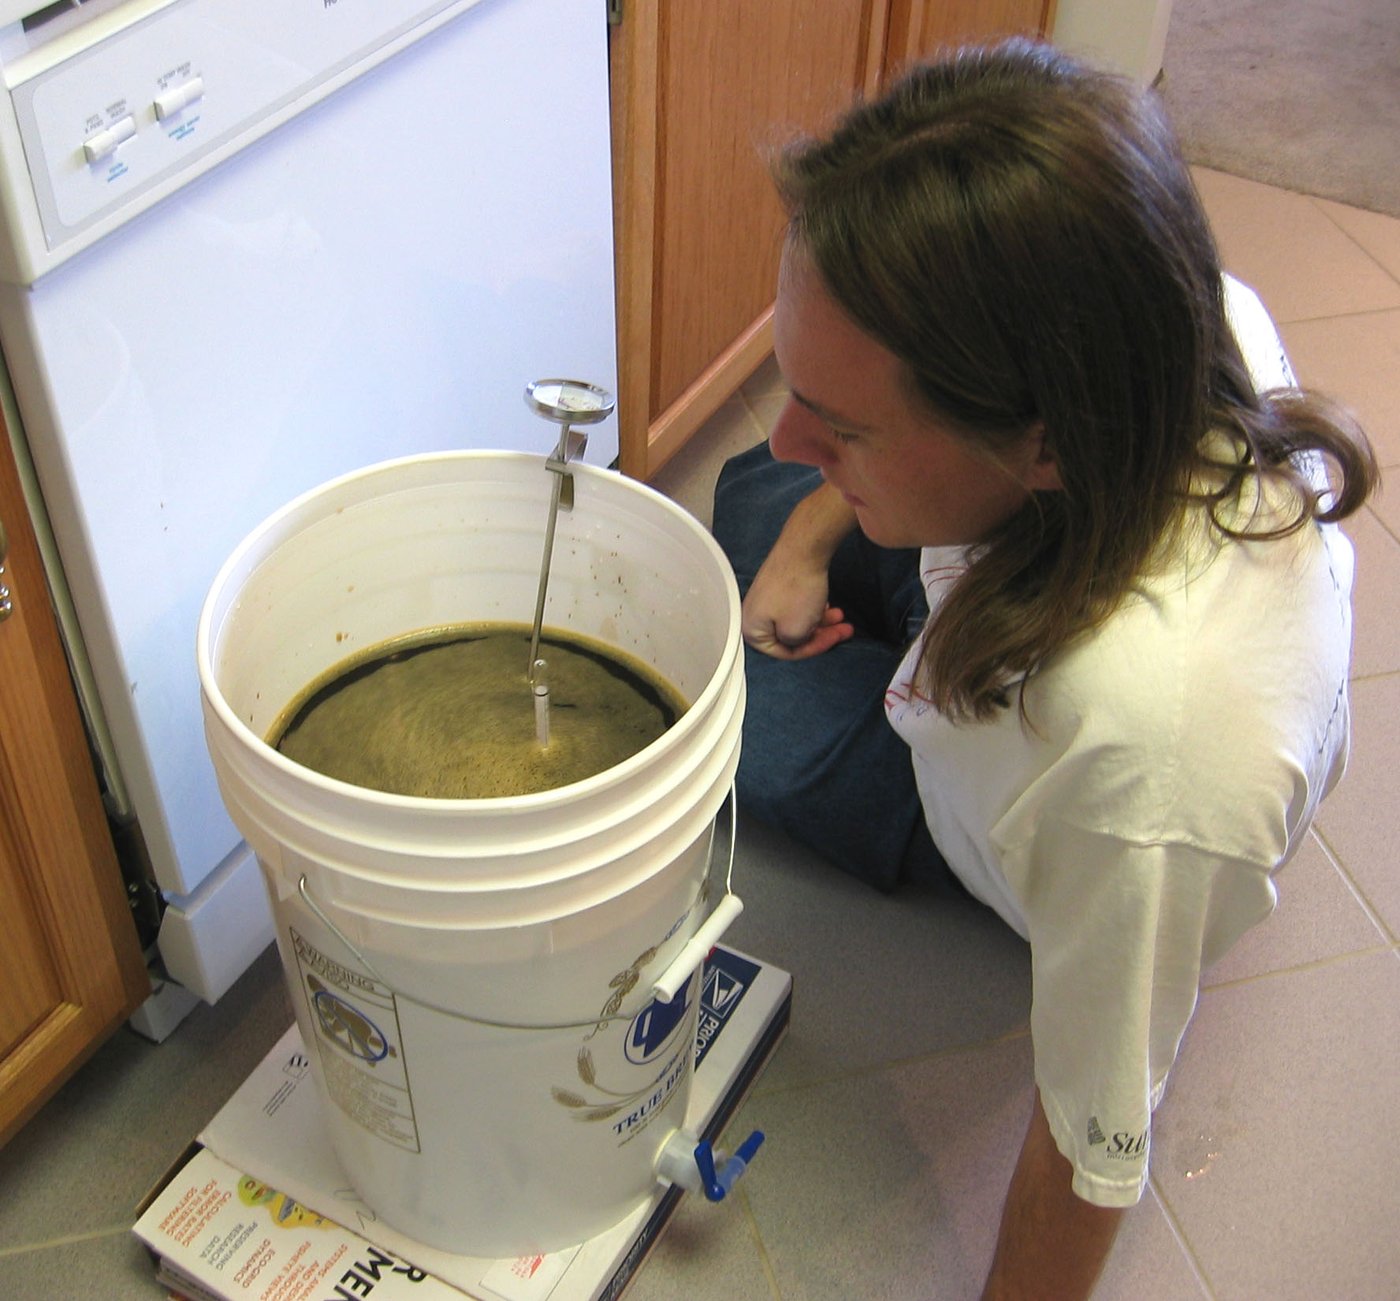
- Ferment. Seal with the airlock and ferment at the yeast’s recommended temperature (mid-60s °F for most ales) — controlling this is the biggest flavor lever you have (Vol 2 §2.4). Wait ~2 weeks, and confirm completion with two identical gravity readings a few days apart, not the calendar (the repeatability thread).
- Bottle. Mix priming sugar (~5 oz / 130 g corn sugar for 5 gallons) into the bottling bucket, gently transfer the beer onto it, fill and cap the sanitized bottles, and condition ~2 weeks at room temperature for natural carbonation (Vol 3 §3.9).
5.1.6 Common Pitfalls and How to Avoid Them
- Skipping sanitation. The #1 cause of ruined batches. Fix: sanitize everything that touches post-boil wort, every time.
- Boil-overs. A full kettle foams over at the hot break and when hops go in. Fix: don’t fill the kettle past ~70%; keep a spray bottle of water handy; lower heat at the break.
- Scorched extract. Added to a kettle on high heat, extract caramelizes on the bottom (off-flavors, darker color). Fix: add it off the heat and stir fully before resuming the boil.
- Pitching too warm. Pitching yeast into 90 °F wort produces harsh, solventy fusel alcohols. Fix: chill to ~70 °F first.
- Fermentation temperature swings. Beer fermented too warm tastes hot and overly fruity. Fix: ferment in the coolest stable spot you have; a “swamp cooler” (the fermenter in a tub of water with a wet towel) is a free Tier-1 upgrade.
- Bottle bombs. Bottling beer that isn’t fully fermented, or over-priming, can over-pressurize bottles. Fix: confirm a stable FG before bottling; measure priming sugar by weight.
- Chlorinated tap water. Municipal chlorine/chloramine makes medicinal off-flavors. Fix: a crushed Campden tablet, or use spring/RO water (Vol 2 §2.5).
5.1.7 Where Tier-1 Leaves You; What Tier-2 Adds
With Tier-1 mastered you can brew clean, repeatable, genuinely good beer in any style that suits extract — which is most of them. The real limits you’ll hit are two: a stovetop can’t do a full-volume boil of 5+ gallons (so you dilute, which slightly mutes hop character and can darken the beer), and extract gives you less control over the malt profile (and the occasional extract “twang” from older liquid extract).
Tier-2 (Vol 6) addresses both: a bigger kettle and a heat source for a full-volume boil, an immersion wort chiller for fast cooling, real fermentation-temperature control, and your first taste of mashing — a partial mash that converts some of your own grain alongside the extract. It’s the bridge to all-grain.
Cross-references: the process behind every step is in Vol 3; ingredients in Vol 2; the styles you can brew at this tier in Vol 4; Tier-2’s upgrades in Vol 6.
Comments (0)